background image

5

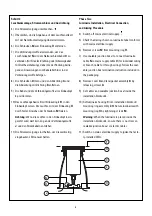
Installation mit Erdeinbautopf

Schritt 1 – Einbau des Einbautopfes 

(während der Erd- oder Beton arbeiten) 

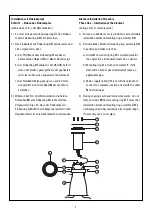
1) Es muss eine passende Aussparung für den Einbau -

topf mit Einbauring 

L

/

H

erstellt werden.

2) Den Einbautopf mit Einbauring 

L

/

H

positionieren und

sich vergewissern, dass 

a) der Pfeil 

R

auf dem Einbauring 

H

auf das zu

beleuchtende Objekt (Wand, Baum, Säule) zeigt, 

b) der Einbauring 

H

bündig mit der Oberfläche 

F

ist

(wenn der Boden später gefliest oder gepflastert

wird, lassen Sie einen angemessenen Abstand).

c) das Netzkabel 

O

lang genug ist, um die Verbin -

dungs  muffe 

J

mit dem Kabel 

N

der Leuchte zu

verbinden.

3) Während der Erd- oder Betonarbeiten die beiden

Schrauben 

M

vom Einbauring 

nicht entfernen.

Vergewissern Sie sich, dass der Einbautopf mit

Einbauring 

L

/

H

nicht beschädigt oder verformt wird.

Gegebenenfalls ist eine Abdeckplatte zu verwenden.

Blockout Installation Procedure 

Phase One – Installation of the blockout

(during earth or masonry work) 

1) Ensure a suitabele recess is provided to accommodate

installation blockout/mounting ring assembly 

L

/

H

.

2) Set installation blockout/mounting ring assembly 

L

/

H

in position and make sure that: 

a) Arrow 

R

on mounting ring 

H

is oriented towards

the object to be illuminated (wall, tree, column). 

b) Mounting ring 

H

is flush with surface 

F

. If the

floor will be tiled or paved afterwards leave an

appropriate gap.

c) Mains supply cable(s) 

O

is of sufficient length to

connect the sealable junction box 

J

with the cable

N

from luminaire.

3) During ongoing earth and/or masonry works, do not

remove screws 

M

from mounting ring 

H

. Ensure that

installation blockout/mounting ring assembly 

L

/

H

is

not damaged and has maintained its original shape.

If necessary use a cover plate.

A

Q

P

C

E

O

F

R

X

M

B

J

Summary of Contents for ETC120-GB LED

Page 1: ...WE EF LEUCHTEN Montage und Wartungshinweise f r Bodeneinbauleuchten ETC120 GB LED Installation and Maintenance Instructions for Inground Uplights ETC120 GB LED...

Page 2: ...tel alle Oberfl chen reinigen und sicher stellen dass alle Kabeleinf hrungen sauber sind 3 Die Dichtung auf Besch digungen pr fen und ggfs ersetzen Wichtig Wenn die Abdeckung besch digt ist muss die g...

Page 3: ...sch digten Netzkabel wenden Sie sich f r den Austausch bitte an WE EF 5 To remove the LED module proceed as follows a Rotate the wheel W by using a screwdriver in the direction of the OPEN mark until...

Page 4: ...d ausgeschlossen Bei Fragen wenden Sie sich bitte an unsere technische Hotline unter 49 5194 909209 Montag Freitag von 08 00 Uhr bis 16 00 Uhr Installation The luminaire should be installed and mainta...

Page 5: ...h gravel base see pic 6 Installationsmethoden Einbauvarianten mit BET Es ist f r eine ausreichende Drainage zum Beispiel durch ein Kiesbett zu sorgen 1 In Park und Gartenanlagen Abb 1 2 In gefliesten...

Page 6: ...t besch digt oder verformt wird Gegebenenfalls ist eine Abdeckplatte zu verwenden Blockout Installation Procedure Phase One Installation of the blockout during earth or masonry work 1 Ensure a suitabe...

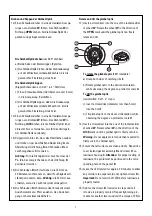
Page 7: ...fe J und den Stromkabeln entstehen 11 Die Stromversorgung einschalten um die werkseitig eingebauten LEDs anzuschalten Phase Two Luminaire Installation Electrical Connection and Aiming Procedure 4 Swit...

Page 8: ...reht und gekippt werden kann Rotate and tilt the gimbal optic 12 Insert a screwdriver into the one of the radial cavities of wheel W Rotate the wheel W in the direction of the OPEN mark until the gimb...

Page 9: ...Fax 41 22 752 49 74 info switzerland we ef com www we ef com ETC120_GB_LED_011219 006 1148 Technische nderungen vorbehalten Technical specifications are subject to change WE EF 2019 Sicherheit Der He...

Reviews: