background image

7 of 9

WX-501-0535 • 01.22

Device ID

Gives the ID number of the device being configured, which is used to identify the device when you 

are connecting to it. By default, this number is the last five digits of the serial number, which can be 

found under the About tab or on the barcode sticker on the bottom of the device. It is recommended 

that you do not change this number unless another device on the network has the same ID number.
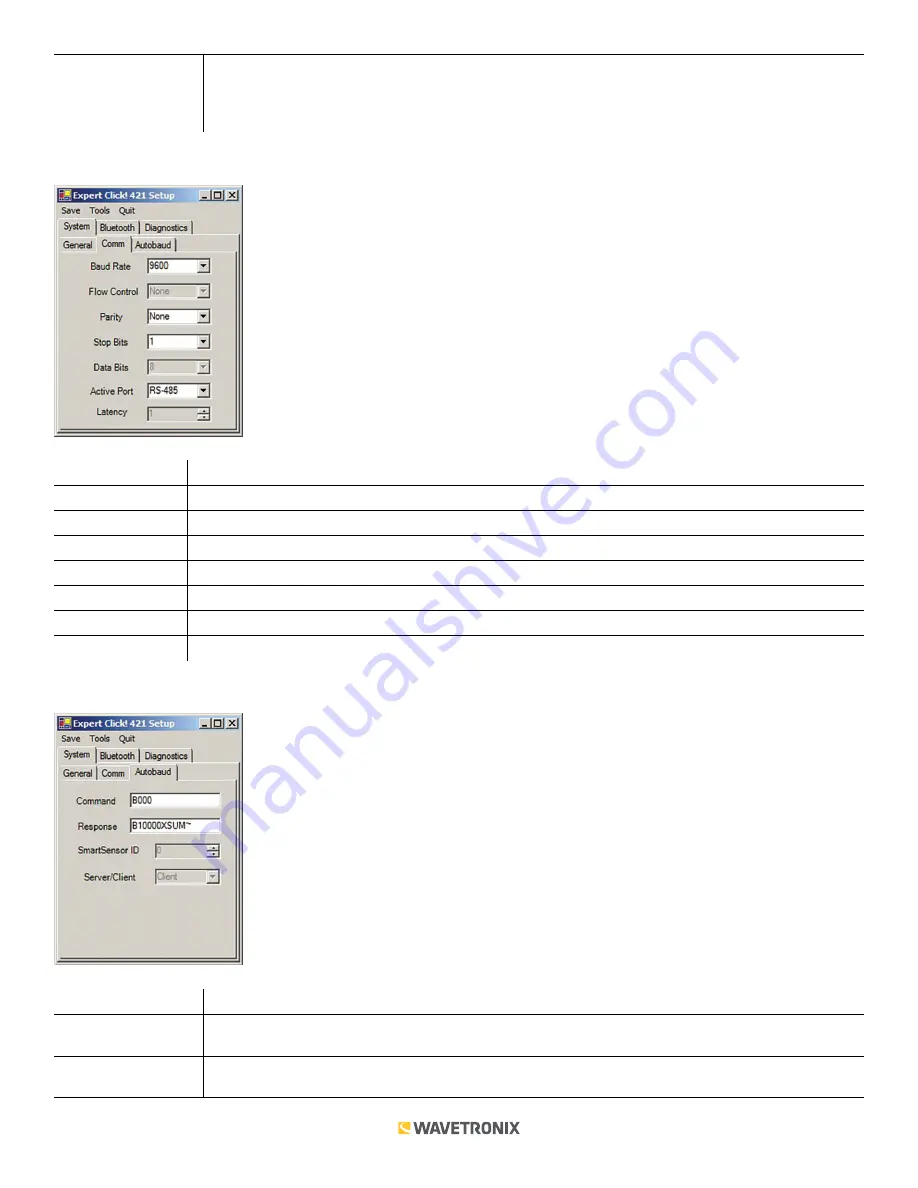
The 

Comm

 subtab allows you to configure how the Click device communicates (see the figure and table below).

Setting

Description

Baud Rate

Allows you to change the baud rate at which the device connects to the sensor.

Flow Control

Is used for configuring hardware handshaking. This option is currently not available.

Parity

Allows you to set parity error checking.

Stop Bits

Allows you to set the number of stop bits.

Data Bits

Shows you the number of data bits being sent. This option cannot be changed.

Active Port

Indicates on which port you are communicating with the sensor. This option cannot be changed.

Latency

Indicates the latency between the sensor and the Click device. This option cannot be changed.

The 

Autobaud

 subtab allows you to configure how the device autobauds (see the figure and table below).

Setting

Description

Command

Allows you to set the command sent from the device during the autobaud process. Don’t change 

these values unless instructed to by Wavetronix Technical Services.

Response

Shows the response the device is expecting from the above command. Don’t change these values 

unless instructed to by Wavetronix Technical Services.

Summary of Contents for Click 421

Page 1: ...r LED Indicators Mode Switch RS 232 Connector RS 485 Connector TOP FRONT Communication Ports The back of the Click 421 features a 5 position connector that plugs into a T bus connector and provides po...

Page 2: ...t also has a push button labeled Mode Switch which is used to cycle the Click 421 through operation modes This will be discussed later in the On device Configuration section On device Configuration Th...

Page 3: ...g pushed to the laptop or handheld is good open a terminal emulation program such as HyperTerminal and connect to the Bluetooth signal Observe the data being received It should be the alphabet repeate...

Page 4: ...ttings on any driver and saving them to the Click device will change those settings on all drivers The Backups option can be used to read configurations that have previously been saved to file SmartSe...

Page 5: ...n Shows the version of firmware your device currently has installed If Click Supervisor detects a discrepancy between this version and the most current version it currently has access to you will be p...

Page 6: ...Expert driver allows you to see all possible settings and fields both those available in the SmartSensor driver and those available only through this driver The driver is divided into three tabs Syste...

Page 7: ...re handshaking This option is currently not available Parity Allows you to set parity error checking Stop Bits Allows you to set the number of stop bits Data Bits Shows you the number of data bits bei...

Page 8: ...the power level of the Bluetooth signal the options are 25 50 75 and 100 Password Provides a field to enter the password to be used if you have enabled the use of a password on the Bluetooth signal Pa...

Page 9: ...o a file Selecting this will open a directory box allowing you to name your settings file This file will always be saved in the Wavetronix folder created when you installed Click Supervisor under Wave...

Reviews: