5
HEATING DEVICES MANAGEMENT
Press on
in the main screen and after selecting the room,
on
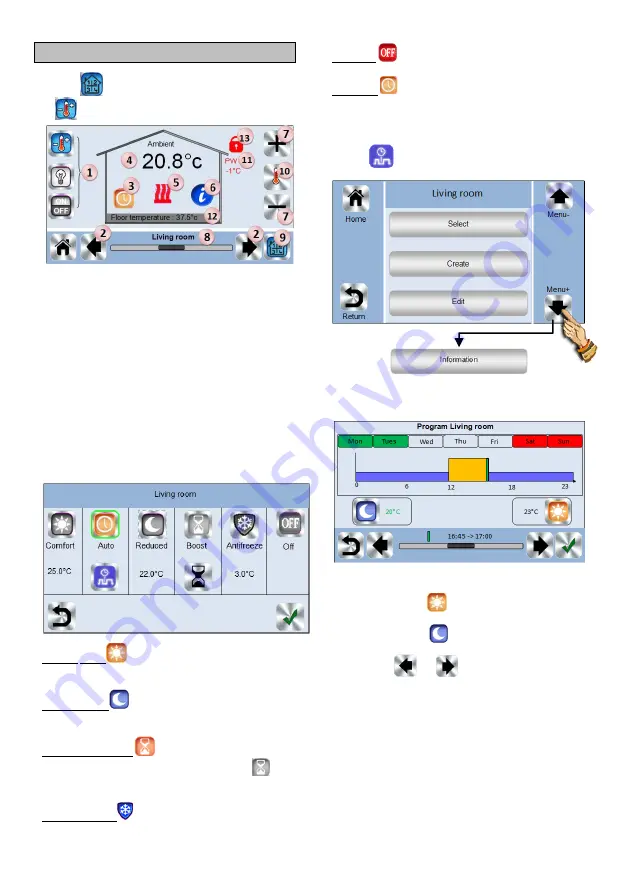
1
. Device type choice (heating, lighting, On/Off). These buttons
are only displayed if one device type is installed in the room
(colored if active).
2
. Room changing.
3
. Current mode, press on this icon to enter in the menu where
you can change the current operating mode.
4
. Ambient temperature or setting temperature (setpoint) after one
press on 10.
5
. Heating indicator (animated if heating).
6
. Information about the heating devices installed in the room.
7
. Set the current setpoint (deactivated if the screen is locked).
8
. Current room name.
9
. Quick access to the desired room.
10
. To display either the ambient or setting temperature in 4.
11
. Pilot wire status.
12
. Floor temperature if floor regulation.
13
. Only displayed if the screen is locked.
Press on « 3 » in the previous menu to access this modes
menu.
Comfort
Mode
: Set the room in comfort mode. If it
remains active, the comfort temperature will be followed all the
time.
Reduced Mode
: Set the room in reduced mode. If it
remains active, the reduced temperature will be followed all the
time.
Timer or Boost Mode
: Temporary derogation. Set the
timer duration (days, hours, minutes) by pressing on
button, then validate and set the desired temperature on main
screen.
Anti freeze Mode
: Use this mode to put your room in anti-
freeze mode (the temperature is set in the Installation menu)
OFF Mode
: To switch OFF the room heating. Be careful!
In this mode, your installation can freeze!
Auto Mode
: In this mode, the room temperature will follow
the program you have chosen. You can choose between
existing programs or you can create a new one that you can
modify as you want.
Press on
to select between :
a- Select:
To select an existing program.
b- Create:
To create a new program.
Select the days for which you want the same program (in the
example, Wednesday, Thursday and Friday).
Use the Comfort button
to select the hourly ranges during
which the comfort temperature will be followed (brown range)
and the reduced button
to select the hourly ranges during
which the reduced temperature will be followed (blue range).
Use the arrows
and
to put the cursor on the desired
hours.
Validate the program; the validated days are then highlighted in
green (on this example: Monday and Tuesday).
The days that are not programmed are displayed in red.
c- Edit
: To view and modify an existing program
d- Information:
to view the current program
P1:
morning, evening & weekend.
P2:
morning, midday, evening & weekend.
P3:
day & weekend.
P4:
evening & weekend.
P5:
morning, evening (bathroom).
a
b
c
d
Summary of Contents for Vision BT-CT02-RF
Page 50: ...50...
Page 52: ...52 PPLIMW15088Eb...


