background image

32

Watkiss BookMaster Service Manual - Issue 1 - 14/12/00

Service Procedures 

• 

BookMaster Pro

rings. Eight rings are supplied as part of a kit (914-423), two each of four dif-
ferent thicknesses.  

Procedure

1. Switch off the BookMaster.
2. Remove the R/H and L/H side covers.
3. Push the fold roller lever arms apart slightly, and fit a spacer ring on to the

lever bump stop cam (265-567) on each side of the machine. The same
thickness ring must be used on each side. Use the thinnest ring first.

4. Run some sample booklets through the BookMaster. If scuffing of the

cover still occurs, change the spacer ring to the next thickness up. Continue
until satisfactory performance is obtained.

5. Replace the machine side covers.

Note:

 for general use, it is recommended that the spacer rings are removed and

the machine is used at factory settings.

3.3 BookMaster Pro

These procedures apply only to the BookMaster Pro. The previous section
includes additional procedures which apply to all BookMasters (see section
3.2 ‘‘BookMaster Standard’’).

For details on the 900-152b Position Motor Control Board (PIC board), see
section 4.2.2.

PARTS REQUIRED

TOOLS REQUIRED

914-423 Fold Roller Spacer Ring Kit

3mm Allen Key

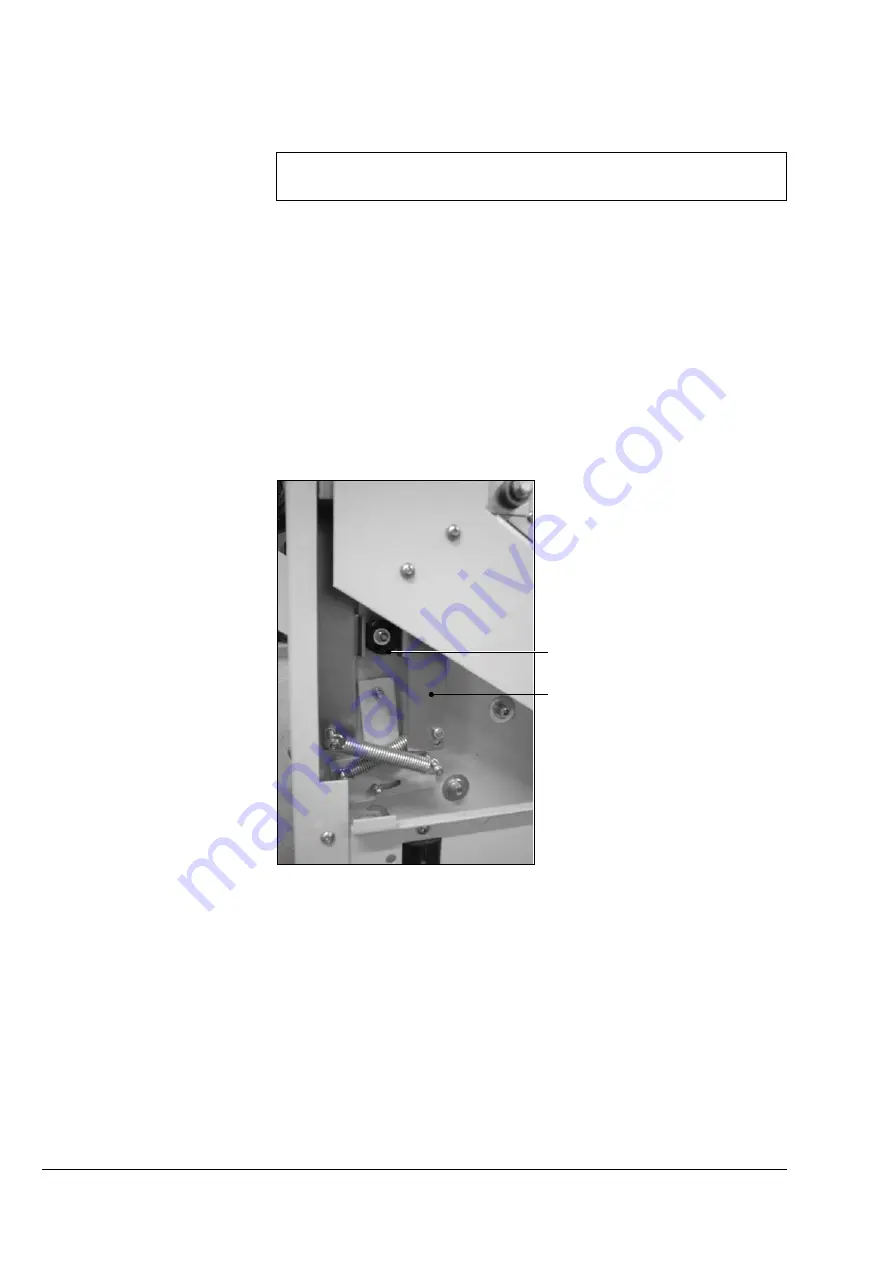
Lever bump stop cam

Fold roller lever arm

Figure 3:13    Lever bump stop cam

Summary of Contents for BookMaster

Page 1: ...ding BookMaster and TrimMaster Standard and Pro Versions Issue Date 14 December 2000 Issue Number 1 Part Number 969 240 1 Blaydon Road Middlefield Industrial Estate Sandy Bedfordshire SG19 1RZ U K Tel...

Page 2: ...Reserved Reproduction adaptation or translation without prior written permission is prohibited except as allowed under the copyright laws Warranty The information contained in this document is subjec...

Page 3: ...aster Pro 11 2 Tools and Materials 2 1 Recommended Tools 13 2 2 Consumables 14 3 Service Procedures 3 1 Introduction 15 3 1 1 Safety 15 3 1 2 Operation 15 3 1 3 Orientation 15 3 1 4 Test Paper 15 3 1...

Page 4: ...Conveyor Belt 40 3 4 8 Centralising Waste Conveyor Belt 41 3 4 9 Removing and Regrinding the Trimmer Blade 42 3 4 10 Blade and Anvil Grinding Instructions 46 3 5 TrimMaster Pro 46 3 5 1 Trim Axis Home...

Page 5: ...ssories 104 7 8 2 Connecting to the Watkiss Vario Oscillating Floor Base 105 7 8 3 Nagle Panel and Settings 105 8 Trouble Shooting 8 1 Trouble Shooting Chart 107 8 2 Error Indicators 111 8 2 1 Status...

Page 6: ...c iv Watkiss BookMaster Service Manual Issue 1 14 12 00...

Page 7: ...ater is required Details on installing these configurations may be found in Chapter 7 Instal lation ABBREVIATION MODULE NAME DESCRIPTION PART NUMBER BMS BookMaster Standard Manually adjusted booklet m...

Page 8: ...Fit the motorised infeed to the BMP Fit the Nagle Interface panel onto the Vario or Eco Vario Deliver sets to the rear This gives bi directional communication in error conditions The BookMaster Offlin...

Page 9: ...eft to right con OFB Oscillating Benchbase with floor conversion kit Use the BMS underneath the OFB Fit the 905 195 VBCH Side Cover Remote Socket to the OFB and use the 742 394 BookMaster OFB Interfac...

Page 10: ...Interface PCB The staple heads and clinchers may be positioned either 115mm or 138mm apart to suit different sheet sizes If required a third staple head can be fitted to one side of the existing head...

Page 11: ...s Service Manual see section 3 2 1 Cycling the BookMas ter by Hand and see section 3 4 1 Cycling the TrimMaster by Hand Mains Power Mains power is connected via a fused socket The status of all the in...

Page 12: ...HEAD STATUS Blinking once per second The staple cartridge is about to or has run out Constantly illuminated The staple head is selected and ready to run Blinking rapidly There is a staple head jam or...

Page 13: ...t the trailing edge by a steel clamp 5 before being trimmed A sensor 8 in the conveyor detects the successful passage of the book and triggers the outfeed conveyor TrimMaster Blade Drive Drive to the...

Page 14: ...ay be taken from the TrimMaster or the BookMaster Figure 1 3 BookMaster Outfeed Conveyor 1 6 BookMaster Motorised Infeed BMI The Motorised Infeed BMI is an optional module which accepts sheets and aut...

Page 15: ...a low cost alternative to the Motorised Infeed It can NOT be used as an infeed when connecting the BookMaster to collators Figure 1 5 BookMaster Infeed Guide 1 8 BookMaster Receiving Tray BRT The Boo...

Page 16: ...ly A loose fuse holder may cause connection problems If needed bend the tabs on the holder to tighten the fit 1 10 1 BookMaster Standard Transformer Taps The transformer is fitted with adjustable taps...

Page 17: ...are shown in the tables below LOCATION FUSE FUNCTION RATING Power input socket Main line fuse x2 1 per line 240V 5 0A HRC Quick acting F 115V 10A HRC Quick acting F Motor Drive PCB F1 9V Rail 3 15A G...

Page 18: ...12 Watkiss BookMaster Service Manual Issue 1 14 12 00 System Description Fuses...

Page 19: ...panner Combination 5 5mm 952 062 Spanner Combination 7mm M4 952 063 Spanner Combination 8mm M5 952 066 Spanner Combination 10mm M6 952 067 Spanner Combination 13mm M8 955 005 Spanner 19mm A F Spanner...

Page 20: ...Service Manual Issue 1 04 12 00 Tools and Materials Consumables 2 2 Consumables PART NO DESCRIPTION Lint Free Cloth 951 007 Loctite 242 Thread Locking Compound 951 152 Anti seize Compound Lubricant T...

Page 21: ...d or L H left hand side of the machine this is always as viewed from the outfeed end of the machine 3 1 4 Test Paper Ensure that a supply of paper is available for testing purposes This should ide all...

Page 22: ...3 3 BookMaster Pro 3 2 1 Cycling the BookMaster by Hand The BookMaster and TrimMaster are cycled separately to cycle the TrimMas ter by hand see section 3 4 1 Cycling the TrimMaster by Hand Procedure...

Page 23: ...maximum either manually on the BMS or via the control panel on the BMP Manual cranking point Note Provision is made to fit the third staple head on either the L H or R H side of the BookMaster The uni...

Page 24: ...ote above Place the PCB plate onto the lid and align the four fixing holes with the adjustment slots so that the head will be in the correct position aligned with the clincher Offer up the staple head...

Page 25: ...er to the mains power supply switch on and wait for the ready bleeps 5 Observe the staple sensor LED labelled stitch sensor on the PCB this is normally ON Insert a single sheet of 80gsm bond paper int...

Page 26: ...he screw equates to approximately 2mm of travel 3 Tighten the locking screws and produce a test booklet Repeat the proce dure if necessary 3 2 5 Edge Staple Latch Solenoid Adjustment The edge staple l...

Page 27: ...sembly fixing screws 8 Position the solenoid assembly so that the edge staple latch is as close as possible to the clincher guard but not protruding into the paper path Tighten the fixing screws 9 Loo...

Page 28: ...oth side panels 3 Remove the fold latch cover panel and unclip the front wire frame 4 Unscrew the four M5 x 10mm retaining screws and carefully remove the L H drive belt tension plate 253 040 Care mus...

Page 29: ...be necessary for this to be removed when aligning the fold rollers with the fold blade 18 Rotate the roller assembly using the manual cranking bolt Check that the rollers spin freely with no tight spo...

Page 30: ...en the rollers close to the edge of the outfeed aperture until it is within about 1mm of the fold blade Repeat on the R H side of the machine CAUTION Never force the rules between the rollers or pull...

Page 31: ...th one hand release the fold clutch by pulling the latch outwards At the same time rotate the flywheel anti clockwise with your other hand to move the blade forward Looking down into the BookMaster in...

Page 32: ...e inner locking nut 8 Punch out the two pins that secure the crank arms to the clutch shaft see Figure 3 10 9 Punch out the pin that secures the clutch to the shaft see Figure 3 10 10 Remove the clutc...

Page 33: ...the clutch pin through 8 Fit the outer locking nut to the anti rotation screw Tighten the outer and inner locking nuts together Be careful not to bias the clutch assembly to one side or the other the...

Page 34: ...r channel is adjusted laterally on the tamper carriage using the cammed nuts fixed to the two mounting screws The tampers are factory set so that the adjustment cam bias is in the upper position there...

Page 35: ...ple heads by pressing the orange on off button 2 Take a sheet of A3 paper that is known to be square and mark the top Hand feed the sheet into the BookMaster and examine the resulting folded sheet for...

Page 36: ...aple legs and check that they have been clinched correctly i e the legs are as straight and par allel as possible If not re adjust the staple lid assembly 6 Ensure that the adjustment screws are tight...

Page 37: ...itting In gen eral the cables will only fit into the correct connector in the correct orientation 3 2 14 Guard Switch Adjustment When the stapler cover panel is opened a guard switch automatically cut...

Page 38: ...ter If scuffing of the cover still occurs change the spacer ring to the next thickness up Continue until satisfactory performance is obtained 5 Replace the machine side covers Note for general use it...

Page 39: ...lays are too far away from the edges of the paper then tighten the adjust ment screws an equal amount 4 Re check the sidelays steps 3 and 4 and adjust as necessary until correct calibration is achieve...

Page 40: ...rt another sheet of A4 8 5 x 11 paper and repeat adjustment as nec essary 8 Replace fold latch cover 3 3 3 Top Jog Belt Calibration The top jog optical emitter sensor is mounted on an adjustable brack...

Page 41: ...Remove the C clip and nylon washer from the L H side of the top jog clutch shaft 6 Remove the split pin from the top jog clutch shaft 7 Unplug the top jog clutch connecting wires from the Main Control...

Page 42: ...between the top of the wire frame 262 231 and the top of the clamp roller shaft 265 538 This adjustment has been predetermined to give a good trim over a wide vari ety of booklet thicknesses Indicatio...

Page 43: ...ng trimmed out of square first ensure that the conveyor clamps are not adjusted incorrectly or unevenly i e allowing the book to bounce out of square against the trim stop or causing one edge of the b...

Page 44: ...assembly away from the TrimMaster The infeed conveyor can now be withdrawn from the Trim Master 5 Refitting of the infeed conveyor is the reverse of removal 3 4 5 Replacing Infeed Conveyor Belts Proc...

Page 45: ...ure that the assembly pivots correctly before tightening orange screws 3 4 6 Replacing Main Conveyor Belt Stretched or worn conveyor belts can cause poor feeding and out of square books 1 Set the Trim...

Page 46: ...from the infeed conveyor drive shaft support plate on the R H side of the trimmer Unclip the circlip and remove the plate 8 Remove the circlip from the end of the waste conveyor drive shaft and slide...

Page 47: ...ilst the machine is running Make sure that you can easily reach the mains input lead 1 Disconnect the mains power supply from the BookMaster TrimMaster 2 Disconnect the TrimMaster and place in suitabl...

Page 48: ...nd nicks in the blade The guidelines provided should accompany the blade and anvil when they are sent for re grinding see section 3 4 10 Blade and Anvil Grinding Instructions Whenever the TrimMaster b...

Page 49: ...ed position of the TrimMaster blade and with a marker pen or similar mark along the bottom edge of the blade see Figure 3 22 This will act as a guide when refitting Removing the TrimMaster Blade Sligh...

Page 50: ...rude above the clamp at point A or below it at point B see Figure 3 25 Lightly tighten the centre screw sufficient to hold the blade in this position Remove the L H TrimMaster side cover two x M5 butt...

Page 51: ...de at all times Place a single sheet of paper large sheet size between the blade and the anvil and manually crank to produce a test cut Check that a clean cut is obtained across the full width of the...

Page 52: ...tion Calibration If books are not being trimmed to the size selected on the control panel the axis position may need calibrating Blade Material High Carbon High Chrome Aisi D2 D3 Grinding Angle See dr...

Page 53: ...This will give access to the adjustment screws Figure 3 26 Trim Axis Home Position Adjustment 4 Using a 4mm allen key turn the adjustment screws Clockwise to increase trim Anti clockwise to decrease...

Page 54: ...48 Watkiss BookMaster Service Manual Issue 1 14 12 00 Service Procedures TrimMaster Pro...

Page 55: ...r PCB layouts and their diagnostics see section 4 2 PCBs BookMaster Pro Connection Diagram 2 pages TrimMaster Pro Connection Diagram 900 141 Eco Vario Interface Board 900 152b Position Motor Control B...

Page 56: ...50 Watkiss BookMaster Service Manual Issue 1 14 12 00 Electronics Software Connection Diagrams...

Page 57: ...Electronics Software Connection Diagrams Watkiss BookMaster Service Manual Issue 1 14 12 00 51...

Page 58: ...52 Watkiss BookMaster Service Manual Issue 1 14 12 00 Electronics Software Connection Diagrams...

Page 59: ...Electronics Software Connection Diagrams Watkiss BookMaster Service Manual Issue 1 14 12 00 53...

Page 60: ...54 Watkiss BookMaster Service Manual Issue 1 14 12 00 Electronics Software Connection Diagrams...

Page 61: ...Electronics Software Connection Diagrams Watkiss BookMaster Service Manual Issue 1 14 12 00 55...

Page 62: ...56 Watkiss BookMaster Service Manual Issue 1 14 12 00 Electronics Software Connection Diagrams...

Page 63: ...Electronics Software Connection Diagrams Watkiss BookMaster Service Manual Issue 1 14 12 00 57...

Page 64: ...58 Watkiss BookMaster Service Manual Issue 1 14 12 00 Electronics Software Connection Diagrams...

Page 65: ...Electronics Software Connection Diagrams Watkiss BookMaster Service Manual Issue 1 14 12 00 59...

Page 66: ...60 Watkiss BookMaster Service Manual Issue 1 14 12 00 Electronics Software Connection Diagrams...

Page 67: ...Electronics Software Connection Diagrams Watkiss BookMaster Service Manual Issue 1 14 12 00 61...

Page 68: ...d BMP 900 164 BookMaster Interface Board BMS BMP 900 165 Clinch Drive PCB BMS BMP 900 168 BookMaster Standard Main Control Board BMS Table 4 2 BookMaster and TrimMaster PCBs DESCRIPTION PL1 Low voltag...

Page 69: ...is triggered and the motor is stopped Motor moves forward until microswitch is released Axis position is zeroed Note If the home microswitch is broken or missing the motor will drive for ward for app...

Page 70: ...L2 Connection to Motor PCB PL3 Connection to Outfeed Conveyor LED2 Conveyor running PL4 Trim Sensor LED3 Sensor actuated PL5 Paper Stop Solenoid LED4 LED5 Solenoid actuated Not used PL6 TrimMaster Dri...

Page 71: ...nd The staple cartridge is about to or has run out Constantly illuminated The staple head is selected and ready to run Blinking rapidly There is a staple head jam or other error Not illuminated The St...

Page 72: ...rimMaster socket PL9 Remote Interface Socket 742 391 opto isoltated input and output PL10 PL11 Infeed Belt Top Jog home sensor PL12 Paper input sensor PL13 PL14 Emitters for PL11 and 12 PL15 Status ru...

Page 73: ...itor is charged and ready for actuation LEDs blink during actuation PL4 Connection to control PCB 900 157 PL5 Connection to Stitch head Control PCBs PL6 28V power supply connector PL7 Output to clinch...

Page 74: ...2 Unused PL3 Connection to BookMaster Interface PCB 900 164 PL4 Unused PL5 Side staple latch solenoid edge staple PL6 Unused PL7 Connections to the guard switch conveyor outfeed socket on BookMaster a...

Page 75: ...ster Pro Remove the rear panel to access the Interface PCB 2 Move the link switch LK1 to the ON 1 position 3 Insert the floppy disk into the computer disk drive 4 Exit to DOS 5 Change to drive A A Ent...

Page 76: ...70 Watkiss BookMaster Service Manual Issue 1 14 12 00 Electronics Software BookMaster Pro Software...

Page 77: ...purpose These inspections include online running with a Watkiss Vario collator but can also be conducted offline TrimMaster Pro inspections require connection to a BookMaster Pro Inspection should on...

Page 78: ...eck all controls and settings 2 Check voltage settings SECTION 3 RUNNING CHECKS CHECKED COMMENTS NOTES PASSED 1 Hand feed 2 4 8 16 and 20 sheets of A4 into the machine and check booklets SECTION 4 LAB...

Page 79: ...el Adjust the BookMaster bottom lay through its full travel Move the edge staple latch in and out checking both positions 2 Check voltage settings Caution Before switching on the machine check the vol...

Page 80: ...OMMENTS NOTES PASSED 1 Check that all the labels are fitted SECTION 4 PRE RUN SETTING UP CHECKED COMMENTS NOTES PASSED 1 Check all controls and settings 2 Check voltage settings SECTION 5 RUNNING CHEC...

Page 81: ...Section 4 Pre run setting up 1 Check all controls and settings Visually check all controls are correctly fitted When making adjustments cross check that the adjustments are prop erly calibrated Adjust...

Page 82: ...ettings 2 Check voltage settings 3 Check which software is installed and update if required SECTION 3 RUNNING CHECKS CHECKED COMMENTS NOTES PASSED 1 Hand feed 2 4 8 16 and 20 sheets of A4 into the mac...

Page 83: ...positions 2 Check voltage settings Caution Before switching on the machine check the voltage tappings on the transformer 3 Check which software is installed and upgrade if required Section 3 Running...

Page 84: ...D 1 Check that all the labels are fitted SECTION 4 PRE RUN SETTING UP CHECKED COMMENTS NOTES PASSED 1 Check all controls and settings 2 Check voltage settings SECTION 5 RUNNING CHECKS CHECKED COMMENTS...

Page 85: ...Check all controls and settings When making adjustments cross check that the adjustments are properly calibrated 2 Check voltage settings Caution Before switching on the machine check that the unit i...

Page 86: ...red 5 Test the infeed sensor 6 Hand feed sets of 4 sheets of A4 check booklets and adjust as necessary 7 Check outfeed conveyor is working if fitted SECTION 3 RUNNING CHECKS CHECKED COMMENTS NOTES PAS...

Page 87: ...atch in and out checking both positions 2 Check all wiring and connections behind the rear panel Check all the wiring and connections ensuring that they are correctly located and secure Check that no...

Page 88: ...stops when the lid is lifted Section 4 Labels 1 Check that all the required labels are fitted Tamper adjustment Staple adjustment Fold position adjustment staple latch Edge staple adjustment Voltage l...

Page 89: ...KED COMMENTS NOTES PASSED 1 Check all controls and settings 2 Check voltage settings SECTION 5 RUNNING CHECKS CHECKED COMMENTS NOTES PASSED 1 Hand feed 2 4 8 16 and 20 sheets of A4 and check booklets...

Page 90: ...erly calibrated Adjust the conveyor through the minimum and maximum travel mak ing sure it has a free and easy movement 2 Check voltage settings Caution Before switching on the machine check that the...

Page 91: ...tandard After Build Inspection Watkiss BookMaster Service Manual Issue 1 04 12 00 85 Section 7 Pre delivery checks 1 Clean all parts of the machine 2 Record the serial no of the machine 3 Re check all...

Page 92: ...sheets 8 Check top knock top jog is correctly calibrated 9 Check calibration of all adjustments 10 Check outfeed conveyor if fitted is working SECTION 3 RUNNING CHECKS CHECKED COMMENTS NOTES PASSED 1...

Page 93: ...t no wires are positioned where they can catch or rub 2 Check voltage settings Caution Before switching on the machine check that the voltage tappings on the mains transformer are set correctly 3 Chec...

Page 94: ...der the Vario to make A3 A4 booklets of 2 sheets Check the sets feed cleanly into the machine Run samples in Long Sknock 4 Running the BookMaster Pro under the Vario to make A4 A5 booklets Run the sys...

Page 95: ...HECKS CHECKED COMMENTS NOTES PASSED 1 Hand feed 2 4 8 16 and 20 sheets of A4 into machine and check booklets 2 Check trim length microswitch is correctly calibrated to the control panel adjust microsw...

Page 96: ...t the unit is the correct voltage Section 5 Running Checks 1 Hand feed 2 4 8 16 and 20 sheets of A4 into the BookMaster Pro and check books Check all the booklets are cut squarely and cleanly pay part...

Page 97: ...ld only be conducted by Watkiss trained engineers The routine maintenance schedule sheets in this section may be photocopied for this purpose and we recommend that a copy of each machine inspection is...

Page 98: ...ction 3 2 7 Removal and Fit ting of Fold Rollers 4 Check all fixing screws are tightened 5 Check that the sidelays operate correctly and smoothly 6 Check that the staple and fold mechanism is square s...

Page 99: ...Conveyor Belts 2 Check all fixing screws are tightened 3 Check the sharpness of the TrimMaster blade along its full length The blade should cleanly cut one sheet of paper disconnect from mains and cyc...

Page 100: ...correctly and smoothly 6 Check that the staple and fold mechanism is square see section 3 2 4 Staple to Fold Calibra tion 7 Check adjustment axes are accurate i e the home positions are calibrated co...

Page 101: ...harpness of the TrimMaster Pro blade along its full length The blade should cleanly cut one sheet of paper disconnect from mains and cycle with a 19mm AF spanner 4 Clean the conveyor sensor 5 Check th...

Page 102: ...96 Watkiss BookMaster Service Manual Issue 1 04 12 00 Routine Maintenance TrimMaster Pro Routine Maintenance Schedule...

Page 103: ...Any damage caused by failure to do so will not be covered by the guarantee The required machine voltage is shown on the label on the rear of the unit 7 2 Connecting the BookMaster and TrimMaster Proce...

Page 104: ...yor BOC The Outfeed Conveyor can be fitted to either the BookMaster or the TrimMas ter Procedure Refer to IPC 964 440 BookMaster Accessories Figure 1 1 Secure the leg bracket at 90 to the payout table...

Page 105: ...ng Tray BRT The BookMaster Receiving Tray fits only on the BookMaster not the Trim Master Procedure 1 Fit the back plate of the receiving tray onto the location pegs on the Book Master see Figure 7 5...

Page 106: ...7 The motorised infeed Loosen the two hand screws see Figure 7 8 on either side of the Motorised Infeed Figure 7 8 Motorised infeed fixing Connect the Motorised Infeed interface cable to the socket o...

Page 107: ...3 On the Vario set the batch size as required For further details on terminal emulator mode please refer to the Watkiss Vario Service Manual and to section 4 3 2 Terminal Emulator Mode in this manual...

Page 108: ...Route the cable on the underneath of the panel so that the panel sits flat on the surface of the BookMaster 8 Fit the shakeproof washers and M5 nuts to secure the offline control panel to the BookMas...

Page 109: ...motorised infeed to the BMP Fit the Nagle Interface panel onto the Vario or Eco Vario Deliver sets to the rear This gives bi directional communication in error conditions The BookMaster Offline Contro...

Page 110: ...eck that the front feed out conveyor on the collator is in its upper horizontal position and that all the feed out paper guides are clipped up The divert catch tray must also be removed see Figure 7 1...

Page 111: ...s hole in the rear of the base and plug into the socket on the Interface board see Figure 7 12 3 Replace the side cover 7 8 3 Nagle Panel and Settings The 905 197 Elec Assy Vario Bench Cover Nagle soc...

Page 112: ...f required If installing the bookletmaker with a Vario collator enter Terminal Emulator Mode via a PC and serial link Toggle the OUT3 function The emulator will respond OUTPUT 3 ERROR SIGNAL Also sele...

Page 113: ...shing moving BMP only BMP thinks axes are still moving to size Use PICI on terminal emulator to obtain diagnostics see 4 3 2 Terminal Emula tor Mode BookMaster Pro will not start up and there are thre...

Page 114: ...see section 3 2 11 Squaring Up Pro cedure Sheets bouncing on stitch latch Increase settle time BMP only Top jog is hitting top of set BMP only adjust or calibrate Adjust top jog see BMP operating man...

Page 115: ...er Conveyor belts broken or loose and slip ping Replace belt s see sections 3 4 5 and 3 4 6 Conveyor clamp set too tight Adjust see section 3 4 2 Conveyor Clamp Adjustment Paper jams whilst edge stapl...

Page 116: ...e sta ple latch Check the edge staple latch for burrs polish latch using silicone polish Edge of booklet damaged Top jog over running and damaging stock Adjust top jog sensor For BMP see section 3 3 3...

Page 117: ...p pressure see 3 4 2 Conveyor Clamp Adjustment Trim stop is not set square Adjust and square the trim stop see 3 4 3 Conveyor belt s loose and slipping Replace belt s see sections 3 4 5 and 3 4 6 Trim...

Page 118: ...MODE STAPLE HEAD STATUS Blinking once per second The staple cartridge is about to or has run out Constantly illuminated The staple head is selected and ready to run Blinking rapidly There is a staple...

Page 119: ...en the boards and to control individual axes each board must have its own unique software address As part of the serial circuit that connects power and communications to all boards there is also a tri...

Page 120: ...Emulator mode uses the PC screen to provide diagnostic information on the BMP status 1 Switch off the power on the BookMaster Pro Remove the rear panel to access the Interface PCB 2 Insert the floppy...

Page 121: ...ycles CR RELEASE Debug information only Clutch release time D addh lenh DUMP MEM Debug information only DOUBLE 2x SK Enables double side jog DSK DS An extended side knock perma nently on in v1 3c only...

Page 122: ...n temporarily and so would not normally be witnessed 4 Stapler head BMP only 5 Always IDLE x ancillary information 0 Normal 2 Internal fault 3 Still in programming mode will self correct 4 Low staples...

Page 123: ...r panel 8 3 3 Staple Head Control Board 900 156 LED 2 on the Staple Head Control Board provides the following diagnostic information 8 3 4 Manually firing the staple head For checking staple head and...

Page 124: ...d then come back on again 5 Pressing the grey button on that PCB will now operate the staple head and clincher It is recommended to place a piece of paper or cloth beneath the staple head to catch the...

Page 125: ...48 x 210 5 83 x 8 27 A4 210 x 297 8 27 x 11 69 A3 297 x 420 11 69 x 16 54 B3 364 x 520 14 33 x 20 47 USA PAPER SIZES MILLIMETRES 5 x 8 137 7 x 215 9mm 8 x 11 215 9 x 279 4mm 11 x 17 279 4 x 431 8mm Ta...

Page 126: ...ications you can use the following feedback form to send us your com ments about accuracy and quality Please give specific page references and fax the completed form to us on 44 0 1767 691769 Please m...

Page 127: ......

Page 128: ...ervice Manual Issue 1 04 12 00 Part Number 969 240 1 Blaydon Road Middlefield Industrial Estate Sandy Bedfordshire SG19 1RZ U K Tel 44 0 1767 682177 Fax 44 0 1767 691769 Email info watkiss com Watkiss...

Reviews:

Related manuals for BookMaster