background image

Section 6.  System Setup, Programming  

    and 

Testing

All system programming and installation setup is performed through 
the OASIS user interface. 

Main Screen:

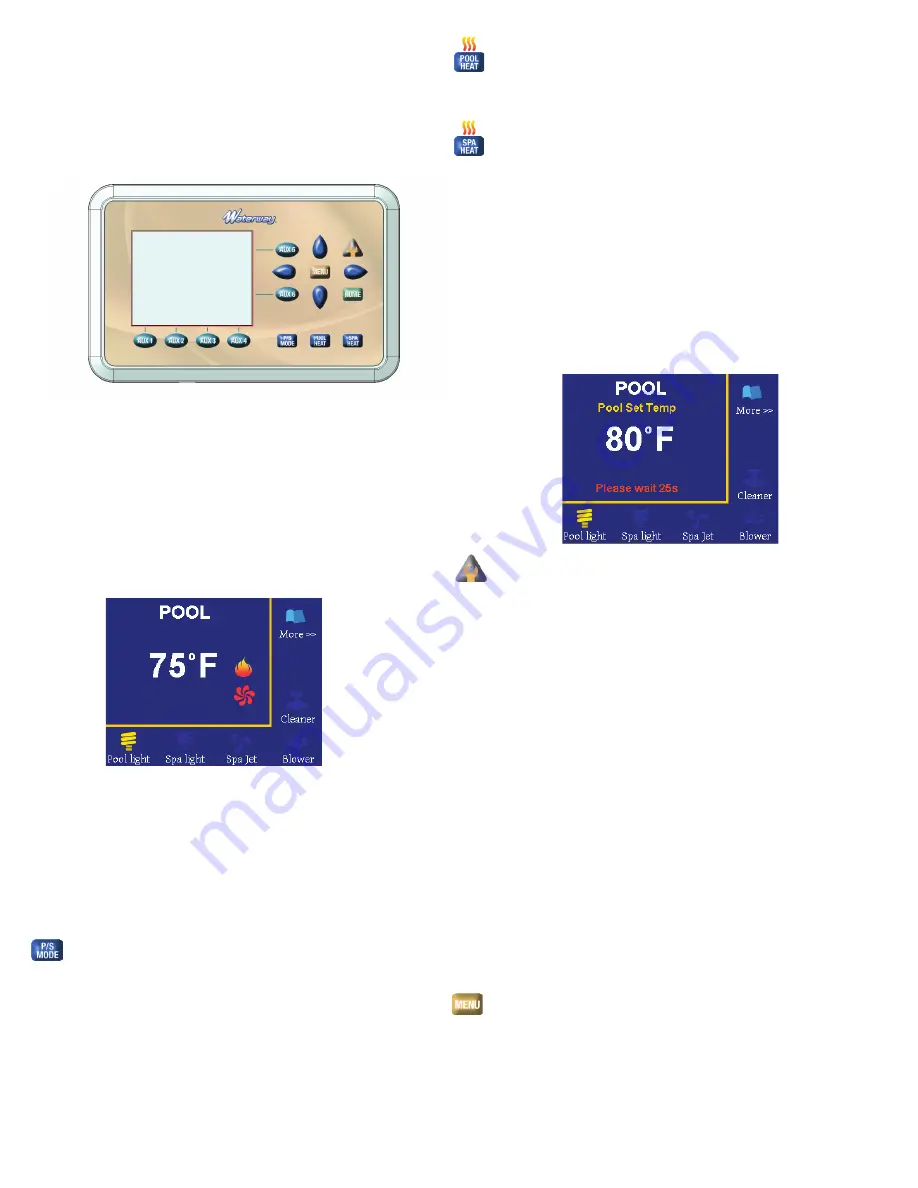
The main screen displays the current mode of the system, time, 
water temperature, air temperature, and the status of accessories 
(Pool Light, Blower, Booster Pump, etc).

Operation:

• 

Buttons 1 to 6:

 Turn accessories ON and OFF by pushing buttons  

  1 - 6 around the LCD display. The accessories are shown above 
  buttons 1 - 4, and on the right of buttons 5 and 6. If there are    
  more than 6 accessories, Button 6 will show “More>>” and when  
  pushed, will display a new list of accessories for buttons 1 to 5.
• 

P/S mode

 will cycle system between “POOL – OFF” and “POOL”  

  for a pool only system. For a Pool/Spa combo, it will cycle system  
  between “POOL – OFF”; “POOL”; “SPILLOVER”; “SPA”; and then 
  return to “POOL – OFF”. The valves will turn and a message 
  “Please wait 40s” will display on the panel. This message is  


  updated every 5 seconds and it will clear when the valves  
  completely stop in the correct position. Then the Filter pump will   
  turn ON if the OASIS is not in “POOL – OFF” mode.

• 

POOL HEAT

 will cycle system between “POOL – OFF” and  

  “POOL” with heater enabled. Heater will turn ON one minute after  
  Filter pump ON and if the water temperature is less than Pool Set  
 temperature.
• 

SPA HEAT

 will cycle system between “POOL – OFF” and “SPA”  

  with heater enabled. Heater will turn ON one minute after Filter  
  pump ON and if the water temperature is less than Spa Set  
 temperature.

• 

Up and DOWN buttons

 are used to set water temperature in 

  POOL mode. The screen will display “Pool Set Temp” with the  
  current pool set temp. In “SPA” mode, it will display “Spa Set Temp”  
  with the current spa set temp. After 5 seconds without any change  
  to the set temperature, the screen will reverse back to the Main   
  screen with current water temperature displayed.

• 

SERV button

 will cycle the system between “Service Timeout”,  

  “Service Mode”, and normal mode. “Service Timeout” immediately  
  turns off all equipment, disables all Timers, and lasts for 3 hours.  
  “Service Mode” turns off all equipment, disables all Timers, and   
  lasts for 24 hours. Press a fourth time to cancel “Service Mode”. 
• 

HOME button

 return to Main screen from any other screen.

• 

MENU button

 used to enter the Menu setting screen and navigate  

  between fields.
• 

LEFT/RIGHT button

 used to navigate under Menu screens.

Panel Timeout:

• If the user is in a menu and no button is pushed within 60  
  seconds, the screen will timeout, current screen settings will be  
  lost and panel reverts back to MAIN screen.
• In MAIN screen, if no buttons are pushed within 30 minutes, the  
  display will switch to display the Waterway Logo screen. Any  
  button pushed during this time will reverse to MAIN screen. In Logo  
  screen, if no buttons are pushed within 60 minutes, all LCD lights  
  will turn off and the panel goes to sleep. Any button pushed during  
  this time will wake the panel up and LCD lights will turn back on.

Menu Navigation:

• MENU button: used to enter settings menu and sub-menu   
  screens. For screens with several settable fields, MENU can be  
  used to navigate between different fields within the screen. For  
  screens with the choice to enable or disable devices like the  
  PARTY Mode device selection screen, MENU will be used to select  
  or deselect the device.

14

Figure 6. User Interface

12:55 pm / 80°F

12:55 pm / 80°F

Summary of Contents for OASIS

Page 1: ...TRUCTION MANUAL POOL SPA CONTROL 2200 E Sturgis Road Oxnard CA 93030 Phone 805 981 0262 Fax 805 981 9403 waterway waterwayplastics com www waterwayplastics com Designed Engineered Manufactured in the...

Page 2: ...ld consult a physician before using a spa or hot tub and should limit spa water temperatures to 100 F 38 C Water temperature in excess of 38 C 100 F may be injurious to your health c Before entering a...

Page 3: ...ne radio or television within five 5 feet 1 52m of a spa or hot tub The use of alcohol drugs or medication can greatly increase the risk of fatal hyperthermia in hot tubs and spas Water temperature in...

Page 4: ...Hardware Mounting Hardware Mounting bracket Mounting Bracket Mounting Bracket for remotely installing UI Mounting Bracket for remotely installing UI Cover plate for UI housing Cover plate for UI hous...

Page 5: ...nted The four 4 mounting holes are 3 15 16 10 cm apart center to center NOTE Make sure to mark out the four 4 holes as accurately as possible 4 Drill four 4 holes in the mounting surface 5 Press the f...

Page 6: ...ician may conveniently access it All high voltage wiring must be done by a licensed electrical contractor NOTE See Figure 10 4 OASIS Electrical Wiring Diagram on page 10 for specific wire locations an...

Page 7: ...a Light Booster Pump etc Connect only one device per relay For each device 1 Connect ground wire to ground bar 2 Connect line power to Line 1 and Line 2 3 Connect equipment power to Load 1 and Load 2...

Page 8: ...the filter before the heater 2 Install the O ring on the sensor and insert the sensor into the hole Wrap and tighten metal clamp around the pipe to secure sensor 5 1 Wire the Temperature Sensors Wire...

Page 9: ...e OASIS Wifi to the JP4 RS 485 connector see Figure 10 4 Wiring Diagram 1 Feed wire through the black low voltage wiring knockout 2 Connect the Black White Green and Red wires as shown in Figure 8 5 2...

Page 10: ...SOLAR J4 OPTION FILTER PUMP AUX 1 AUX 2 AUX 3 AUX 4 AUX 5 GROUNDING BAR WATERWAY OASIS TOPSIDE PANEL BREAKER BOX GROUND NEUTRAL OASIS WI FI KIT BLOWER FILTER PUMP J1 INTAKE J2 RETURN SOLAR TEMP SENSO...

Page 11: ...ERWAY OASIS TOPSIDE PANEL BREAKER BOX GROUND NEUTRAL OASIS WI FI KIT Variable Speed Connector Filter Pump High Filter Pump Low BLOWER FILTER PUMP J2 RETURN SOLAR TEMP SENSOR AIR TEMP SENSOR WATER TEMP...

Page 12: ...roller for a Variable Speed pump it is important to select the correct pump WWVSP Power Defender 165 Power Defender 270 WWVSP2 Power Defender 300 Intel VSP Pentair IntelliFlo pumps Hayward VSP select...

Page 13: ...Port for Jandy Pro Series VS pump WATERWAY VSP CONNECTION TO POWER DEFENDER 165 PUMP WATERWAY VSP CONNECTION TO PUMP BLACK COM WHITE B GREEN A WATERWAY VSP CONNECTION TO POWER DEFENDER 270 PUMP Figure...

Page 14: ...display Pool Set Temp with the current pool set temp In SPA mode it will display Spa Set Temp with the current spa set temp After 5 seconds without any change to the set temperature the screen will re...

Page 15: ...option Move between items in the left column with UP and DOWN Use the MENU or RIGHT button to navigate between columns By default the right column shows Not Used To change this setting use MENU or RIG...

Page 16: ...RIGHT to toggle the selection between am pm or 24 hour selection Heat Source this option can only be changed if a Solar valve or Heat Pump is selected in Assign Output as shown below Then Heat Source...

Reviews: