WATERLOO PROFESSIONAL HD 36

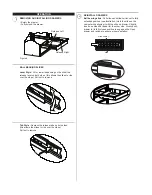
DIVIDER INSTALLATION
Items Needed:
10-24 x 5/16 Hex Screw (Qty: 24)
Dividers (Qty: 6)
5/16

"

 Wrench

Process:
•  Decide which position and in which drawers they would 

best serve your needs.

•  The dividers are cut to fit right to left in the drawers. If you 

prefer to run them front to back, they may be trimmed in 
length to do so.

• Position the dividers in the desired locations.
•  Thread screws through the bottom of the drawer and into 

each divider. Tighten all the screws.

DRAWER LINER INSTALLATION
Items Needed:
Drawer Liner Roll
Scissors

Process:
•  Remove the non-slip drawewr liner from the roll. The 

drawer liner may be cut with scissors to fit each drawer 
and around the drawer divideres, if necessary.

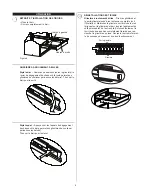
CHEST ATTACHMENT (if purchased)
Items Needed:
10-24 x 5/16 Hex Screw (Qty: 4) 
1/2

"

 Wrench

Process:
• Remove the wooden top from the cart.
•  Remove the top two drawers of the cart (refer to the 

drawer removal instructions).

•  Lift the chest onto the cart. Line up the holes in the bot-

tom of the chest with the holes in the top of the cart.

•  Attach the chest using (4) screws inserted from the 

underside of the top of the cart. (See Figure 8)

• Wrench tighten all screws.
•  Replace the drawer (refer to drawer installation instruc-

tions).

• To remove, reverse procedure.

OPERATION

Handle Lever

LOCKING AND UNLOCKING THE UNIT

Locking the Unit:
•  Always check the unit to make sure all the drawers are 

completely closed before locking.

• Pull handle lever out.
• Insert the key into the lock and turn it clockwise.
• Release lever.

Figure 5

Unlocking the Unit:
• Pull the handle lever.
• Insert key into the lock and turn it counterclockwise.
• Release lever.

Figure 3

Figure 4

3


Screw

Drawer

Dividers

Summary of Contents for PROFESSIONAL HD 36" 8-DRAWER CABINET

Page 1: ...er should never be ex ceeded Only transport this product empty Properly secure when transporting DO NOT exceed maximum product weight including contents See Operations Sections Capacities for more inf...

Page 2: ...the unit to its upright position CASTER INSTALLATION if required Items Needed 5 16 18 x 1 Hex Screw Qty 16 Caster Pack 1 2 Wrench Hardware and other included contents can be found in the bottom drawe...

Page 3: ...Items Needed 10 24 x 5 16 Hex Screw Qty 4 1 2 Wrench Process Remove the wooden top from the cart Remove the top two drawers of the cart refer to the drawer removal instructions Lift the chest onto the...

Page 4: ...over the stops Pull out to remove Figure 6 Empty the drawer Fully extend the drawer Ball bearing slide Pull slides and slide carrier out to fully extended position see illustration Hold the slide on t...

Page 5: ...ide For smooth operation make sure that the drawers are matched with their original slides TROUBLESHOOTING Problem Cause Solution The unit unlocks but the drawers still will not open One or more of th...

Page 6: ......

Page 7: ...poner las correderas NO hale la unidad emp jela cuando la mueva UTILICE LOS FRENOS cuando el producto no est en movimiento Esto impedir que se deslice NO altere la unidad en modo alguno Por ejemplo n...

Page 8: ...contenido incluidos pueden ser encontrados en el Caj n inferior a menos que se indique lo contrario Paquete de ruedas Paquete de manija Rollo de forro para caj n Divisor de cajones Proceso Quite el c...

Page 9: ...l Llave Inglesa de 1 2 Proceso Retire la parte superior de madera de la unidad rodante Retire las dos cajones superiores de la unidad rodante re fi rase a las instrucciones para remoci n de cajones Le...

Page 10: ...extendida ver ilustraci n Sostenga la corredera en el gabinete mientras lo alinea con la corredera del caj n INSTALACI N DE GAVETAS COJINETES DE BOLAS Estilo palanca Levante o baje dependiendo de la c...

Page 11: ...e los cajones correspondan con sus correderas originales SOLUCI N DE PROBLEMAS DEL SISTEMA DE CIERRE Problema Causa Soluci n La unidad puede desbloquearse pero los cajones no abren Una o m s de los ca...

Page 12: ......

Page 13: ...num ros de mod le et autres renseignements requis pour obtenir des pi ces de rechange se trouvent sur une tiquette situ e du c t int rieur droit du tiroir le plus haut S CURIT DANGER indique une situa...

Page 14: ...i n cessaire Articles requis Vis t te hexagonale 5 16 18 x 25 mm 1 po Qt 16 Ensemble de roulettes Cl de 12 7 mm 1 2 po La quincaillerie et les autres articles compris se trouvent dans le tiroir du bas...

Page 15: ...u besoin ATTACHEMENT DU COFFRE si achet Articles requis Vis t te hexagonale 5 16 18 x 25 mm 1 po Qt 4 Cl de 12 7 mm 1 2 po Proc dure Retirez le dessus en bois du chariot Retirez les deux tiroirs sup r...

Page 16: ...tiroir pour le sortir Figure 6 Videz le tiroir Ouvrez compl tement le tiroir Glissi re roulement billes Tirez les glissi res et le porte glissi re jusqu leur extension compl te voir l illustration Ma...

Page 17: ...tionnement en douceur assurez vous que les tiroirs sont bien associ s avec leurs glissi res d origine D PANNAGE Probl me Cause Solution L unit se d ver rouille mais les tiroirs ne s ouvrent toujours p...

Page 18: ......

Page 19: ...und die Reinigung der Schiebek sten zu erleichtern Die Matten der Schiebek sten lassen sich mit Wasser und Seife reinigen Kugelf hrung Gleitf hrung SICHERHEIT GEFAHR zeigt eine gef hrliche Situation...

Page 20: ...NTAGE falls erforderlich Was Sie brauchen Sechskantschraube 5 16 18 x 1 Menge 16 Lenkrollenpackung 13mm 1 2 Schraubenschl ssel Verbindungselemente und andere mitgelieferten Inhalte befinden sich im un...

Page 21: ...8 x 1 Menge 4 13mm 1 2 Schraubenschl ssel Verfahren Entfernen Sie die h lzerne Abdeckung vom Wagen Entfernen Sie die obersten zwei Schiebek sten aus dem Wagen siehe Anweisungen zum Schiebekas tenausba...

Page 22: ...wegt werden Schiebekasten herausziehen Abbildung 6 Leeren Sie den Schiebekasten ffnen Sie den Schiebekasten vollst ndig Kugelf hrung Schienen und F hrung so weit wie m glich herausziehen siehe Abbildu...

Page 23: ...k sten wieder mit den urspr nglichen Schienen PROBLEMBEHANDLUNG Problem Ursache L sung Die Einheit l sst sich auf schlie en aber die Schiebek sten k nnen nicht herausgezogen werden Einer oder mehrere...

Page 24: ......

Reviews: