


CARTON CONTENTS
HARDWARE
ASSEMBLY
Hardware Included:
TOOLS REQUIRED:
3/8
"
Wrench
1/2
"
Wrench
5/16
"
Wrench
Scissors
Screwdriver
Caster Pack
Cabinet:
Handle Pack (Qty: 1)
Caster pack
Drawer Liner Roll (Qty: 1)
Drawer Dividers (Qty: 6) (for the 46" Cabinet, dividers
can be found in the top full length drawer.)
Literature
Hardware bag
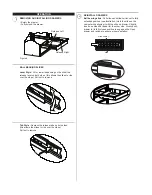
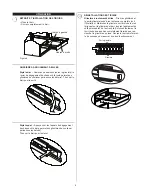
Process:
• Lay the cart down on its back. (Use packaging material
to protect the paint finish.)
• Mount both swivel casters on the same side of the cart
using (4) screws on each caster.
• Wrench tighten all screws.
• Mount rigid casters to the opposite end of the cart in the
same manner.
• Return the unit to its upright position.
CASTER INSTALLATION (if required)
Items Needed:
5/16-18 x 1 Hex Screw (Qty: 16)
Caster Pack
1/2
"
Wrench
Hardware and other included contents can be found in the
bottom drawer (unless otherwise noted).
Handle Pack
Drawer Liner Roll
Drawer Divider
SIDE HANDLE INSTALLATION
Items Needed:
1/4 - 20 x 1-1/2" Hex Screw (Qty: 4)
Handle (Qty: 1)
3/8
"
Wrench
Process:
• Attach (1) handle endcap using (2) screws. Tighten with
a wrench.
• Align handle with notches in attached endcap, hold in
position.
• Align notches in second handle endcap and attach using
(2) screws. Tighten with a wrench.
• To remove, reverse the procedure.
Figure 1
Figure 2
2
10-24 x 5/16 Hex Screw
(Qty: 24)
1/4 - 20 x 1-1/2 Hex Screw (Qty: 4)
(Included with Handle Pack.)
5/16 - 18 x 1 Hex Screw (Qty: 16)
(Only included with 36" Cabinet.)
Screw
Handle


