background image

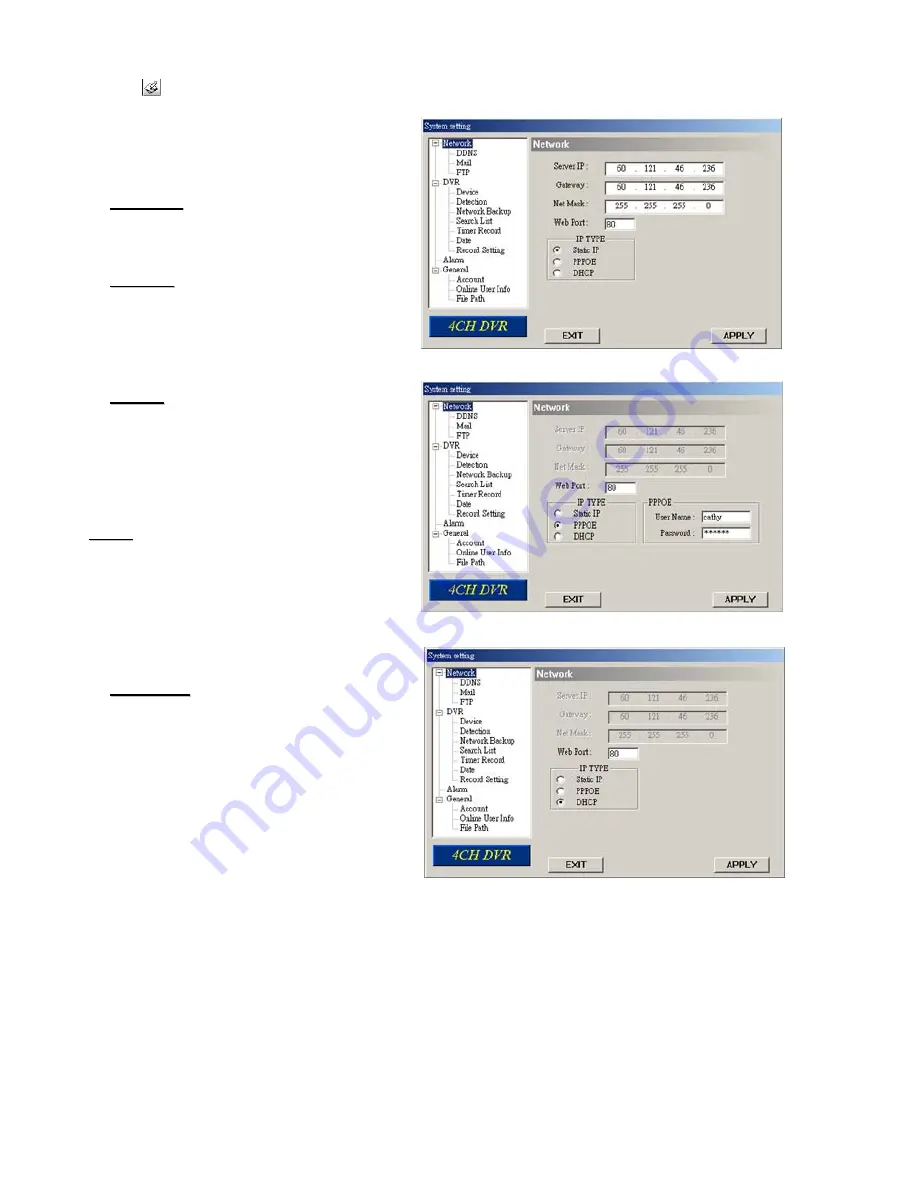
System Config > Network


Press the 

 button to enter the System Config. 


The network configuration allows the 
DVR to connect to an Ethernet or 
dial-up network. 

- 29 - 


Static 


IP:

Static IP:


Enter the “server IP”, “gateway”, “net 
mask” and “web port”, and then press 
“APPLY” to confirm.


PPPOE:

PPPOE:


Enter the “username” and “password” 
provided by your ISP (Internet Service 
Provider). Then, go to “DDNS” and 
finish DDNS settings before pressing 
“APPLY”. 


DHCP:

DHCP:


This DHCP function needs to be 
supported by a router or a cable 
modem network with DHCP services. 
Choose the DHCP IP type. Then, go 
to “DDNS” and finish DDNS settings  
before pressing “APPLY”. 

Note:

Note:


 PPPOE and DHCP network 

connection types are required to apply 

D

D

D

D

N

N

S

S


s

s

e

e

r

r

v

v

i

i

c

c

e

e

s

FIRST

 to get a 

H

H

o

o

s

s

t

t

n

n

a

a

m

m

e

e” to correspond to the 

dynamic IP address 

 Some router brands may need to 

restart the DVR to get the IP address. 


Web 


Port:

Web Port:


The DVR can be viewed over the 
network with the software AP or a web 
browser. Typically, the TCP port used 
by HTTP is 80. However in some 
cases, it is better to change this port 
number for added flexibility or 
security. The valid number ranges 
from 1 to 9999. 

Summary of Contents for DVR4ENTPACK3

Page 1: ...264 Video Compression Technology High Quality CCD Image sensor Multiplex Operation 14 x IR LEDs Long Recording Duration 480 TVL Resolution Intelligent Video Motion Detection Recording Remote Network Surveillance Backup Functions Easy to operate like a VCR System Auto recovery after power loss blackout Note The latest version of this manual can be found at http www watchguardalarms com au ...

Page 2: ... warrant that this manual will be uninterrupted or error free We reserve the right to revise or remove any content in this manual at any time THIS PRODUCT IS LICENSED UNDER THE MPEG 4 VISUAL PATENT PORTFOLIO LICENSE FOR THE PERSONAL AND NON COMMERCIAL USE OF A CONSUMER FOR i ENCODING VIDEO IN COMPLIANCE WITH THE MPEG 4 VISUAL STANDARD MPEG 4 VIDEO AND OR ii DECODING MPEG 4 VIDEO THAT WAS ENCODED B...

Page 3: ... Footage 25 Section 2 Network Operation 26 Using the supplied software to view the DVR over the network internet 26 Default DVR Network settings 26 Connecting via Software Viewer E 26 Playback Operation 27 Playback Operation 28 System Config Network Dynamic DNS 30 System Config Network Mail 30 System Config Network FTP 31 System Config DVR 31 System Config Device 31 System Config Detection 32 Syst...

Page 4: ... 4 LAN Clients 46 Port Forwarding 47 Connecting Remotely 47 ...

Page 5: ...ctivate the call monitor function and press again to quit Press to show the four channel display mode Power Press long enough to turn on off the DVR 1 4 Press one of the buttons to select the channel to display Press one of these four buttons to move up down left right Under the playback mode press these buttons to pause stop rewind or fast forward the playback file Under the setting mode press to...

Page 6: ...t ti io on n H HD DD D N Ne ea ar rl ly y F Fu ul ll l Network Type I IP P G Ga at te ew wa ay y N Ne et tm ma as sk k P Pr ri im ma ar ry y D DN NS S S Se ec co on nd da ar ry y D DN NS S P Po or rt t D De e I In nt te er rl la ac ce e F FS S D Dw we el ll l D Du ur ra at ti io on n V VG GA A O Ou ut tp pu ut t D Di is sp pl la ay y C Co ov ve er rt t E Ev ve en nt t R Re ec co or rd d E En na ab...

Page 7: ...1 Image Size Sets the size that images will be displayed at Select FRAME FIELD or CIF resolutions 2 Quality Sets the quality to record in It is best to experiment with these settings to find a quality level that suits you There are four options available BEST HIGH NORMAL and BASIC 3 Images per Second IPS Sets how many images per second IPS the DVR will record in when manually set to record by the ...

Page 8: ...ation Move to the starting time point and press ENTER to set the starting time marked in red colour Then use to set the timer recording schedule After setup press ENTER again to create an ending time point marked in yellow colour and press MENU to exit DETECTION TIMER 0 2 4 6 8 10 12 14 16 18 20 22 24 SUN MON TUE WED THU FRI SAT PLEASE CONSULT YOUR INSTALLER FOR ADVANCE SETTINGS MOVE SELECT X Axis...

Page 9: ... DVR is recording stop recording before hand The daylight savings option will tell the DVR to adjust the time during a certain date range D DA AY YL LI IG GH HT T S SA AV VI IN NG G START 4TH SUN MAR 01 00 00 END 4TH SUN OCT 01 00 00 ADJUST 01 00 Example In the image above During the daylight savings time period starting on the 4th Sunday of March and ending on the 4th Sunday of October the DVR ti...

Page 10: ...es of the cameras Detection This option enables disables motion detection for this individual camera Area Press ENTER to setup area masking for this camera Note The Advance menu of the DVR should be used by enthusiasts or experts only Changing settings in this section of the menu can drastically alter the performance and functionality of the DVR It is recommended you do not change anything in this...

Page 11: ... 00 and the lowest sensitivity setting is 15 The default setting is 03 Note The default setting of Spatial Sensitivity is 03 which means once an object is detected in more than 3 grids the system will get triggered So the value of Spatial Sensitivity must be less than the number of grids that you set up for the motion detection area TS Time of Sensitivity The TS function is used to set the sensiti...

Page 12: ... detected Alarm Buzzer Configures whether to sound the buzzer when the internal alarm is triggered HDD Buzzer Configures whether to sound the buzzer when the hard drive is full Alarm Duration SEC Sets the amount of time to record once an alarm event has been detected HDD Nearly Full GB Sets the amount of remaining hard drive capacity required before the alarm will sound A AL LE ER RT T INT BUZZER ...

Page 13: ...203 021 020 020 SECONDARY DNS ADDRESS 230 021 020 020 PORT 0080 Network Type Configures which network connection the DVR uses Select STATIC IP DHCP or PPPoE network connection After choosing which type of connection to use press the ENTER button to enter the relevant information for each type IP Address Enter the IP address of the DVR Gateway Address Enter the Gateway address of the DVR Network Ad...

Page 14: ...on When running in single channel display mode this function allows you to set how long each image will display for before switching to the next channel Select from 03 05 10 or 15 seconds VGA Output Allows you to choose the output display resolution when connecting the DVR to a monitor via a VGA cable Select from 800 x 600 1024 x 768 1280 x 1024 1400 x 1050 1440 x 900 1680 x 1050 or 1600 x 1200 Di...

Page 15: ...ing ON or OFF Timer Recording function allows the DVR to record at a scheduled time Event Record IPS Select the Images per Second IPS for the EVENT RECORD function Select from 3 7 12 or 25 IPS Timer Record IPS Select the Images per Second IPS for the TIMER RECORD function Select from 3 7 12 or 25 IPS Pre Alarm Record Select to enable or disable the pre alarm function ON or OFF When pre alarm and e...

Page 16: ...ing Clear HDD Erases all recorded footage off the hard drive Upgrade Auto Keylock Configures the DVR to automatically turn the keylock on after 30 60 or 120 seconds Set to NEVER to disable this feature Note Your DVR has been pre configured to record for 4 weeks This is not the factory default setting Language Configures the language of the on screen display Video Format This option switches the vi...

Page 17: ...arching Event Info Event Search S SY YS ST TE EM M DATE 03 10 2009 CHANNEL 1 EVENT MOTION SEARCH HDD ALL START Date Allows you to set the date which you would like to search for footage from Channel Select the camera channel Select 1 2 3 or 4 Event Allows you to select which motion trigger to search for Select from Motion or Alarm Search HDD Select which HDD to search for images Select All or Mast...

Page 18: ...he machine HDD Size Shows the remaining space on the Slave HDDs Event Info Event Log Event Log This section of the menu allows you to view lists of system events such as video loss network access etc H HD DD D I IN NF FO O HDD NUM HDD SIZE HDD NUM HDD SIZE MASTER 1 080 000 SLAVE 1 NO HDD MASTER 2 NO HDD SLAVE 2 NO HDD EXT001 NO HDD EXT 002 NO HDD EXT003 NO HDD EXT 004 NO HDD EXT005 NO HDD EXT 006 ...

Page 19: ... footage which is to be backed up END TIME Select the end time of the footage which is to be backed up AVAILABLE SIZE Displays the available capacity of the inserted USB flash drive CHANNEL Select the channels to back up Select the channels by pressing ENTER to change the symbol in front of the channel number Symbol means that this channel is selected to backup Symbol means that this channel is no...

Page 20: ... function to locate the footage you wish to backup See page 25 for how to search for footage Plug your USB drive into the DVR Press MENU on the front panel of the DVR or the remote Use the navigational buttons to move down the menu to BACKUP and press ENTER Using the navigational buttons select the START and END times of the footage which is to be backed up Select which channels you wish to includ...

Page 21: ... in the form of 192 168 0 xxx or 10 1 1 xxx Give your computer a unique IP address in the same range as your computer i e if your computer IP address is 192 168 0 1 give your DVR 192 168 0 2 Attempt to ping this IP address from your computer using an MS DOS prompt Once you can successfully ping your DVR you will be able to connect to it using the included remote access software Video Server E 21 N...

Page 22: ...h I T and networking experience that can perform port forwarding How to Setup Remote Viewing Connect your DVR to the ADSL Modem Give the DVR a valid IP address Ping the DVR from a PC on your network Log into your ADSL modem and Port Forward Port 80 to the IP address of your DVR Once you can successfully ping your DVR you will be able to connect to it using the included remote access software Video...

Page 23: ...e cross over cable into the DVR and the other end into your computer Allocate your DVR an IP Address and your computer a different IP address Ensure the addresses are within the same range I E Your DVR can be 192 168 0 1 and your PC can be 192 168 0 2 Attempt to ping the DVRs IP address from your computer using an MS DOS prompt Once you can successfully ping your DVR you will be able to connect to...

Page 24: ...enu Scroll down to ADVANCED CONFIG DETECTION and press ENTER Set each camera s detection DET to ON You can also setup the area of detection and sensitivity for each camera Refer to page 9 of this manual for further information about these functions The DVR is now set to record motion If you wish to turn off the Alert Buzzer follow these steps Press MENU to bring up the main menu Scroll down to ADV...

Page 25: ...ss START to begin searching If any footage is found it will begin playback Event Search Press MENU and scroll down to EVENT INFO EVENT SEARCH Press ENTER to open the quick search menu Using the navigation buttons select the following settings o Date Set the Date Time Year to search for footage o Channel Select which channel to search for footage 1 2 3 4 o Event Select between MOTION or ALARM o Sea...

Page 26: ...ou can obtain the AP software from the supplied CD ROM Note Refer to page 13 for information regarding checking altering the DVR network settings AP Software Login Screen Login Exit Port Username Password IP Address Search for DVR DVR List Open Backed Up footage Upgrade Firmware Copy AP Software Settings To Connect via the Software Viewer Open the Software Viewer E program Enter your username pass...

Page 27: ...a Snapshot Saved in the location set in System Config General File Path Snapshot Path g Start and stop recording Saved in the location set in System Config General File Path Record Path This will record what you see on screen to your own computer h Open the System Config menu i The number of users connected to the DVR j Theses buttons all emulate the front panel of the DVR Please refer to the quic...

Page 28: ...e Play back the video only without audio A AV V S Sy yn nc c Play back with the audio and video synchronously Watermark Proof the authenticity of the backup video Open Previous File Open the previous backup video Open Next File Open the next backup video O On ne e c cl li ic ck k t to o a ac ct ti iv va at te e De interlace De blocking OSD AVI Convert Config Setting Watermark Open Previous File Op...

Page 29: ...router or a cable modem network with DHCP services Choose the DHCP IP type Then go to DDNS and finish DDNS settings before pressing APPLY Note Note PPPOE and DHCP network connection types are required to apply D DD DN NS S s se er rv vi ic ce es s FIRST to get a H Ho os st tn na am me e to correspond to the dynamic IP address Some router brands may need to restart the DVR to get the IP address Web...

Page 30: ...x will appear on this window The system will automatically get DNS information from the Internet if this check box is selected System Config Network Mail When the recording is triggered by an alarm or a motion a video copy file can be captured The DVR will send an e mail notification to the assigned recipients up to 5 recipients Note Note To activate the e mail notification function please enable ...

Page 31: ...nter the camera channel name up to 6 characters Adjustment Adjustment Adjust the BR brightness CT contrast SU saturation HU hue REC recording of the camera After setting press OK and then press APPLY to confirm System Config Device Select the desired channel of the installed external device Press E Ed di it t to enter the setting box Device Type Device Type Choose either general camera or PTZ came...

Page 32: ...owards how long the object stays in the detection area to get triggered The smaller the value the higher sensitivity for the motion detection RE RE The value of RE is a reference for the detection The bigger the value the higher sensitivity for the motion detection Alarm Alarm Select LOW HIGH for the alarm polarity Motion Detection Area Motion Detection Area By clicking the area with your mouse on...

Page 33: ...art the backup will begin and a status bar will be displayed The DVR Network Backup pop up window will show the message Download process is finished when the backup has succeeded Press PLAY button to directly convert and play the file or Exit to quit To convert the backup file later please find the file in the designated file path and double click it twice for AVI conversion and file playback 1 En...

Page 34: ...his button to start downloading the list 4CH DVR System Config DVR Timer Record DATE DATE Choose a day from DATE drop down menu The options are OFF SUN MON TUE WED THU FRI SAT MON FRI SAT SUN and DAILY START START Enter the start time of timer recording END END Enter the end time of timer recording In this menu you can schedule 7 different sets of time for recording Press APPLY if the settings are...

Page 35: ...ight saving time in hour ADJUST 4CH DVR MANUAL RECORD MANUAL RECORD Specify whether to use manual recording YES ON and set IPS number EVENT RECORD EVENT RECORD Specify whether to user event recording YES ON and set IPS number TIMER RECORD TIMER RECORD Specify whether to use timer recording YES ON and set IPS number OVER WRITE OVER WRITE Specify whether to overwrite the HDD capacity when the HDD is...

Page 36: ... file contained with the MJPEG pictures 1 10 pictures to be sent to the address which is set under FTP 36 System Config General h Clean the alarm message which is shown on the screen Get the information of the DVR firmware version in this window Select TURBO Step 1 10 Select TURBO Step 1 10 To speed up menu selection or the control of the PTZ camera under video web servers users can activate TURBO...

Page 37: ...he functions a b c d e and f HIGH Control only a b c d and e functions but cannot control f function NORMAL Control only a d and e functions but cannot control b c and f functions GUEST Watch the image only Only a function can be used SUPERVISOR HIGH NORMAL GUEST Life time Life time According to different authority levels different accounts can stay online for different time periods 1 Min 5 Min 10...

Page 38: ...rs information list Name IP Address Authority Level Resolution and Image Quality System Config General File Path 38 Snapshot Path Snapshot Path Assign the route for saving the snapshot picture Record Path Record Path Assign the route for saving the manually recorded file ...

Page 39: ...e DVR images over the network with IE web browser Update the JAVA program Update the firmware of the software AP Can t play the recorded data on my DVR There must be at least 8192 images of recorded data for playback to work properly If not your DVR will stop the playback For example if the IPS is set to 30 the recording time should be at least 273 seconds 8192 images 30 IPS for the playback to wo...

Page 40: ...ress OK Follow the on screen prompts to install the Java Runtime Environment 40 Note Replace D with the letter of your CD or DVD drive Connecting to the DVR To log into the DVR you need to type the following address into Internet Explorer http ip address port You will need to replace the ip address and port with the values from the Advance Network section of the menu For example using the default ...

Page 41: ...oftware instructions 41 S Same as the AP software operation ame as the AP software operation C Change Image Quality hange Image Quality C Change Resolution hange Resolution P PTZ TZ S Sets the display position of the image LT Upper Left LD Lower Left RT Upper Right Lower Right ets the display position of the image LT Upper Left LD Lower Left RT Upper Right Lower Right ...

Page 42: ...ial communication signals 12 13 PIN OFF 14 ALARM RESET Connecting the wire from ALARM RESET PIN 14 to GND PIN 9 connector will disable alarms An external signal to ALARM RESET PIN 14 can be used to reset both ALARM OUTPUT signal and DVR s internal buzzer When any alarm has been triggered the signal becomes Low and all alarm activities will be stopped Under the normal operation the signal remains H...

Page 43: ...MODE c 0x63 KEY_16 CUT n 0x6e KEY_SET_CHANNEL F 0x46 KEY_CH15 S 0x73 KEY_SEARCH E 0x45 KEY_CH14 d 0x64 KEY_AUDIO D 0x44 KEY_CH13 K 0x4B KEY_KEY LOCK C 0x43 KEY_CH12 z 0x5A KEY_ZOOM B 0x42 KEY_CH11 S 0x53 KEY_SLOW A 0x41 KEY_CH10 P 0x50 KEY_PLAY 9 0x39 KEY_CH9 r 0x72 KEY_REC 8 0x38 KEY_CH8 W 0x57 KEY_POWER 7 0x37 KEY_CH7 R 0x52 KEY_RIGHT 6 0x36 KEY_CH6 L 0x4C KEY_LEFT 5 0x35 KEY_CH5 N 0x4E KEY_DOWN...

Page 44: ...the four screws on the back side of the upper cover Make sure your hard drive is set to Master Refer to the hard drive manufacturer s website if you are unsure Mount the hard drive in the internal bracket and attached the power and data cables Fig 1 Fig 2 Fig 3 Fig 4 Fig 5 Fig 1 Fig 2 Fig 3 Fig 4 Fig 5 44 ...

Page 45: ...ove model Initial Router Setup The DSL 504T comes with a Quick Installation Guide which should guide you through physically connecting the router as well as inputting your own internet connection details such as your username and password Once you have successfully connected the router to the internet i e you can browse to websites move onto the next step If you can t get your computer to connect ...

Page 46: ...the DDNS Server to www dyndns org Enter the details for the Username Password and Host Name as per the DynDNS account you created Save the settings Click Apply Click the Tools tab Click the System menu item Click the Save and Reboot button and select OK when prompted to continue DVR IP Address Following the instructions in page 14 of the manual go to the Advance Network section of the DVR menu sel...

Page 47: ...R item from the Available Rules and press the Add button to the right of the Available Rules list Once the page reloads You should now have the DVR item in the Applied Rules list Click the Tools tab Click the System menu item Click the Save and Reboot button Connecting Remotely Note If connecting from the local network you MUST use the internal IP address eg 10 1 1 50 For more information on conne...

Reviews: