


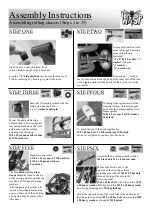


STEP FOUR
STEP THREE
STEP TWO
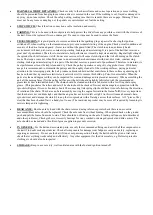
STEP ONE
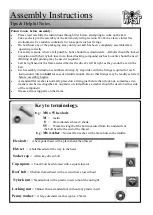
Assembly Instructions
Assembling rolling chassis (Steps 1 to 29)
Stand frame on end (on a kind, level
surface, such as an old carpet) & secure..
Press
4 x
3
/4’’ king pin bush
into front axle tubes top &
bottom, removing any flashing or paint from tubes.
Grease & mount front stub
axles left & right (steering
arms on top facing
forwards).
3
/
4
” x 5” H.T hex bolt,
3
/
4
”
washer,
stub axle,
3
/
4
” washer ,
3
/4” nylock nut.
If required a
3
/
4
” washer
may be inserted between the bush & the inner face of the stub
axle. Tighten until solid then back off the nylock to provide
movement.
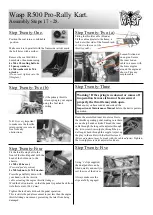
Assemble the 2 x threaded track rods
4 x
M10 lock nuts & 4 x track rod ends.
Mount rods & rod ends to the
top side of the steering column
actuating arm with the
M10 x 55 hex bolt
through the top of the arm in the
following order:
M10 x 55 hex bolt
, L.H. rod end,
2 x M10
x 20 heavy washer
, R.H track rod,
2 x M10 x 20 heavy wash-
er
, steering actuating arm,
M10 nylock nut
.
Mount the opposite ends of the track rods to the underside of
the stub axle arms using
M10 x 40 hex bolt
, stub arm,
2 x M10
x 20 heavy washers
, rod end &
M10 nylock
.
Grease & fit steering column with the
solid nylon steering bush.
1 x
3
/
4
” washer & split pin.
Mount the attached steering
column bush in between the two
rear facing brackets on the front
axle beam, with the column
actuating arm facing up.
M8 x 55 soc cap & M8 washer
& M8 nylock nut.
Working at the opposite end of the
steering column, fit the white split
bush over the column shaft & fix to
frame upright.
M8 x 55 soc cap, 2 x M8 washers
& nylock.
To pinch the top of the bush together use,
M8 x 40 hex bolt, 2 x M8 washers & M8 nylock.
Do not over tighten or you may split the bush.
Mount steering wheel.
3 x M6 x 30 soc cap, 4 x M6 washers,
2 x M6 x 25 penny washers,
3 x nylocks.
The
two black wrist retainer
straps
should be fitted to the top
of the steering wheel using the top
two M6 x 30 fixings & 2 penny
washers.
(The straps are polyester & will
require a mounting hole making
near to either end of the webbing,
any fraying may be sealed with a
little heat.)
STEP FIVE
STEP SIX