


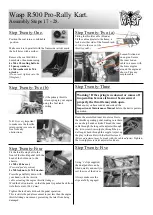


Fitting the engine & Transmission
Torque Converter.
Step Eight
Undo the idle shaft. Place onto the pulley the drive belt,
(N.B
The belt is asymmetrical as are the pulleys. Be sure that the
flat side of the belt is to the flat side of the pulley ie the engine
side).
Tighten the bearing risers.
Fit the bronze bush (Driver bush #10)
to the driver engine pulley. The belt
can now sit on the bush over the engine
shaft.
Step Nine
You are now ready to assemble the driver pulley.
Fit the black keyed hub driv-
er (Driver hub #4) to the en-
gine shaft with the drive flats
facing out.
Slide on the ‘v’ half pulley
(Driver movable face #8 com-
plete with shoe driver Ass. #5)
up to the belt.
Step Ten
Finally fit the outer drum (driver
drum #3) onto the drive flats.
Using
1x black heavy gauge
washer #2,
(or 2x
3
/
8
” x 1
1
/
4
”
mudguard washers )
1x
5
/
16
” spring washer
&
1x
5
/
16
UNF x 1
1
/
2
” hex bolt.
Torque down to 20ft. Lbs. Max.
Be sure the washers do not bend out through over tightening.
Warning: The standard Honda engine has an imperial
output shaft & UNF threads (Not metric) in the output
shaft & its four planet holes. The UNF thread form is fin-
er than on metric bolts.
Fit , tension & align the chain with the connecting clip in the
direction of rotation of the chain.
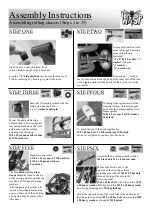
Step Seven
Push the collar to the left of the
pulley up very tight against the
pulley spring boss removing any
possibility of side play.
Drill as in Step Six.
Tighten the grub screw down &
check the pulley & its key are fast
to the shaft, with no movement.
Repeat the procedure with drive
sprocket & collars making sure
the chain will run free from
obstructions, & can be lined up
easily with the rear axle sprock-
et.
1
2
3
4
5
8
10
12
Torque converter
Driver Assembly.