INTRODUCTION
© WASP S.r.l.
6
45
First use of the printer
6
6.4. Autocalibration
First of all remove the safety clips from the belts. To enable automatic calibration, when the machine is off, manually
move the extruder and bring it into contact with the aluminum plate, at which point the printer can be switched
on. If the automatic calibration sensor is detected successfully, the message “AUTOCALIBRATION ENABLED” will
appear on the display, this will enable the command in the PREPARE menu.
Before starting the automatic calibration, it is recommended to set the desired bed temperature according to the
material and wait a few minutes for the temperature to be evenly distributed.
Make sure that the printing plate is clean and the aluminum of the bed is clearly visible. there are no obstacles to
contact with the extruder (anything other than aluminum or covering it needs to be removed/cleaned).
Also make sure that there are no printing residues on the extruder nozzle, it is advisable to clean the hot nozzle with
a cloth or paper.
At this point it is possible to start the automatic calibration from “PREPARE> AUTOCALIBRATION”, a warning
message will appear on the display, which will make sure to clean the bed and the extruder, it will start the procedure
that will last a few minutes.
Learn more on the Autocalibration procedure on paragraph 8.2 “Autocalibration”.
6.5. Loading/unloading of the filament
To load the filament, proceed as follows:
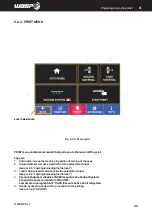
1. Use the command PRINT>LOAD MATERIAL and follow the procedure in the display
2. Chose the extruder you want to load (LEFT for Left Extruder or RIGHT for Right Extruder)
3. Wait for the extruders to reach temperature.
4. Take the spool to be loaded into the printer by first removing it from its packaging.
5. Break off the first two centimeters of wire and straighten the first section so as to facilitate loading later.
6. Place the spool on the appropriate reel support
7. Insert the filament inside the inlet and slide it until it reaches the thread take-up hole.
8. Confirm on the display and wait for the extrusion process to finish
If another filament is already loaded in the extruder remove it following this procedure:
1. Use the command PRINT>UNLOAD MATERIAL and follow the procedure in the display
2. Chose the extruder you want to unload (LEFT for Left Extruder or RIGHT for Right Extruder)
3. Wait for the extruders to reach temperature.
4. Wait for the printer to unload the filament
5. Remove the spool from the spool holder on the material storage area.
Summary of Contents for 4070 ZX
Page 1: ...MANUAL OF USE AND MAINTANANCE ORIGINAL INSTRUCTIONS WASP4070ZX...
Page 4: ......
Page 14: ...INTRODUCTION WASP S r l 1 14 1...
Page 30: ...INTRODUCTION WASP S r l 4 30 Description of the printer 4...
Page 60: ...INTRODUCTION WASP S r l 60 Ordinary and extraordinary maintanance...
Page 67: ...INTRODUCTION WASP S r l 67 Use of the printer Fig 8 6 Free Zeta System...
Page 82: ...WASP S R L Via Castelletto 104 48024 Massa Lombarda RA Italia www 3dwasp com info 3dwasp com...

