background image

16 December 2014 

Due to continued product improvement, Warmington Ind LTD reserves the right to change product specifications without prior notification. 

All Dimension are in mm……. Copyright on all products and Specifications © 


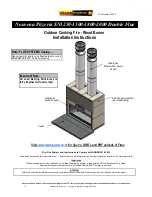
PLAN, FRONT ELEVATION & CROSS SECTION 


This is a general installation guide only 


Contact a “NZHHA Installer” for Installation Advice.


See : www.homeheat.co.nz , choose “members” & pick your Area & Fire type (wood / Gas etc) this will provide you with a 

NZHHA Certified Installer (use the SFAIT Installers Only .)  

HEARTH  & PLINTH CONSTRUCTION DETAILS


1. 

All the dimensions are minimums  

2. 

Fit the Plinth into position in the Cavity. If onto a wooden floor ensure that an insulating plinth is fitted as per 
the specifications. 

Ensure that the plinth is elevated to allow for finishing on the hearth. (See Hearth 

and plinth details) 

3. 

Fit  the  firebox  into  the  Cavity.  Bolt  the  fire  box  to  the  plinth  or  through  to  the  floor  with  the  bolting  point 
provided on the Left and Right hand sides of the fire box (seismic restraints). 

4. 

Fit the Adaptor to the Fire box. Ensure that exhaust sealant is used between the fire and Adaptor. Bolt into 
position with the bolt in the Left and right hand sides of the Fire box. 

5. 

Install the flue system.  

6. 

Fit the Hebel Heat cell around the fire. A general minimum lay out is shown in this Specification. 

FIREBOX INSTALLATION


Note: Hearth and Plinth Construction.


For Combustible Flooring an Insulating Hearth and Plinth 
of 75mm ACC is required. 

Plinth to be Offset above Hearth by the Hearth Finishing’s  

( e.g. Tiles / Granite / Solid Plaster / etc ) 

All  Load  Bearing  Canter  Levered  Hearths  must  be 

Engineered to carry loads .  

IMPORTANT NOTE : 


Offset 

Offset for 
Hearth 
finishing 

*Note: If Solid Plastering the structure , it is recommended to use a Fibreglass Mesh with a Latex Based Solid Plaster 

to minimise the chance of the Solid Plaster cracking. (See your Solid Plasterer for correct materials and applications) .


This is an example of a Raised & Canter 

Levered Hearth. See Spec for details 

This Hearth 
& Plinth 
setup is at  
Floor Level 

Summary of Contents for Nouveau Pizzeria SN1250 Double Flue

Page 1: ...ns for further reference Ensure that you have the correct and current Installation details for the Warmington Fire Installation The Warmington unit is to be Installed by a Certified Warmington Install...

Page 2: ...ce To be maintained to the manufactures Instructions Installation Notes A rebate of 40mm is recommended from the front face of the surround to the front of the fire to reduce the ingress of water into...

Page 3: ...10 910 Firebox Depth C 600 600 600 600 Flange Width D 1550 1850 2050 1300 Flange Height E 935 935 935 935 Adaptor Height F 480 480 538 480 Pizza Oven Width AA 470 470 470 470 Pizza Oven Height BB 129...

Page 4: ...ith the bolting point provided on the Left and Right hand sides of the fire box seismic restraints 4 Fit the Adaptor to the Fire box Ensure that exhaust sealant is used between the fire and Adaptor Bo...

Page 5: ...rtant Notes All Framing Dimensions are Internal Only All Timber Framing Cladding must be constructed to suit an Outdoor Environment as per NZ Building Code Firebox is recessed 40mm into ACC Surround T...

Page 6: ...arth Projection SS 850 850 850 850 Plinth Width TT 1610 2010 2410 1410 Plinth Depth UU 700 700 700 700 Centre of Flue NN 450 450 450 450 TIMBER PLAN FRONT ELEVATION CROSS SECTION Important Note All Lo...

Page 7: ...tion SS 850 850 850 850 Window Height VV 940 940 940 940 Window Width WW 1560 1860 2060 1310 Note Ensure that the Fire and Flue System is Installed before the Alcove access is blocked off Block module...

Page 8: ...C Heat cell is constructed around the firebox using 75mm ACC see attached minimum spec below 2400x600x75 Power Panels are required for basic heat cell construction as shown in detail Firebox with Hebe...

Page 9: ...t cell construction as shown in detail Firebox with ACC Surround Note If plastering the Heat Cell structure it is recommended to use a fibreglass mesh with a latex plaster to minimise the chance of th...

Page 10: ...hat the flue pipe is 5mm lower that the Flashing cone 2 Fit the Top Spider into position ensure that the legs of the spider are fitted inside the liner and that the spider is positioned hard down onto...

Page 11: ...men flashing Butynol Dectite an Additional Flue pipe Baffle is required All external air vents ceiling penetrations must be bird proofed with permanently fixed screens All flashing to comply with E2 T...

Page 12: ...Y CHASE FLASHING DETAILS VENTING THROUGH CHIMNEY CHASE VENTING THROUGH FLASHING No Insulation under flashing Insulation under flashing CHIMNEY CHASE FLASHING AND AIR VENTILATION OPTIONS Note Flashing...

Page 13: ...are in mm Copyright on all products and Specifications 13 FLUE HEIGHT MINIMUM DETAILS FRAME OUT AND TRIM OUT DETAILS FOR CHIMNEY CHASE Option X Singled Lined Flue System Option Y Double Lined The flue...

Page 14: ...imension are in mm Copyright on all products and Specifications 14 Important Note All Load Bearing Structures are to be Engineered to carry load RAISED HEARTH CLEARANCES Mantle Clearances Firebox Y Z...

Page 15: ...AEROSOLS IN THE VICINITY OF THIS APPLIANCE WHEN IT IS OPERATING WARNING DO NOT STORE FUEL WITHIN HEATER INSTALLATION CLEARANCES WARNING WHEN OPERATION THIS APPLIANCE AS AN OPEN FIRE USE A SPARK SCREEN...

Reviews: