background image

MAKING A TEST OBJECT FROM THE SD CARD

----------------------------------------------------------------------------------------------------------------------------------------------

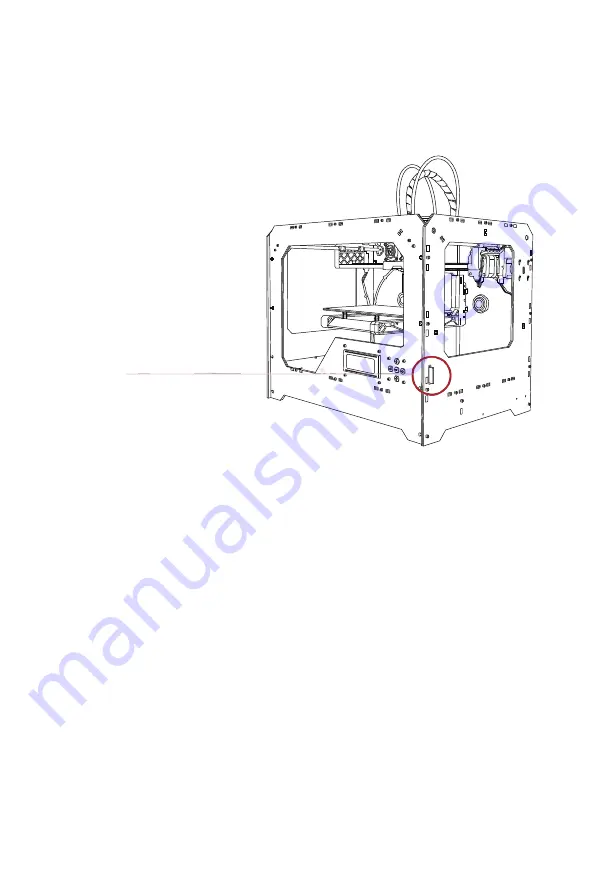
1. Locate the SD Card

2. Select a Project from the SD Card

The WANHAO DUPLICATOR package 

includes an SD card pre-loaded with 

files for making test objects.

SD Card

After you have successfully leveled the build platform and loaded the PLA

Filament into the extruder, the LCD panel will say: “I am ready”

A:Use the up and down arrow buttons to navigate through the list of models on

      the SD card.

B:To select a model, press OK.

C:The Printer will begin to build your object. You can use the LCD panel to monitor

      the temperature of the extruder and the status and progress of your object.

C

 Startup process: leveling, loading , testing

---------------------------------------------------------------------------------------------------------------------------------------

--------

29


more object availiable please download from our websiteShare
: WWW.THINGSHARES.com

Summary of Contents for Duplicator 4

Page 1: ...Duplicator 4 4x Desktop 3D Printer USER MANUAL...

Page 2: ......

Page 3: ...BS and PLA filament Unloading Duplicator ABS and PLA filament Making a Test Object from the SD Card D MAKING AN OBJECT WITH WANHAO REPLICATOR G Download and Install WanHao Replicator G Download an Obj...

Page 4: ...WANHAO WELCOME Let s get started...

Page 5: ...ooting WANHAO is excited to welcome you to the world of the WANHO Duplicator 4 4x Following this guide will help ensure that you are getting the most out of your machine and that you continue to make...

Page 6: ...AT 16 max 2GB PHYSICAL DIMENSIONS Without Spool With Spool Shipping Box Net Weight Shipping Weight 47 32 38 cm 47 32 38 cm 59 43 54 cm 11 5kg 19kg 15kg 21kg TEMPERATURE Ambient Operating Temperature S...

Page 7: ...files are translated into instructions for the WANHAO Duplicator 4 4X and sent to the machine via USB cable or SD Card Then the WANHAO Duplicator 4 4X heats the WANHAO PLA Filament and squeezes it out...

Page 8: ...WANHAO Setting UP Your WANHAO Duplicator 4 4x Desktop 3D Printer...

Page 9: ...t the WANHAO factory We hope you ll take your time and be just as careful unpacking it and getting it set up 08 A WELCOME LET S STARTED NOTE Do not force or tear anything during unpacking and set up T...

Page 10: ...HAO ABS PLA Filaments 2KG 2pc Filament guide tube 2pc Spool holder Hex wrenches 1pc SD card Build plate 1 PC 3M tape 1 PC glass with clips P ower cord USB cable SETTING UP YOUR WANHAO DUPLICATOR 4 4X...

Page 11: ...M 2 LCD PANEL 3 KEY PAD 4 THE EADED Z AXIS ROD 5 BUILD PLATFORM 6 FILAMENT GUIDE TUBE 7 EXTRUDER CABLE 8 EXTRUDER 9 FILAMENT SPOOL 10 SPOOL HOLDER 2 1 5 4 3 6 7 8 10 9 10 SETTING UP YOUR WANHAO DUPLIC...

Page 12: ...ou use the manual to guide you though the setup process and keep it at hand as you unpack the contents of the box If you find that anything described in the manual is missing email us at support wanha...

Page 13: ...ist the black cable at any time 3 Removing the Accessory Box A Remove the two remaining protective foam pieces from the bottom of the Duplicator 4 4x s box B Pull out the accessory box This box contai...

Page 14: ...Wanhao masking tape is used for both ABS and PLA printing which can make filament stick to the platform easier 5 Freeing the Extruder A Use strong scissors or a wire cutter to cut the zip ties holding...

Page 15: ...ewed from the back on the back of the WANHAO Duplicator 4 4x Make sure that the end of the filament guide tube is flush with the bottom of the guide tube holder The filament guide tube should not hang...

Page 16: ...ewed form the back Squeeze the spool holder and push the spool on until it locks USB cable Spool Holder 9 Attaching the USB Cable A Locate the USB A to USB B cable Insert the USB cable into the USB B...

Page 17: ...nsure that the flat side of the connector faces down 11 Powering On the WANHAO Duplicator 4 4x A Plug the AC power cord into an electrical outlet B Set the power switch to the ON position C The WANHAO...

Page 18: ...Startup Process Leveling Loading Testing...

Page 19: ...gh the LCD menus and make selections The left arrow usually allows you to go back or cancel an action OK button means the Printer is working NOTE Use the up and down arrow buttons to scroll through th...

Page 20: ...ate can block the Printer PLA Filament from extruding from the nozzle This can also scratch the build plate Leveling your build plate often will help ensure that objects adhere well to the plate How t...

Page 21: ...e Some Room Between the Build Plate and the Nozzle When directed by the LCD screen tighten each of the four knobs under the build platform about four turns Support Card Leveling Knobs C Startup proces...

Page 22: ...d the extruder nozzle without tearing or damaging the paper 3 Adjust Each Knob Again The script will prompt you to adjust each knob again This allows for fine tuning This time the A4 Paper should slid...

Page 23: ...NG THE BUILD PLATE 5 Compare your printed raft with the following Nozzle height checking diagram to ensure you have the correct nozzle height and filament width C Startup process leveling loading test...

Page 24: ...gain you can use the up and down arrows to scroll through the top level menu on the LCD panel and use the OK button to select Utilities Scroll to Level Build Plate and select it You can use these menu...

Page 25: ...l to build things What You Will Do Remove the end of the filament guide tube from the hole in the top of the extruder Feed the free end of the PLA Filament from the spool into the end of the filament...

Page 26: ...A Filament from the filament spool With a pair of scissors cut a clean edge Feed the end of the PLA Filament into the end of the guide tube where it attaches to the back of the Printer Feed the PLA Fi...

Page 27: ...xtruder Click through the message until your Printer asks you to press the OK when you see plastic extruding After you ve fed the PLA Filament all the way through the guide tube press the OK button on...

Page 28: ...o the opening After about five seconds you should begin to feel the motor pulling in the filament Maintain pressure for another five seconds and then let go 6 Stop Extrusion Watch the extruder nozzle...

Page 29: ...ent and select it Then select Load You can use these menus to return to the load script at any time Wait a few minutes for the extruded PLA to cool then pull it off the nozzle You can discard this ext...

Page 30: ...PLA Filament into the extruder the LCD panel will say I am ready A Use the up and down arrow buttons to navigate through the list of models on the SD card B To select a model press OK C The Printer wi...

Page 31: ...Making an Object with WanHao ReplicatorG...

Page 32: ...How to make an object using a computer and WanHao Replicator G Making an object with WanHao Replicator G D Making an Object with Wanhao Replicator G 31...

Page 33: ...r WanHao Duplicator and open a browser session b Enter the URL www wanhao3dprinter com and download the correct Replicator installer for your operating system c After downloading open the installer an...

Page 34: ...hares A Open a browser session and go to www thingshares com Use the search field at the upper middle to search for what files you want Your search results should include that Click on the link B At t...

Page 35: ...go into Mirror mode In this mode click the buttons at the upper side of the right to reflect the object in X Y Z respectively 6 Scale Click the Scale button to go into Scale mode In this mode click an...

Page 36: ...D Making an Object with Wanhao Replicator G 35 USING WANHAO REPLICATORG 3 Open WanHao Replicator G Continued 3 2 7 6 4 5 8...

Page 37: ...t Rafts provide a base for supports and help your object stick to the build plate 4 Support Select this to have your object include easily removable support structures under overhanging parts of the o...

Page 38: ...format to your SD card Specify a name for the file 4b Put the SD card to the card slot and choose the saved file to print 5 Build with Computer 4c Choose your machine type in replicator G then connect...

Page 39: ...Troubleshooting Diagnostics and Maintenance...

Page 40: ...roubleshooting and maintenance tasks for your WANHAO Duplicator4 Desktop 3D Printer For details on more advanced troubleshooting and m aintenance tasks go to wanhao3dprinter com FAQ E Troubleshooting...

Page 41: ...r not diagonally After you feel the motor grab the filament continue to maintain pressure on the filament for another five seconds 2 Object is stuck to build plate Wait for the object to cool down Obj...

Page 42: ...walk you through tasks associated with the Filament Script that walks you through the process of leveling the build plate LOAD Left Right Script that walks you through the process of loading the Fila...

Page 43: ...wanhao 3d printer 2 Grasp both sides of the build platform and push it gently to the bottom of duplicator 4 4X Use a clean lint free rag or your finger to spread the PTFE based grease onto the top se...

Page 44: ...of the fan guard using the 2 5 mm hex key included with your duplicator 4 4X As one piece remove the fan guard the fan the heat sink and spacers Keep these pieces together and set them aside 3 Unclip...

Page 45: ...the duplicator 4 4X s extruder to move on the X and Y axes GCode The computer language used to describe the toolpath your wanhao 3d printer will use to build an object GCode is converted to x3g befor...

Page 46: ...n place Spool holder The plastic piece that attaches to the back of wanhao duplicator 4 4X and holds the spool of wanhao Filament The spool holder ensures that the Filament is fed evenly to the extrud...

Page 47: ...e address above to open a ticket with the wanhao Support Team To help us understand your problem from the start it is very helpful to include pictures or a video as attachments with your email sales w...

Page 48: ...WANHAO sales WanHao3DPrinter com Made in China 86 579 82346658 www wanhao3Dprinter com...

Reviews: