


4
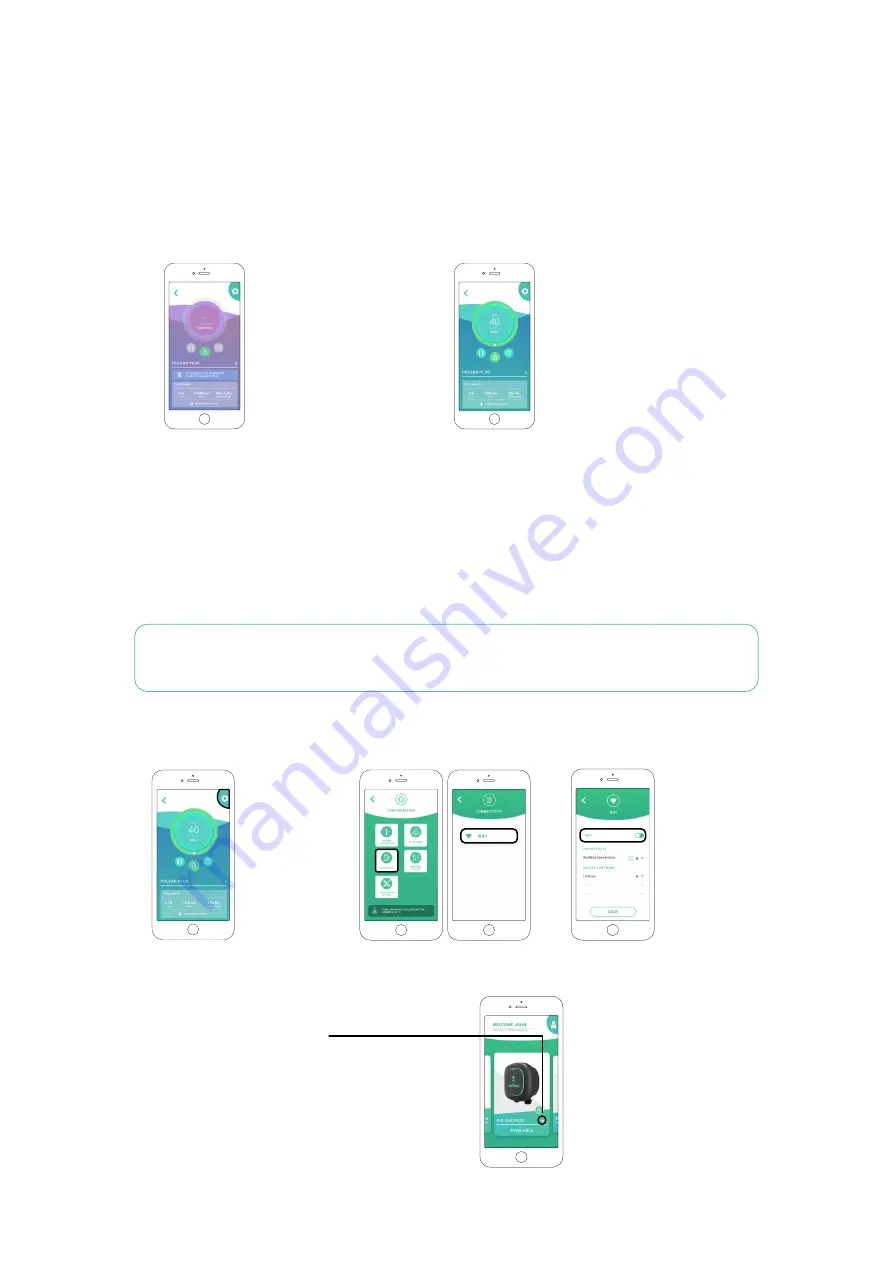
Connecting your charger to a Wi-Fi network
Before you can add and connect to your charger via your Wi-Fi network you must first connect to your charger
via Bluetooth.
1.
Tap the gear icon in the top right
corner to go to Configuration.
2.
On the Configuration screen,
tap the “Connectivity” icon
then tap “WIFI”.
3.
Enable the Wi-Fi toggle to activate
the Wi-Fi connection. Wait several
seconds until the network list appears.
4.
From the network list, tap on your network and enter your network password when prompted. It can take
up to 30 seconds to establish the Wi-Fi connection.
Note: You do not require an active Wi-Fi connection to use your charger, however connecting your charger to Wi-Fi will
enable additional features, including voice control via your Amazon Alexa or Google Assistant-enabled smart devices.
When both connections are available, you can use either Bluetooth or Wi-Fi to manage your charger.
Basics - Setup
QUICK REFERENCE GUIDE
4.
Your charger will communicate with your
mobile device and activate the connection.
The connection process can take several
seconds. While connecting, the app
background will appear purple.
5.
Once connected, the app background will appear in the
status color of the charger (see the “Charger status:
Understanding the Pulsar Plus LED status lights” section).
If the charger image in the app background is grey, you are
not connected to your charger (see “Troubleshooting”).
6.
When you are connected to your charger via the myWallbox app on your mobile device, myWallbox will
synchronize with the settings and data stored within the charger. If you do not connect your charger to an
active Internet connection (see “Connecting your charger to a Wi-Fi network” below), the myWallbox app will
sync the data with your myWallbox portal when your mobile device is connected to the Internet.
5.
The charger view and the charger list will now
show an active Wi-Fi symbol.
6.
If you need information about your Wi-Fi connection
or need to configure a manual connection, tap the
information (i) icon next to the connected network
name on the Configuration > Wi-Fi screen.


