Walker WP11DTB Operating Instructions Manual Download Page 23


22

12. CHANNEL NAVIGATION 

Channel “P+/P-” Buttons:

  Pressing “P+/P-” buttons will help you to go to the next or the previous channel in 

the list. 
 

Numeric Buttons:

 Pressing a number button will activate a small digit entry window on the left upper corner of 

the screen. After a digit is entered, the box will wait for 2 seconds till you enter another digit. If no digit is entered 
during these 2 seconds, then the box will switch to the entered number channel. 
 
If a number that is greater than the maximum number of channels is entered, the box will switch automatically to 
the last channel. Each time the box switches to the desired channel, an information window is displayed on the 
lower part of the screen. The small bar on top right of the banner indicates the current signal quality. 
 
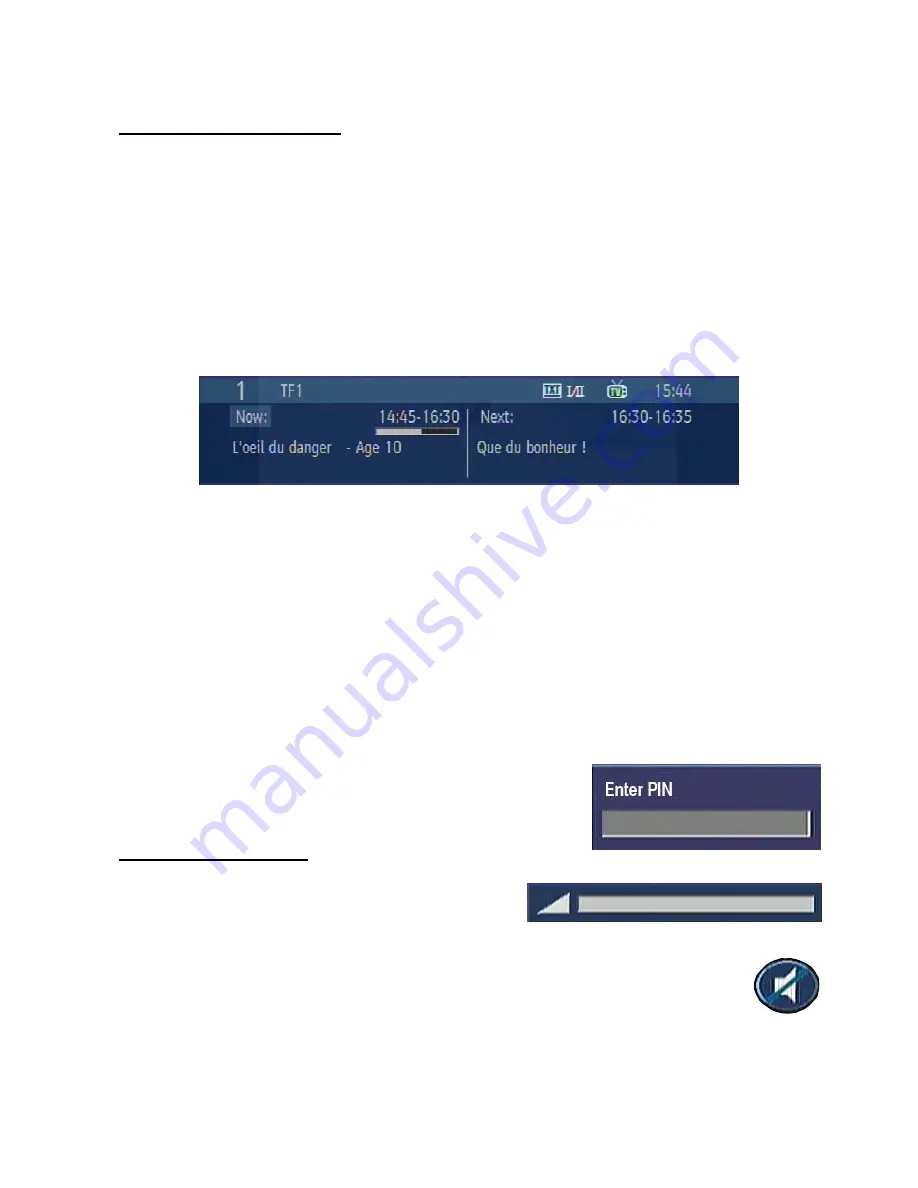
When INFO button is pressed, and when changing channels the information window is displayed on the lower 
part of the screen. The small bar indicates the program duration. On the channel info window there are: 


  Current event name next event name, and their start and end times. 

  Program duration bar. 

  Program mode (TV or Radio). 

  Channel number. 

  Name of the channel. 

 
The  second  press  of  the  info  button  brings  up  a  box  containing  a  brief  description  of  the  currently  viewed 
programme. 
 
You  can  now  use  the  >  button  to  change  the  programme  description  to  that  of  the  next  programme  on  the 
current channel. 
 
On a blank screen, if you press the up/down buttons, the info banner will appear and you can switch  between 
channels saved in the list. To watch one of them, press the OK button. If you press the INFO button, you will 
switch to the last watched channel and the info banner will be closed. 


When switching to a locked channel (channel), lock code is requested via 
a window as shown in the picture. Only after the correct code is entered, 
it  is  allowed  to  access  to  this  channel.    To  skip  this  channel,  Channel 
“P+/P-”buttons must be used.


13. VOLUME CONTROL  

When “V+ / V-” buttons are pressed, a banner is displayed, this 
shows  the  present  volume  level  graphically.  By  keeping  these 
buttons  pressed,  the  sound  can  be  increased  with  “V+”  or 
decreased “V-“ button. 
 
When  the  MUTE  button  is  pressed,  a  mute  symbol  is  displayed  on  the  screen.    This  symbol  will 
disappear in 3 or 4 seconds after the MUTE button is pressed. The mute symbol is not displayed on 
the screen in case of any menu displayed.  

Summary of Contents for WP11DTB

Page 1: ...DIGITAL TERRESTRIAL RECEIVER OPERATING INSTRUCTIONS WP11DTB BE WALKER WISE logon to www walker ie SAORVIEW Digital Receiver...

Page 2: ...TIMERS 12 8 SETUP 13 8 1 CONFIGURATION MENU 13 8 1 1 DIGITAL AUDIO OUTPUT 13 8 1 2 AUDIO DELAY 14 8 1 3 LOW POWER 14 8 1 4 FAVOURITE MODE 14 8 1 5 CHANNEL LIST 14 8 1 6 ACTIVE ANTENNA 14 8 1 7 RECEIVE...

Page 3: ...rd protected Low power consumption less than 1 W Optional RECEPTION DVB T Compliant Input frequency range VHFIII 174 230 MHz 8 MHz bandwith UHFIV and UHFV 470 862 MHz 8MHz bandwith Input signal level...

Page 4: ...ct to direct sun light excessive dust or mechanical shock or in a location near heat sources The set should be placed on a solid and safe base Do not place the apparatus on a soft surface such as a ru...

Page 5: ...UDIO Optical Digital Audio Output 8 POWER SUPPLY DC IN 12V 3 PREPARING 3 1 REMOTE CONTROL First open the battery cover on the underside of the remote control Put in both batteries 1 5 Volt RO3 AAA ref...

Page 6: ...input of your TV only if your TV has an HDMI input If you want to get a high quality picture prefer the HDMI output The set top box gives RGB or CVBS output If you want to get the picture via scart c...

Page 7: ...e activating the receiver since booting of software will take some time Then you can turn on your digital set top box by pressing the standby button on the remote control You will see that the red lig...

Page 8: ...ONTROL LAYOUT OK TEXT BACK MENU INFO PR VOL 2 3 5 6 7 8 9 0 ABC DEF GHI JKL MNO LIB P P SUBT 1 4 PQRS TUV WXYZ FAV WIDE GUIDE PIP PIP SWAP PIP TIMERS AUX 1 2 3 4 5 6 7 8 9 10 11 12 13 14 15 16 17 18 1...

Page 9: ...ide TV aspect ratio mode 15 Subt Show Hide Subtitles 16 Swap Change the HDMI resolution 17 PIP optional PIP Window Channel Up 18 Mute Mute 19 Used in Media Browser and EPG menu 20 optional Search back...

Page 10: ...are located After choosing the country you have to set your TV type in the next window The next menu will ask you to choose the HDMI resolution If you intend just using the Scart output then just pres...

Page 11: ...Setting the favourite list Channel table is the place where the channels are managed 5 1 NAVIGATING THE WHOLE LIST OF CHANNELS In the channel table serves for moving the focus to the previous or next...

Page 12: ...e first character highlighted Now moves to the previous next character toggles the current character i e b character becomes a on and c on Pressing the numeric buttons 0 9 replaces the highlighted cha...

Page 13: ...listed below RED BUTTON SHRINK make the info boxes smaller GREEN BUTTON EXPAND make the info boxes larger YELLOW BUTTON PREV DAY displays the programs of previous day BLUE BUTTON NEXT DAY displays th...

Page 14: ...ns of GREEN button or cancel with RED button Edit the list via GREEN button and delete with the RED button 8 SETUP The adjustments in this menu are 8 1 CONFIGURATION MENU You can configure the setting...

Page 15: ...radio channels if you navigate Text Only you navigate through only Text channels with the PR PR buttons If you choose Show All all channels can be navigated with the PR PR buttons To save the recent...

Page 16: ...se check the HDMI resolutions supported by your TV set and select the most appropriate one from this menu Note that only stored channels can be watched over HDMI not VCR input This function duplicates...

Page 17: ...u write it down and keep it safe 8 1 10 TIME SETTINGS Use the buttons to go to the Time Settings option Press OK button to enter the Time Settings Menu In the Time Zone Setting option if you choose Au...

Page 18: ...ted automatically Any existing channels will be erased All channels found are stored in a sorted form with respect to their channel numbers 8 3 2 MANUAL SEARCH After the OK button is pressed in Instal...

Page 19: ...on or First Time Installation first plug the USB MEMORY CARD device out and power off on the box Plug the USB MEMORY CARD device in again Playing Media Files Play This plays the selected file Play Thi...

Page 20: ...slideshow Rotate rotate the picture using up down buttons BACK back to file list Shuffle shows the files randomly and continuous in current folder and icon turns the highlighted icon If during a slide...

Page 21: ...ing the steps below 1 Copy the bin file including higher version than the software loaded in flash into the USB flash memory root directory This file should be named upgrade bin 2 Insert the USB disk...

Page 22: ...box Timer Menu Channel Table Menus are not accessible Channel navigation is not allowed Therefore trying to enter these menus or do channel navigation will display a warning message on the screen Whe...

Page 23: ...n bar Program mode TV or Radio Channel number Name of the channel The second press of the info button brings up a box containing a brief description of the currently viewed programme You can now use t...

Page 24: ...The digital set top box is in standby Remote control is incorrectly aimed Battery exhausted Press the standby button Check if nothing blocks the front panel Change the batteries You have forgotten an...

Page 25: ...N Symbolrate COFDM with 2K 8K FFT mode Modulation 16 QAM 64 QAM FEC for all DVB modes automatically found ii VIDEO H 264 MPEG 4 part 10 main and high profile level 4 1 MPEG 2 MP HL video decoder HD di...

Page 26: ...4 GND 15 RED Output 5 GND 16 Fast Blanking Output 6 Audio Left Input 17 GND 7 BLUE Output 18 GND 8 Function Switching Output 19 CVBS Output 9 GND 20 CVBS Input 10 RX 21 GND 11 GREEN Output HARDWARE C...

Page 27: ...sposed of correctly you will help prevent potential negative consequences for the environment and human health which could otherwise be caused by inappropriate waste handling of this product For more...

Reviews: