ProSpray 24
g
Repairs at the unit
10. Clean pump manifold (2).
11. Lubricate upper packing (8) and lower packing (9)
with machine grease.
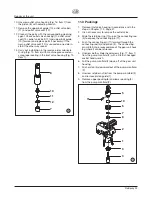
12. Insert upper packing (Fig. 18) with O-ring (1) and pro-
truding lip (2) downward.
13. Insert lower packing (Fig. 19) with the beveled edge
(1) facing upward.
14. Insert piston guide (Fig. 17, Item 7) into the retainer
nut (6). Screw retainer nut (6) into the pump manifold
(2) and tighten by hand.
15. Push installation tool (included with the replacement
packings) for the piston (3) from above onto the pis-
ton.
16. Lubricate installation tool and piston (3) with machine
grease.
17. Guide piston (3) through the lower packings (9) into
the pump manifold (2) from below. Using a rubber
mallet, lightly tap the piston (3) from below until it can
be seen above the pump manifold.
18. Remove installation tool from piston (3).
19. Carefully tighten retainer nut (6) with adjusting
wrench.
20. Position the pump manifold (2) underneath the gear
unit housing and push up until it rests against the
gear unit housing. When the connecting pin hole on
the piston rod (3) lines up with the hole in the con-
necting rod (5), insert the connecting pin (11).
21. Slide the retaining ring (10) down over the connecting
pin (11).
22. Attach pump manifold (2) to the gear unit housing.
Ensure that the pressure sensor does not damage
the pressure sensor seal (10).
23 Screw pump manifold (2) tightly to gear unit housing.
24. Lubricate O-ring (Fig. 15, Item 6) between pump
manifold (2) and inlet valve housing with machine
grease. Screw inlet valve housing to the pump mani-
fold.
1
1
2
25. Unit on high-rider cart
Screw on suction tube. Screw on return tube and
clamp to suction tube.
Unit on stand and low boy cart
Push connection bend of suction hose into the inlet
valve housing (Fig. 15, Item 1) and secure with retain-
ing clip. Screw on return hose and clamp to suction
hose.
26. Install front cover.

