154
22. NC rotary table (optional)
22.5 Setting the axial play of the worm shaft
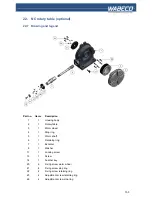
The worm shaft (5) is in the eccentric tappet (7). The axial play of the worm shaft is set using the
setting nuts (27).
To set the axial play of the worm shaft, proceed as follows:
1. Remove the NC drive unit
(see chapter: “Removing the NC drive unit”)
.
2. Open the lock by undoing the first of the two setting nuts (27) using a 17 mm wrench.
3. Depending on requirement, tighten or loosen the second setting nut (27) with the wrench.
4. Counter the first setting nut with the second.
5. After successfully completing the settings, reinstall the remaining parts in the reverse order.
22.6 Setting the axial play of the eccentric tappet
The axial play of the eccentric tappet (7) is set using the holding ring (6).
To set the axial play of the eccentric tappet, proceed as follows:
1. Remove the NC drive unit
(see chapter: “Removing the NC drive unit”)
.
2. Undo the four threaded pins (26) in the holding ring (6) using a 2.5mm Allen key.
3. Tighten the four fixing screws (22) of the holding ring using a 2.5 mm Allen key crosswise and
medium-tight.
4. With the locking screw (11) loosened, it should only be possible to swivel the eccentric tappet with
difficulty or not at all.
5. The four threaded pins in the holding ring can now be used to set the play very finely.
6. Tighten the threaded pins crosswise, evenly and in small stages and constantly check the
movement of the eccentric tappet.
7. The play is set correctly when the eccentric tappet can again be swivelled evenly with moderate
force.
8. After successfully completing the settings, reinstall the remaining parts in the reverse order.
Summary of Contents for CC-F1200 high speed
Page 42: ...42 6 Fitting and removing the tools 1 2 3 4 5...
Page 68: ...68 17 Drawings and legends 17 2 Electronic hood with 1 4 kW motor 17 2 2 CC F1200 CC F1210...
Page 70: ...70 17 Drawings and legends 17 3 Milling head with 1 4 kW motor...
Page 72: ...72 40 1 51004008 0002 Mounting pin 17 Drawings and legends 17 4 Milling head with 2 0 kW motor...
Page 74: ...74 17 Drawings and legends 17 4 Milling head with 2 0 kW motor...
Page 76: ...76 17 Drawings and legends 17 5 Z stand with vertical skid with trapezoidal threaded spindle...
Page 82: ...82 17 7 Lateral drive for z axis with trapezoidal threaded spindle 17 Drawings and legends...
Page 84: ...84 17 8 Cross slide support with trapezoidal threaded spindle 17 Drawings and legends...
Page 94: ...94 17 Drawings and legends 17 11 Z stand with vertical skid with ball screw spindle...
Page 100: ...100 17 Drawings and legends 17 13 Lateral drive for z axis with ball screw spindle...
Page 102: ...102 17 Drawings and legends 17 14 Cross slide support with ball screw spindle...
Page 114: ...114 17 Drawings and legends 17 20 Operating console for 1 4 kW motor...
Page 116: ...116 17 Drawings and legends 17 20 Operating console for 1 4 kW motor...
Page 118: ...118 17 Drawings and legends 17 21 Operating console for 2 0 kW motor...
Page 120: ...120 17 Drawings and legends 17 21 Operating console for 2 0 kW motor...
Page 122: ...122 17 Drawings and legends 17 22 Bracket arm for operating console...
Page 124: ...124 17 Drawings and legends 17 23 Industrial monitor and folio keyboard...


