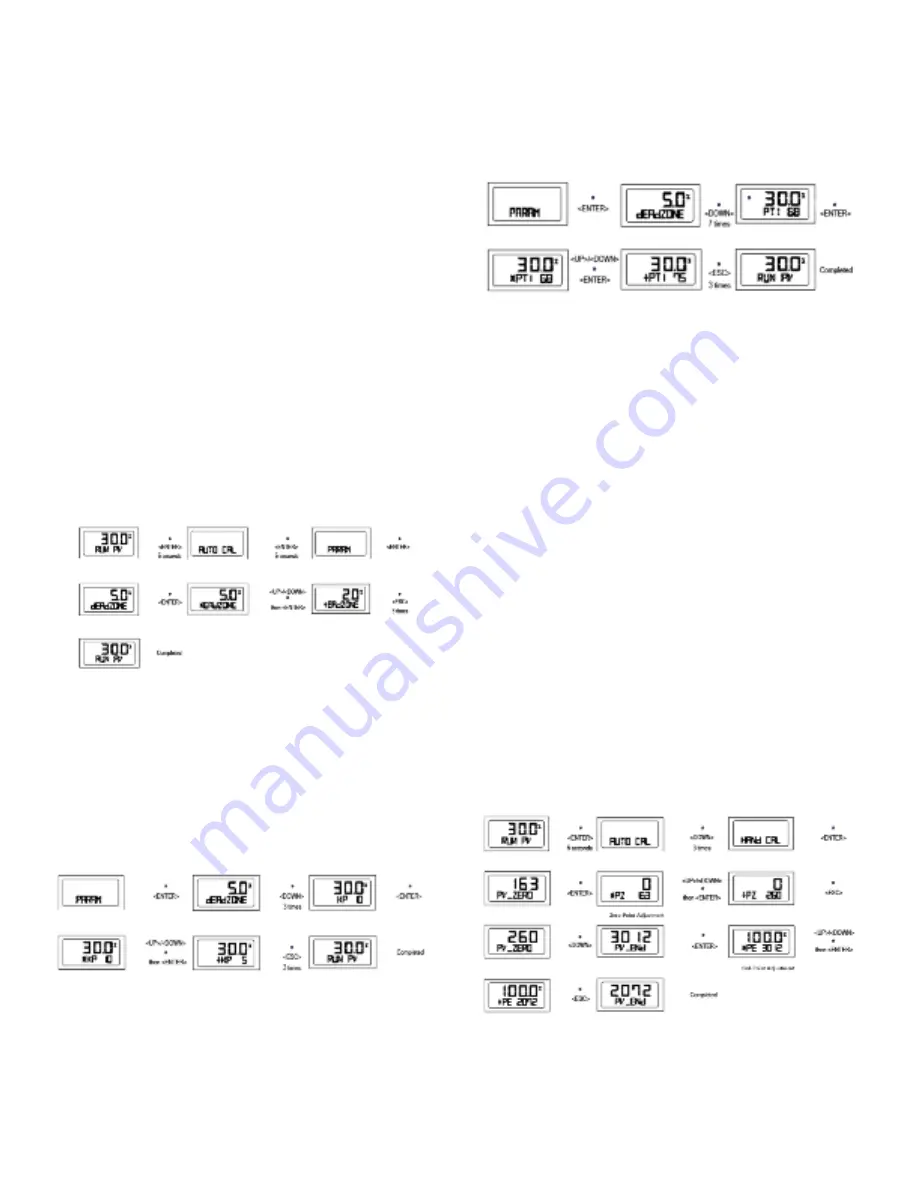
Parameter Mode (PARAM)
Parameter Types
There are four types in parameter mode: Dead Zone, KP, KI, and KD.
These values are reflected as soon as they are changed, therefore the
appropriate values are found by checking the valve’s motion in real time.
Dead Zone (dEAdZONE)
This is the range of error % that the positioner is not adjusted. Hunting or
oscillation due to friction between the stem and packing is prevented by this
parameter.
KP
This is a proportion constant value that is correction by error %. If this value is too
big, there can be hunting, even though it finds position by the input signal. If the
value is too small, accuracy gets worse.
KI
This is an integral constant value adding or subtracting the correction that is
corrected error % on the previous correction signal. If this value is too big, there
can be oscillation. If it is too small, the time to find the exact position increases.
KD
This is a differential constant value adding the previous correction signal with the
changing correction signal by the error % change rate.
Adjustment of Parameter
Dead Zone (dEAdZONE)
1. Push <ENTER> at RUN mode for 6 seconds and AUTO CAL message
appears.
2. Push <DOWN> twice and PARAM mode is displayed.
3. Push <ENTER> and dEAdZONE mode is displayed.
4. Push <ENTER> again and *EAdZONE message appears.
5. Adjust dEAdZONE value by pushing <UP> or <DOWN>. Adjusted value is
applied immediately without additional operation. Users can easily check its
adjustment by changing the current input signal to the positioner. Optimum control
value is found by adjusting values during valve operation.
6. Push <ENTER> to save the value. +EAdZONE message appears on LCD.
7. Push <ESC> three times to return to RUN mode.
KP
1-3. Adjustment method and procedure same as dEAdzone.
4. Push <DOWN> at dEAdZONE mode and KP mode is displayed.
5. Push <ENTER> and *KP message appears on LCD.
6. Adjust KP values with <UP> or <DOWN>. Adjusted value is applied
immediately without additional operation. Users can easily check its adjustment
by changing the current input signal to the positioner. Optimum control value is
found by adjusting values during valve operation.
7. Push <ENTER> to save the value. +KP message appears on LCD.
8. Push <ESC>.
9. Push <ESC> twice to return to RUN mode.
PT
1-3. Adjustment method and procedure same as dEAdZONE.
4. Push <DOWN> 7 times at dEAdZONE mode and PT mode is displayed.
5. Push <ENTER> at PT mode and *PT message appears on LCD.
6. Adjust PT value with <UP> or <DOWN>. Adjusted value is applied immediately
without additional operation. Users can easily check its adjustment by changing
the current input signal to the positioner. Optimum control value is found by
adjusting the values during valve operation. Push <ENTER> to save the value
and +PT message appears on LCD.
7. Push <ESC>.
8. Push <ESC> twice to return to RUN mode.
HAND CAL
When auto calibration is started, Series 185 and 285 positioners set zero points
and end points based on full stroke.
Hand Calibration Types
PV_ZERO: Edit mode to change the zero point of valve.
PV_END: Edit mode to change the end point of a valve.
TR_ZERO: Edit mode to change the zero point of transmitter.
TR_END: Edit mode to change the end point of transmitter.
Adjustment of valve zero point (1 to 5) and end point (6 to 10).
1. Push <ENTER> at RUN mode for 6 seconds and then AUTO CAL mode is
displayed. Push <DOWN> three times, the HAND CAL mode is displayed.
2. Push <ENTER> at HAND CAL mode and PV_ZERO mode is started.
3. Push <ENTER> at PV_ZERO mode and *PZ mode is started. At this mode, it
is available to change valve zero point, and the valve stem moves automatically
to the current zero point. On LCD, the valve stroke is displayed as 0%. +PZ
message that indicates edit mode of zero point and inner value showing current
zero point position is also displayed.
4. Adjust valve stem by pushing <UP> or <DOWN>. When valve stem has arrived
at the desirable zero point, save it with <ENTER>. +PZ message appears on
LCD.
5. Push <ESC> to return to PV-ZERO mode. (Push <ESC> twice to return to
RUN mode.)
6. In order to change valve end point, push <DOWN> at PV_ZERO mode and
PV_END mode begins.
7. Push <ENTER> at PV_END mode and *PE mode is displayed. At this mode it
is available to change valve end point, and the valve stem moves automatically to
the current end point. On the LCD, the valve stroke is displayed 100%. *PE
message indicating edit mode of the end point and inner value of end point is
also displayed.
8. Adjust valve stem with using <UP> or <DOWN>. When valve stem arrives at
the desirable end point, save it with <ENTER>. +PE message appears on LCD.
9. Push <ESC> to return to PV-END mode.
10. Push <ESC> twice and RUN mode is displayed.


