background image


17


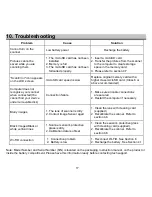
10. Troubleshooting                                     


Problem Cause 

Solution 

Cannot turn on the 
scanner 

Low battery power 

Recharge the battery 

Pictures cannot be   
saved while you are 
scanning them 

1. The microSD card has not been 

installed 

2. Memory is full 
3. The microSD card has not been 

formatted properly 

1. Insert a microSD card 
2. Transfer the pictures from the scanner 

to the computer to create storage 
space in the memory card 

3. Please refer to section 4.7 

“Scan Error" icon appears 
on the LCD screen 

microSD card speed is slow 

Replace original memory card with a 
higher class microSD card. (Class 6 or 
above recommended) 

Computer does not 
recognize your scanner 
when connected(You 
cannot find your device 
under removable disk) 

Connection failure 

1. Make sure all cable connections   

are secured 

2. Restart the computer if necessary 

Blurry images 

1. The lens of scanner is dirty 
2. Contact Image Sensor aged 

1. Clean the lens with cleaning card 

(supplied) 

2. Recalibrate the scanner. Refer to 

section 4.8 

Black Images/Black or 
white vertical lines 

1. Scanner sensor's protective 

glass is dirty 

2. Calibration data is off-set 

1. Clean the sensor’s protective glass 

with cleaning card (supplied). 

2. Recalibrate the scanner. Refer to 

section 4.8 

Wi-Fi® connection 

1. Connection problem 
2.  Battery is low 

1. Reconnect Wi-Fi®. See Section 6 
2. Recharge the battery. See Section 4.1

 
Note: Model Number and Serial Number (S/N) is located on the packaging, instruction manual, on the product or 
inside the battery compartment. Please have this information ready before contacting tech support.   


Summary of Contents for Magic InstaScan PRO PDSWF-ST48-VP

Page 1: ...Magic InstaScan PRO Auto Feed Scanner PDSWF ST48 VP User Manual...

Page 2: ...rmat 9 Scan Quality 9 Scan Color 9 Language 10 Date Time 10 Instant Preview 10 Auto Off Auto Power Off 10 Delete All Delete All Files 10 Format the MicroSD Memory Card 10 Device Information 10 4 8 How...

Page 3: ...JPEG PDF files to the microSD microSDHC card Support the microSD microSDHC memory card up to 32GB Color display to playback the scanned images Built in Wi Fi for file transfer Supports Scan Direct fun...

Page 4: ...single file delete option When zooming in under Playback mode press this button to shift the functions of and between UP DOWN and LEFT RIGHT Press and hold to turn Wi Fi on or off 5 Press this button...

Page 5: ...nned files in the microSD card 4 Using the Scanner 4 1 Charging the Battery Charge the built in battery before using the scanner Charge time while scanner is off Approx 1 5 hours Two charging methods...

Page 6: ...will enter Date Time Language setup mode Once the Date Time Language setting is completed scanner will enter into standby mode By default Auto off feature is set to 3 minutes If the Auto off feature i...

Page 7: ...to indicate scanning is in progress 4 If the scanner is connected to the computer press the once to enter USB mode then you are able to view the scanned files on the computer Notes When scanning and...

Page 8: ...ed image will be displayed 2 Press or to select your desired image Press to zoom into the image and navigational indicators will appear on the screen 3 Press to change the magnification between 4x 8x...

Page 9: ...o confirm your selection and return to the previous Playback screen 4 7 Setup Menu 1 Press to enter Setup menu 2 Press or to exit Setup menu Follow the below three steps to enter setup screen for each...

Page 10: ...on microSD card will be erased during formatting No Yes Reset WiFi Rest the Wi Fi Settings No Yes Device Info Device Information FW Version Wi Fi Name HTTP Address 4 8 How to Calibrate the Scanner No...

Page 11: ...n the LCD screen when calibration is completed 5 Maintenance Cleaning Note For keeping best image quality the scanner needs to be cleaned before or after use Cleaning card included Please make sure a...

Page 12: ...Wi Fi Function 7 1 Enabling the Wi Fi Function View and transfer files from the scanner to your computer laptop smart device or tablets via Wi Fi 1 Turn on the scanner then press and hold the button...

Page 13: ...192 168 1 2 or wifi scan in the address bar to enter the navigation page In the navigation page all the scanned images will be shown on the browser in thumbnails You can view and delete files stored...

Page 14: ...to delete the files 2 Delete all files In the Selected File s window click Select all icon All the files on current page will be checked Note When the Select all option as been clicked it will change...

Page 15: ...file format view file details and rename the files You can save the scanned files to your smart device add or delete tags on files combine more than one file into one multi page PDF file log into you...

Page 16: ...ion Mono Medium resolution Color Low resolution Mono Low resolution 200 Scans Min 210 Scans Min 600 Scans Min 620 Scans Min 1600 Scans Min 1650 Scans Min Scanner photo size A4 A5 5R 4R 3R and smaller...

Page 17: ...your device under removable disk Connection failure 1 Make sure all cable connections are secured 2 Restart the computer if necessary Blurry images 1 The lens of scanner is dirty 2 Contact Image Sens...

Page 18: ...ndows Vista Windows 7 Windows 8 are registered trademarks of Microsoft Corporation Mac OS 10 5 and iOS is a registered trademark of Apple Inc App Store SM is a service mark of Apple Inc Google Play an...

Reviews: