background image

– 11 –

Battery Installation

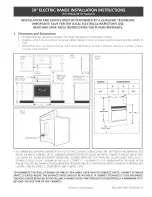
If you are installing a new battery range to an existing field appliance manufactured before January,
1998, the union on the existing field appliance must be checked against the union being used on the
new range. The union manufacturer's name around the face surface of the union nut must match. If
the new range has been shipped using a Ward union and the old appliance has something different,
i.e., Stockham, it must be replaced with a Ward union (Fig. 3). Failure to replace this union could result
in a gas leak.

If a Ward union is needed for installation, it must be ordered through the Vulcan-Hart Company Parts
Depot (Part No. FP-088-89).

Fig. 3

Questions or concerns regarding the above installation procedures may be addressed by calling the
Vulcan-Hart Service Department (502) 778-2791.

Proceed with the battery installation as follows:

1.

Move next range into position and level as explained in LEVELING. Engage union nut on

manifold pipe with male fitting on next range and draw up union nut hand-tight. Be sure ranges
butt both front and rear. If manifolds do not line up, then ranges are not level. Do not adjust
manifold brackets to make manifolds line up, except in extreme cases, because this will cause
gas valves not to line up perfectly with manifold cover holes. Bolt top frames together, using
10-24 x 

1

/

2

" bolts (packed in cloth bag in range oven).

2.

Continue leveling, connecting manifold pipe and bolting top frames of ranges together until all

ranges in the battery are connected, then tighten manifold unions gas-tight. Use wrench to keep
section of union assembled to pipe from rotating. Failure to do this may result in misalignment
of valve stems.

3.

Unpack high shelves or backguards and remove backsplashes.

4.

Place high shelf or backguard in position (see ASSEMBLY- RISER, BACKGUARD AND HIGH

SHELF in this manual).

Summary of Contents for GH3/72

Page 1: ...75 GH60T72 ML 52188 GHM30 ML 52151 GHM45 ML 52152 GHM3 72 ML 126408 GHM6 ML 126404 GHM60 ML 52154 GHM60T ML 52172 GHM72 ML 52155 GHM7245 ML 52179 GHM4572 ML 52181 GHM6045 ML 52177 GHM6T45 ML 52187 GHM...

Page 2: ...N THE EVENT A GAS ODOR IS DETECTED SHUT DOWN UNITS AT MAIN SHUTOFF VALVE AND CONTACT THE LOCAL GAS COMPANY OR GAS SUPPLIER FOR SERVICE FOR YOUR SAFETY DO NOT STORE OR USE GASOLINE OR OTHER FLAMMABLE V...

Page 3: ...SYSTEM 19 FLUE CONNECTIONS 19 ELECTRICAL CONNECTIONS 20 LIGHTING AND SHUTTING DOWN PILOTS 20 ADJUSTMENTS 22 OPERATION 23 BEFORE FIRST USE 23 CONTROLS 24 INSERTING AND REMOVING STANDARD AND CONVECTION...

Page 4: ...ONFIGURATIONS OF MODEL GH SERIES HEAVY DUTY RANGES WITH STANDARD AND CONVECTION OVENS PL 53255 GH45 GH72 GH60 GH60T GH3 72 GH6 GH45 72 GH72 45 GH60 72 GH60T72 GH60 45 GH60T 45 GH45 FULL BODY 34 WIDE G...

Page 5: ...5 CONFIGURATIONS OF MODEL GH SERIES HEAVY DUTY MODULAR RANGES PL 53256 GHM45 GHM72 GHM60 GHM60T GHM3 72 GHM6 GHM45 72 GHM72 45 GHM60 72 GHM60T 72 GHM60 45 GHM60T 45 GHM30 GHM45...

Page 6: ...EXPANDO RANGES MODEL GHX SERIES EXPANDO RANGES WITH CABINET PL 51242 GHX45 GHXM60 GHXM60T GHX45 18 WIDE FULL BODY WITH CABINET GHX72 GHX60 GHX60T MODEL GHXM SERIES MODULAR EXPANDO RANGES GHXM72 GHXM45...

Page 7: ...7 CONFIGURATIONS OF GH SERIES HEAVY DUTY OVENS PL 51243 GHMO1 ON MODULAR STAND GHO1 SINGLE OVEN GHO1C SINGLE CONVECTION OVEN GHO2 DOUBLE STACKED OVEN WORK TOP VIEW...

Page 8: ...y Carefully unpack range s and place in the approximate installation position whether as a battery or single stand alone range Remove all shipping wire and wood blocking Remove parts packed in a cardb...

Page 9: ...amber s must be provided Make sure there is an adequate supply of air in the room to allow for combustion of the gas at the burners INSTALLATION CODES AND STANDARDS Your Vulcan range s must be install...

Page 10: ...e connector and or any quick disconnect device or its associated piping to limit movement of the range s Attach the strain relief to the rear of the range Fig 1 Fig 1 Should it be necessary to disconn...

Page 11: ...h the battery installation as follows 1 Move next range into position and level as explained in LEVELING Engage union nut on manifold pipe with male fitting on next range and draw up union nut hand ti...

Page 12: ...with a backguard as the brackets will be used for support when remounting the rear top plate and backguard backsplash 1 Carefully unpack riser backguard or high shelf with back down on floor in front...

Page 13: ...13 Fig 5 3 Carefully lift riser backguard or high shelf over range Fig 6 4 Carefully guide support channels into the two openings provided at the rear of the range Fig 7 Fig 6 Fig 7...

Page 14: ...setting in place on the range install the left and right end caps End caps simply slide on in between the splasher and the backguard There is a tab on the cap that can be pulled out or pushed in with...

Page 15: ...in Step 2 are no longer required and may be discarded 6 Replace riser backguard or high shelf backsplash panel Mounting is now complete Thermostatically Controlled Griddle Installation Set metal brick...

Page 16: ...s 2 Place one on each side with smooth surface down and oval holes to outside Fig 14 Fig 14 3 Triangle shaped Bricks 4 Place two each side Fig 15 PL 40049 Fig 15 4 Large Bricks 2 Set in center support...

Page 17: ...he range top being careful not to crush the thermo bulb Wedge a 2x4 under the front part of the griddle to hold the plate up This is necessary in order to install the thermostat bulb to the holding br...

Page 18: ...ng bolt until floor contact is made Fig 18 Fig 18 The casters provided for the ranges are the non leveling type therefore the floor must be reasonably level or baked products will be uneven and perfor...

Page 19: ...h it is a part must be connected to an A G A design certified gas appliance pressure regulator available from Vulcan Hart The pressure regulator must have a maximum regulation capacity to handle the t...

Page 20: ...PE CONTACT AN ELECTRICIAN DO NOT REMOVE THE GROUNDING PRONG FROM THIS PLUG If your range is not equipped with a grounding plug and electric supply is needed ground the range by using the ground lug pr...

Page 21: ...tat to desired temperature Fig 19 Nightly Shutdown Turn oven burner valve OFF Complete Shutdown Turn oven burner valve OFF Turn main gas supply OFF Convection Oven Pilot Before lighting oven be sure t...

Page 22: ...DJUSTMENTS All adjustment procedures associated with pilot lighting should be performed by an authorized Vulcan Hart installation or service person The bypass minimum burner flame adjustment must be m...

Page 23: ...CAUTION Do not overheat the griddle plate by setting thermostats well above recommended temperatures Overheating the plate may cause plate warpage and will carbonize any grease on the plate and cause...

Page 24: ...needed to cook a product The thermostat dial s temperature range is from 150 F to 500 F 65 C to 260 C Turn dial counterclockwise to increase temperature and clockwise to decrease temperature ON OFF SW...

Page 25: ...e by raising the rear of the oven rack support hooks above the runner and pulling the racks forward Fig 23 Fig 23 USING THE RANGE Open Burners Since both burners are lit from constantly burning pilots...

Page 26: ...p ranges are quickly lighted and require no preheating time Light only as many burners as needed Griddle Top and Even Heat Top Ranges Heat top thoroughly before using The top can be kept hot with burn...

Page 27: ...placed on 18 x 26 x 1 457 mm x 660 mm x 25 4 mm pans for baking CLEANING WARNING CONVECTION OVEN MODELS ONLY DISCONNECT ELECTRICAL POWER SUPPLY BEFORE CLEANING Suggestions for Care and Cleaning Vulcan...

Page 28: ...t of all carbonized grease tends to cling to the griddled foods giving them a highly unsatisfactory and unappetizing appearance To keep the griddle clean and operating at peak efficiency follow these...

Page 29: ...nless steel equipment clean sparkling and bright General Cleaning Use ordinary soap or detergent and water for routine cleaning of stainless steel To prevent water spots and streaks rinse equipment th...

Page 30: ...also be used Precautions When scraping off heavy deposits of grease or oil from stainless steel equipment never use ordinary steel scrapers and knives Particles of ordinary steel may become embedded i...

Page 31: ...side to side Oven burner bottom or baffles improperly installed Pulling to Edge of Pan Warped pans Oven not level Uneven Bake Front to Rear Overactive flue Range not level front to back Door not clos...

Page 32: ...ve Valve Handle Temperatures Poor door fit Sticking Top Burner Valves Oven door left open Poor Ignition Insufficient gas input Poor air to gas adjustment Restriction in pilot orifice Restriction in ma...

Reviews: