background image


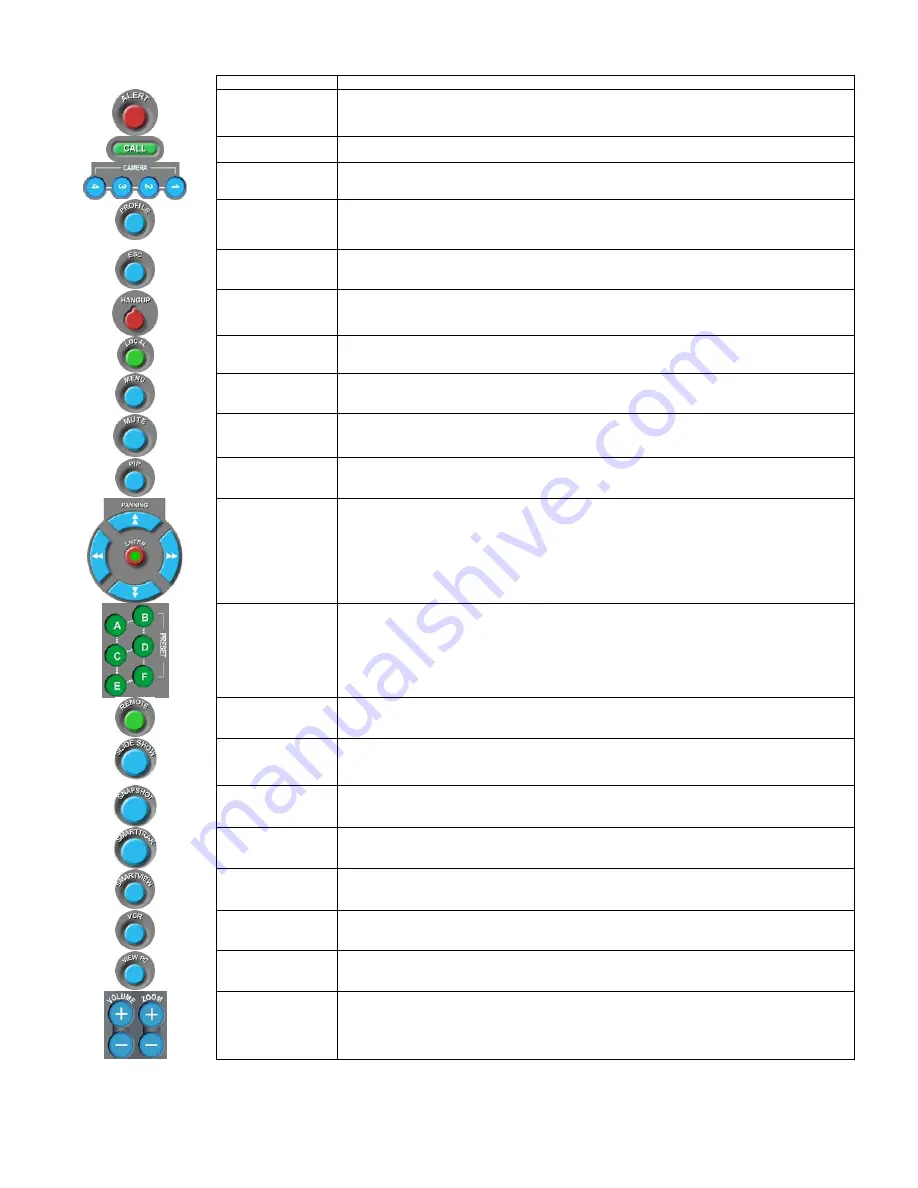
Button Action/Result 


Alert 

Not currently used 


Call 

Press to access the VCS Call/Hangup screen. 


Cameras 1-4 

Press these buttons to select a camera source. 


Profile 

Pressing the Profile button during a conference (on a 2-monitor system) will switch far site video 
to Monitor-1, especially useful where Monitor-1 is projected to a screen.  Selecting any local 
video source returns video routing to normal. 


Escape 

Press to cancel/exit any action, screen or menu. 


Hangup 

Press and hold to disconnect conference calls. 


Local 

Press to select the local view (Here) and local camera control. 


Menu 

Press to bring up the on-screen “Exit VCS” pop-up menu. 


Mute 

Press to mute or un-mute local microphone. 


PIP 

Picture in Picture (PIP) control – Press to turn PIP on, press again to select PIP window position, 
press and hold to turn PIP off. 


Panning 


Enter 

Press these buttons to pan and tilt your cameras. 


Press when a response is required just as you would with any Enter key. 


Presets A-F 

Press these buttons to set or select a camera preset. 

• 

Press briefly to send the camera to a preset 

• 

Press and hold to store a preset. 


Remote 

Press this button to select to the remote site (There) and remote camera control. 


Slide Show 

Press to launch to the VCS Slide Share application. 


Snapshot 

Take a snapshot of Local or Remote video.  Press the Local or Remote button first to determine 
which video will be captured. 


SmartTrak 

(reassigned)


Use to select Camera 5 on Vista VX-P 


SmartView 

Rapidly switches to the designated document camera (defined in System Configuration), takes a 
snapshot of that image, then returns to original camera source. 


VCR 

Press to use the VCR in standard or dual mode. 


View PC 

Press to go directly to your PC desktop.  Use Alt+Tab to switch between running applications or 
to return to the videoconference. 


Volume 


Zoom 

Press to increase or decrease audio. 


Press the plus or minus buttons to increase or decrease depth. 


Summary of Contents for Vista EZ

Page 1: ......

Page 2: ...d to each terminal equipment provides an indication of the maximum number of terminals allowed to be connected to a telephone interface The termination on an interface may consist of any combination of devices subject only to the requirement that the sum of the Ringer Equivalence Numbers of all the devices should not exceed five Austel Notice For Use in Australia Only an Austel permitted terminal ...

Page 3: ...SORS BE LIABLE FOR DAMAGES WHATSOEVER INCLUDING WITHOUT LIMITATION SPECIAL INCIDENTAL CONSEQUENTIAL OR INDIRECT DAMAGES FOR LOSS OF BUSINESS PROFITS BUSINESS INTERRUPTION LOSS OF BUSINESS INFORMATION OR ANY OTHER PECUNIARY LOSS ARISING OUT OF THE USE OF THE SOFTWARE EVEN IF VTEL HAS BEEN ADVISED OF THE POSSIBILITY OF SUCH DAMAGES U S GOVERNMENT RESTRICTED RIGHTS The Licensed Software is provided w...

Page 4: ...ing the wireless keyboard and the QuickTouch RCU We also discuss local Here and remote There camera views and single or dual monitor systems Chapter 3 VCS Menu Toolbars VCS menus and how to use the control devices for quick access Chapter 4 Call Hangup Menu The first section instructs how to make and answer calls discusses menu options and features such as the Speed Dial list and shows how to use ...

Page 5: ...encing also exists on the Support website at www vtel com support Training Personnel safety is a major concern when operating any equipment Therefore VTEL offers training classes in Vista maintenance operations and installation Call VTEL s Training Department USA 1 800 299 VTEL for schedule information VTEL s Website This site gives access to information about VTEL s products and services It s abo...

Page 6: ...estart instead select Restart and click OK Exiting VCS Remember to always hang up if you are in a conference call From the Keyboard Mouse Right click anywhere on the screen and select Exit Immediately From the QuickTouch RCU Press the Menu button to display the VCS pop up menu Using the mouse control pad select Exit Immediately Adjusting the Camera The Vista system makes it easy to control and adj...

Page 7: ... find the magnifying glass icon then press the left click button Basic Operations QuickTouch RCU Rather than switching between devices to control your conferences VTEL s QuickTouch RCU is a dual function device that gives the user a unique setting in which to videoconference We made it easy for the user to switch between modes from hand held to desktop When in the open position a fully functional ...

Page 8: ...Special Note The left and right mouse buttons reverse when using the keyboard in the open position Learn more about using the QuickTouch RCU in the following table next page ...

Page 9: ...to pan and tilt your cameras Press when a response is required just as you would with any Enter key Presets A F Press these buttons to set or select a camera preset Press briefly to send the camera to a preset Press and hold to store a preset Remote Press this button to select to the remote site There and remote camera control Slide Show Press to launch to the VCS Slide Share application Snapshot ...

Page 10: ... two monitor options Each has its advantages Follow the instructions given below Single Monitor System During setup configure your system for a single monitor system Important This setting requires a manual restart of the Vista system software for the changes to take effect Until the restart has been performed far site video will not be visible in a call Dual Monitor System The local monitor displ...

Page 11: ...e are selectable in the System Configuration utility See Chapter 7 Modern Animated Toolbar To activate the animated toolbar simply move the mouse pointer to the top of the screen This will lower the toolbar onto the top of the screen and raise the status bar onto the bottom of the screen Select a new local video source Select a new remote video source Store and recall camera presets Switch between...

Page 12: ...Picture in picture PIP controls Place or disconnect a call Select a new VCR record source Slideshare and snapshots Change system settings ...

Page 13: ...oolbars The illustrations below elaborate on the functions of each toolbar icon Primary Local Cameras Remote Cameras Call Hangup Audio Mute Video Mute PIP On Off Slides Tools Video Sources Send Camera 1 Send VCR Send PC Remote camera selection Tools Record Local Record Remote Here Local There Remote Auto Answer PIP Size Move PIP Swap PIP System Config Snapshot ...

Page 14: ...Presets Darker blue letters B indicate a stored preset Six possible remote camera presets Click briefly to send the camera to a preset or click and hold to save a new preset Speaker Volume Control The volume control in the Classic interface is located in the Status bar at the bottom of the screen If the status bar is not visible move the mouse pointer to the bottom of the screen ...

Page 15: ...calls Use the Address Book tab to quickly locate site names and numbers Use the Hand Dialer to manually call a site not currently in the Address Book Use Add and Edit functions to save or change site information Address Book The Address Book tab allows you to add and edit entries as well as drag desired entries onto the Speed Dial buttons at the bottom Hand Dialer The Hand Dialer tab allows you to...

Page 16: ...n will mute local microphone s and camera 2 Press again to un mute 3 Press the Volume Plus or Minus buttons to increase or decrease volume Controlling Cameras VCS allows you to move zoom save presets and switch cameras at both the local and the remote sites The remote system must support far end control standards Using the Mouse To control the local camera move the mouse pointer over the local vid...

Page 17: ...r 5 To store a preset click and hold the left mouse button on a preset letter Wait for approximately two seconds and the letter will turn green This indicates that the camera location is set 6 To recall a camera location click briefly on a preset letter with the mouse Classic Modern Remote There Camera Presets The remote There site must support far end camera control 1 Establish a video call with ...

Page 18: ...rences You can file slides in trays rename slides and sort slides to customize your presentation Also you will learn how to manage trays and import PowerPoint presentations SlideShow Overview Button Overview Move selected thumbnail up or down within the list Remove selected thumbnail s slide from the list Previous Next Send Open Opening Slides Click the Open button to retrieve slides ...

Page 19: ...splay it in the main window Right click Options Right click an image to manipulate whether it gets sent as an Annex D slide to the far site rearranged in the list of slides or displayed in Presentation Mode full screen Also you may open the Incoming Tray to display thumbnails of any slides received Checking the Auto Share option automatically sends a slide to the far site when you double click a t...

Page 20: ...end PowerPoint slide shows Remote videoconference sites can view the PowerPoint slide shows you send without having the application present on their system To import a PowerPoint presentation Click the Open button Browse to the folder with the desired PowerPoint presentation and select that file The presentation will be automatically converted into a slide presentation Present these slides to the ...

Page 21: ...tem Status section indicates the current operating state of the various VCS components Engine Version displays the currently installed version of VCS software Regardless of whether the system has a DDM Quad BRI or PRI card installed this page indicates the current state of the physical and logical interface to the ISDN network This screen sample is what would appear with a DDM card installed Scree...

Page 22: ...ormation specific to H 320 ISDN connections Information on this page pertains only to H 323 IP connections Stream Information section displays the rate in Kbps of transmit and receive audio and video as well as the H 323 Stack status for that stream Names IP Addresses section displays the IP address for the far site system in a connection and the local system as well as Gatekeeper information Gate...

Page 23: ...transmit and receive video algorithm and video format QCIF FCIF etc Codec Xmit Recv Status section displays additional low level subsystem video statistics FEC Errs section displays Forward Error Correction statistics during H 320 connections only Vid Queue Overflows displays the number of inbound video queue overflows Recv Video State displays the alignment of receive video during H 320 connectio...

Page 24: ...ameras SmartView Button Capture section allows selection of the camera to be used by the SmartView function Monitor Settings section allows the selection of single or dual monitor mode Serial Number section provides a place to type in the system serial number Video Settings section allows setting the upper limit for H 263 video utilization Enable Webserver Check this box if Soft Tablet is to be us...

Page 25: ...of the Network Switch type Line Coding Line Framing and Line Buildout information provided by the network provider Dialing Prefix box allows the user to insert an additional prefix This prefix will be appended to every number dialed This prefix may be required to traverse a PBX or to specify a carrier Phone Numbers section allows insertion of the 7 digit Directory Number assigned for each of the 2...

Page 26: ...eckbox should be checked Note When used on a public network neither checkbox should be checked Gatekeepers and Aliases E 164 Addresses section provides a place to add multiple E 164 identities for the local machine The default E 164 address its IP address without dots is automatically displayed Host Addresses section displays the local machine name as seen by Windows as its Domain Name and display...

Page 27: ...to the address book each time a connection is established For privacy security purposes the user also has the option of showing or not showing incoming caller ID as well as whether or not to display local information Answer Mode section allows the user to decide whether to have the system AutoAnswer incoming calls Web Server Add or remove users determine their privileges by assigning them to a spe...

Page 28: ...videoconferencing system open an Internet browser and type in the address http system alias or IP address tablet e g http 10 15 253 238 tablet OR http learning_center tablet A login screen will appear Type admin all lower case for the User Name Type vtel all lower case for the password Click OK Most of the functions available on the digital graphics tablet are now available to any networked PC e g...

Page 29: ...This is the screen that appears when the Slide Management icon is invoked from the Soft Tablet interface ...

Page 30: ...se failures will occur From the Windows desktop click Start All Programs VTEL Diagnostics Click the Run bar to initiate system diagnostics User intervention is required only to verify that audio microphone s and video routing are all working properly All Pass Fail results are displayed upon completion and individual test results can be reviewed by scrolling up or down ...

Reviews: