background image

Initial Setup

IPanel 4200/4700/5500

Please verify the following items are included with your shipment; camera with 
mounting bracket, camera power supply, wireless keyboard, PC power supply, 
DVD player power supply, panel IR remote, and software (including Windows XP 
Pro). 

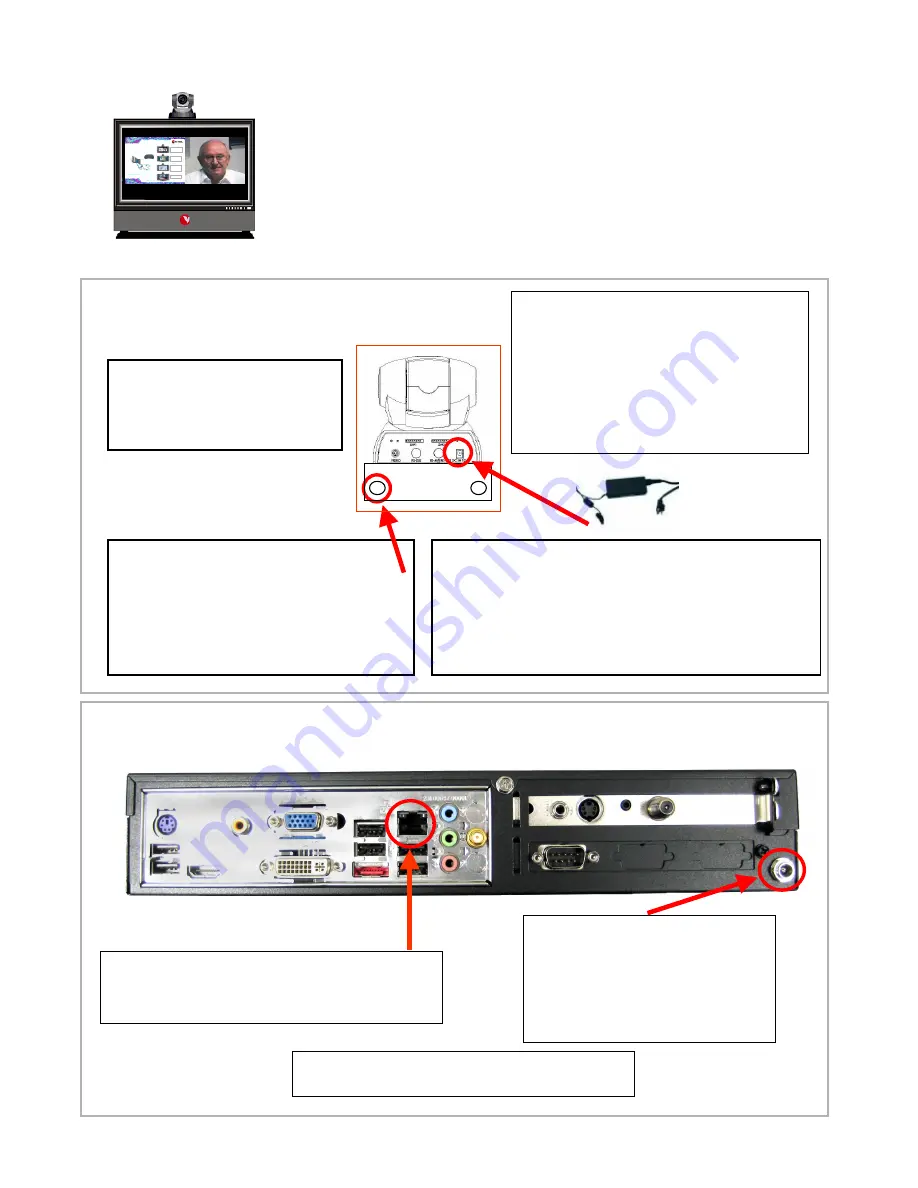
A.

Remove camera and 

camera mounting plate from the 
camera box (located in the 
accessories box).

C.

Use two screws to mount camera 

bracket and camera to the mounting plate 
holding the PC.  Be careful not to over 
tighten the screws.

Align the camera bracket with the front 

of the monitor and stick it down with the 
double sided tape.

B.

Using a Philips screwdriver remove 

the large silver screw from the bottom of 
the camera and use it to mount the 
camera mounting plate to the camera. Be 
careful not to over tighten the screw. 
Note: The L-shaped part of the mounting 
plate (containing two small holes) should 
face toward the back of the camera.

B.

Connect the power supply 

adapter-- a  transformer (“brick”) 
receptacle located on the bottom 
left side of the computer.  The 
power supply adapter is found in 
the accessory box.

A.

Connect an RJ45 cable from your Internet or 

LAN (local area network) connection to the 
bottom of the computer in either RJ45 port.  

1. 

Camera mounting

2. Power and network

C.

Check all cables to ensure none came loose 

during shipping.  

IPanel Systems

“Easy to Drive”
One click operation

AC

Optional
Cable

Internet/LAN

All-In-One Professional Solution

VTEL IPanel 3200/4200

26/32”

Mult imed ia 

Presentations

Internet 

PC Application s

Videoco nferencing

with

Data  Sh aring

HDTV

+

+

D.

Connect the two cables (top of the LCD monitor) to 

the camera --Yellow to composite, black to RS-232.
Make sure the camera power supply is connected to 
camera and AC outlet.   

All camera cables must be connected before 
powering on the computer

.

Summary of Contents for IPanel 4200

Page 1: ...VTEL IPanel VCS 7 0 User Guide IPanel 4200 IPanel 4700 IPanel 5500 ...

Page 2: ...Note The L shaped part of the mounting plate containing two small holes should face toward the back of the camera B Connect the power supply adapter a transformer brick receptacle located on the bottom left side of the computer The power supply adapter is found in the accessory box A Connect an RJ45 cable from your Internet or LAN local area network connection to the bottom of the computer in eith...

Page 3: ...mputer going through familiar screens C This computer screen should be on the left side of the monitor If it isn t go now to 3A Arranging Proper Displays Your monitor needs to be configured for NORMAL Videoconferencing mode 3 Starting up the system D Double click on the red V ball Start VTEL VCS shortcut in the upper left corner This launches the videoconferencing software E After a brief loading ...

Page 4: ...e mode that it was when it was turned off So if someone was watching TV and then turned off the system the panel will return start up in TV mode The following steps will get you to the NORMAL videoconferencing mode regardless of the configuration of the panel during startup Steps A Toggle the button until you see two equal side by side displays The goal is to get HDMI on the left and RGB on the ri...

Page 5: ...et 2 IP Address Enter the IP address you are calling 3 Click Dial Hand Dialer for ad hoc connections Use this 3 step process when you just want to connect to another site not in the address book Call yourself in loop back by dialing your own IP address to test that your system is working OK Address Book for routine connections From list Use your cursor to highlight in blue the site and then left d...

Page 6: ...ms Easy to Drive One click operation AC Optional Cable Internet LAN All In One Professional Solution VTEL IPanel 3200 4200 26 32 Multimedia Presentations Internet PC Applications Videoconferencing with Data Sharing HDTV Zoom In Zoom Out Remote Camera pan left right up down Cursor is small and white when moved into left PC zone Cursor is big and blue when moved into right VC zone 4C Camera controls...

Page 7: ...ing it will not know about it and your calls won t work To remedy this problem just Exit VCS by selecting Exit VTEL Now and then launch VCS 6 0 again Show Local Video Hide Local Video Dock Undock PIP Your local picture undocked size move Shows your video in PIP window Removes local video PIP Undock makes local video into PC style window You can resize and move anywhere Dock removes top blue bar an...

Page 8: ... PC side Maximize the size of the slides locally Right click on the video right side and bring up the videoconferencing menu Select Send PC an ICON appears on your video side In about 10 15 seconds the far site conferencing unit will also see your PowerPoint slide exactly the same as you see it same size and quality Click on your PowerPoint slide and it will automatically like normal advance to th...

Page 9: ... C O p tio na l C ab le I n te rn e t L A N A ll I n O n e P ro f es s io n a l S o lu tio n V T E L I P a ne l 3 20 0 4 2 0 0 2 6 3 2 M u l tim e di a P r es e nta tio n s Inte r n et P C A p p lica tio n s V id e o co n fer e n cin g w ith D a ta S h a rin g H D T V IPanel Systems Ea sy to Drive One click o peratio n AC Optional Ca ble I nternet LAN All In One Professional Solution VTEL IPanel 3...

Page 10: ...On e P ro fession al S olutio n VTEL IPan el 3 20 0 4 200 26 32 M ulti media P res entat ions Int ernet P C A ppl icat ions Vi deoc onferenc ing w it h D at a S haring HD T V Left screen can go full screen Press LEFT INPUT until Cable appears Press VIEW until TV is full screen IP a n e l S ys te m s E a s y to D riv e O ne c lic k o pe rat io n A C O p tio n a l C a b le I n te rn e t L A N A ll I...

Page 11: ... IPanel YES NO NO YES YES NO B A B C 6 IPanel Network Setup for Public Internet The IPanel is designed to videoconference over the public Internet The initial setup may involve your local IT computer network support person to configure your IP network parameters especially your network firewall and some internal IPanel settings This will only have to be done once at initial system installation The...

Page 12: ...ive pieces of information you gathered earlier into the appropriate boxes Once you ve entered this information press OK to close the dialog Verify network connectivity by selecting Internet Explorer on the IPanel and connecting to a public web site it is the same process as any other computer Note there are 2 Ethernet adapters on the back of the IPanel You can use either one but if you are setting...

Page 13: ...GB PC audio 7 Attach LAN connector to PC 8 The keyboard and the dongle receiver are synchronized at the factory If you need to resynchronize the keyboard just push the connect button on the back of the keyboard The keyboard receiver dongle plugged into PC will blink This means th connection between the keyboard and the dongle receiver is successful 9 Attach CD DVD player to PC using the two USB co...

Page 14: ...r to front lower left side of HDTV panel using the VELCRO strips Note the VELCRO strip is already on HDTV lower left front 14 Connect the wired microphone s to pink input if not using wireless microphones 8 11 Camera power 10 Camera control cable 9 S Video cable 12 Wireless microphone charger receiver shown charging microphone Connect into blue PC input 13 IR Transmitter This controls HDTV Mode sw...

Reviews: