Go to
businessphones.vtech.com
to register your product for enhanced warranty support and the latest VTech product news.
User’s manual
VNT814
4-Port Ethernet Router
Page 1: ...Go to businessphones vtech com to register your product for enhanced warranty support and the latest VTech product news User s manual VNT814 4 Port Ethernet Router ...
Page 2: ...ns For customer service or product information visit our website at businessphones vtech com or call 1 888 370 2006 Model number VNT814 Type 4 Port Ethernet Router Serial number Purchase date Place of purchase Both the model and serial numbers of your VTech product can be found on the bottom of the router Save your sales receipt and original packaging in case it is necessary to return your router ...
Page 3: ...ituation Do not allow anything to rest on the power cords Do not install this product where the cords may be walked on or crimped This product should be operated only from the type of power source indicated on the marking label If you are not sure of the type of power supply in your home consult your dealer or local power company Do not overload wall outlets or use an extension cord This product s...
Page 4: ...ields EMF This VTech product complies with all standards regarding electromagnetic fields EMF If handled properly and according to the instructions in this user s manual the product is safe to be used based on scientific evidence available today ii ...
Page 5: ...ecklist Your router package contains the following items Save your sales receipt and original packaging in the event warranty service is necessary iii Router Power adapter Ethernet cable Abridged user s manual ...
Page 6: ... Device info 13 Statistics 14 Setup 15 WAN 15 LAN 16 Advanced 19 Route 19 NAT 21 QoS 28 Port mapping 30 Others 31 Service 33 IGMP 33 UPnP 34 DNS 34 DDNS 35 FTP server 36 Firewall 37 MAC filter 37 IP Port filter 38 URL filter 39 ACL 40 DoS 41 Maintenance 42 Update 42 Password 46 Reboot 48 Time 49 Log 50 Diagnostics 50 Appendix Frequently asked questions 53 FCC part 15 54 For cETL compliance only 55...
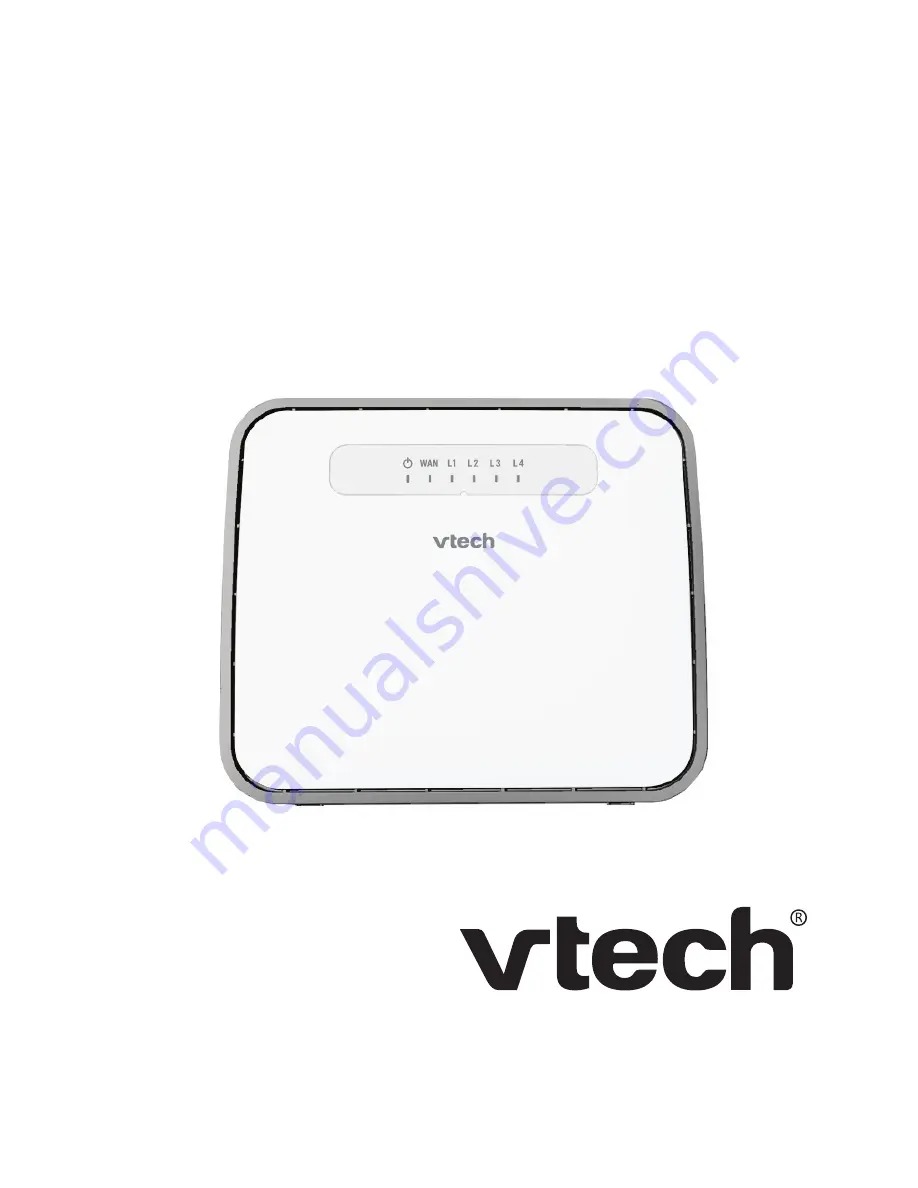
Page 7: ...ght On when the router is powered on 2 WAN light On when the WAN port is connected Flashes when the router receives data from the WAN port 3 L1 L2 L3 L4 lights On when the corresponding LAN port is connected Flashes when the corresponding LAN port receives data ...
Page 8: ...r on the router Press once again to power it off 6 LAN ports Connect to Ethernet devices such as computers and SIP phones 7 WAN port Connects to the wide area network 8 RESET button Press and hold for five seconds to reset the router to default settings Getting started Router overview ...
Page 9: ...f router s you need NOTES Use only the adapter provided Make sure the electrical outlet is not controlled by a wall switch The adapter is intended to be correctly oriented in a vertical or floor mount position The prongs are not designed to hold the plug in place if it is plugged into a ceiling under the table or cabinet outlet To power on press button at the back of the router The light will ligh...
Page 10: ...er on any router or device Follow this sequence to power on the system 1 Parent router 2 Child routers 3 other Ethernet devices Child routers enter Auto Bridge Mode All Ethernet devices obtain IP addresses from the parent router directly Getting started Plan and connect your system Parent router Child routers in Auto Bridge Mode VNT814 Router VNT814 Router VNT814 Router VNT814 Router VNT814 Router...
Page 11: ... the router Before that connect your computer to the LAN port of the router and then set the computer to obtain IP address automatically according to the steps below For Windows XP 2000 Click Start then open the Control Panel 2 Double click Network Connections 1 Getting started Configure your computer network ...
Page 12: ... Getting started Configure your computer network 3 Right click Local Area Connection then select Properties 4 Select Internet Protocal TCP IP then click Properties ...
Page 13: ... Getting started Configure your computer network 5 Select Obtain IP address automatically and Obtain DNS server address automatically then click OK ...
Page 14: ... Getting started Configure your computer network For Windows Vista 7 8 Click Start then open the Control Panel 2 Click Network and Internet then Network and Sharing Center 1 ...
Page 15: ... 3 Click Change adapter settings 4 Right click Local Area Connection then select Properties Getting started Configure your computer network ...
Page 16: ...ct Internet Protocal Version 4 TCP IPv4 then click Properties 6 Select Obtain an IP address automatically and Obtain DNS server address automatically then click OK Getting started Configure your computer network ...
Page 17: ...ser on your computer Type http 192 168 1 1 in the address bar then press Enter The following login page displays 3 Enter the default user name and password as shown below The user name and password are case sensitive User name Password Administrative account admin admin12345 Normal user account user user1234 4 Click Login to enter the web management page of the router NOTE Both administrative acco...
Page 18: ... Click the Wizard menu to start the fast configuration 2 Select or input the information on the page as appropriate to configure the WAN settings Click Next to proceed 3 Preview the settings and click Apply Changes to save the settings Otherwise click Prev to return to the previous page or click Cancel to cancel the fast configuration 1 ...
Page 19: ...nu and you can see the next sub menus Device info and Statistics Device info Router status Click the Status menu The Router Status page under the Device info sub menu in the left pane is opened automatically displaying the basic information of the router including system LAN configuration DNS status and Ethernet WAN interfaces ...
Page 20: ...14 Statistics Click the Statistics sub menu The page displays the packet statistics for transmission and reception regarding network interface Configure your router Status ...
Page 21: ...change to DCHP Relay automatically See DCHP mode on page 17 for more details Channel mode It can be Bridge IPoE or PPPoE Enable NAPT Enable or disable the NATP function Enable IGMP Enable or disable the IGMP function User Name User name of the PPP connection Password Password of the PPP connection Type PPP settings Continuous Manual or Connect On Demand Idle Time min The idle time of the PPP conne...
Page 22: ...92 168 1 1 Subnet Mask The subnet mask of the router s LAN interface The default value is 255 255 255 0 Secondary IP If you enable the Secondary IP you should configure another IP address and subnet mask for the LAN interface IGMP Snooping You can enable or disable the IGMP Snooping function by selecting the radio button MAC Address Control Select the LAN interface on which you want to run MAC Add...
Page 23: ...N You can set the DHCP Server s IP address NOTES If you have more than four Ethernet devices and they are connected to the additional VNT814 router s you purchased there is no need to change the DHCP mode setting of the child router s Once a child VNT814 router is connected with a parent VNT814 router the child router enters Auto Bridge Mode and all Ethernet devices obtain IP addresses from the pa...
Page 24: ...he reserved IP address and MAC address that have been setup for the DHCP Server You can manually input IP and MAC address to make a static assignment Router searches the relevant entry in this table to assign IP address according to the client s MAC address If the router cannot find a corresponding static entry it will choose an unallocated IP address from DHCP pool assign to the client ...
Page 25: ... gateway is an immediate neighbour of your Router that will forward the packet to the destination On the LAN the gateway must be a router on the same segment as your Router over Internet WAN the gateway must be the IP address of one of the remote nodes Metric Metric represents the cost of transmission for routing purposes IP Routing uses hop count as the measurement of cost with a minimum of 1 for...
Page 26: ... as enabling or disabling the RIP function RIP Enable or disable the RIP function of the router Interface The interface on which you want to enable RIP Recv Version Indicates the RIP version in which information must be passed to the device it can be accepted into its routing table Send Version Indicates the RIP version this interface will use when it sends its route information to the other devic...
Page 27: ...twork Users of the public network outside the company can access the DMZ host It allows you to expose one network user to the internet for some special purpose services such as internet gaming or video conferencing DMZ hosting forwards all the ports at the same time to one computer You should assign a static IP address to the destination computer before you use this feature WAN Interface Select th...
Page 28: ... or IP address WAN Interface The interface on which the virtual server used on WAN side WAN Port The open port on WAN side It can be either a single port or a port range LAN Open Port Enter the specific start and end port number you want to forward If it is one port only you can enter the end port number the same as start port number For example if you want to set the FTP virtual server set the st...
Page 29: ...ter Advanced NAT ALG and pass through Click ALG in the left pane In this page you can configure the Application Layer Gateway ALG settings such as enabling or disabling the ALG or pass through function for each application ...
Page 30: ...r router Advanced NAT exclude IP Click NAT Exclude IP in the left pane In this page you can configure some source IP addresses which use the purge route mode when accessing the internet through the specified interface ...
Page 31: ...port trigger rules Nat Port Trigger Enable or disable the port trigger function on the device Application Type You can select the service from the Usual Application Name or define the name from User defined Application Name Start Match Port End Match port The start and end port to match Trigger Protocol The protocol to trigger the rule It can be TCP UDP or TCP UDP Start Relate Port End Relate Port...
Page 32: ...Advanced FTP ALG configuration Click FTP ALG Port in the left pane In this page you can configure the FTP server ALG and FTP client ALG ports If the FTP server listens on port 2100 you can add a FTP ALG port 2100 on the device ...
Page 33: ...any to Many or One to Many One to One One local IP will be mapped to one global IP Many to One The IP between Local Start IP and Local End IP will be mapped to a global IP Many to Many The IP between Local Start IP and Local End IP will be mapped to the IP between Global Start IP and Global End IP One to Many One local IP will be mapped to any of the IP between Global Start IP and Global End IP Lo...
Page 34: ...gn the precedence or add marker for different streams IP QoS Click the QoS sub menu in the left pane The IP QoS page is opened automatically where you can enable or disable the IP QoS and configure the rules if necessary IP QoS Enable or disable the IP QoS function on the device Schedule Mode The schedule mode of the IP QoS function It can be strict prior or WFQ 4 3 2 1 Strict Prior Traffic with d...
Page 35: ...29 Configure your router Advanced IP QoS traffic shaping Click Traffic Shaping in the left pane The tables in this page are used for traffic control You can add traffic shaping rules in the list ...
Page 36: ...mpty It is possible to assign any interface to any group but only one group Port mapping configuration Click the Port Mapping sub menu in the left pane The Port Mapping Configuration page is opened automatically where you can configure the mapping group To manipulate a mapping group Select a group from the table then you can see the available interface LAN and WAN and grouped interface list Select...
Page 37: ...MAC address to age out After the Ageing Time seconds of not having seen a frame coming from a certain address the bridge will delete that address from the Forwarding Table 802 1d Spanning Tree Enable or disable the spanning tree protocol Client limit configuration Click Client Limit in the left pane In this page you can enable or disable the client limit function and set the maximum number of devi...
Page 38: ...32 Configure your router Advanced Telnet configuration Click Telnet in the left pane In this page you can enable or disable the telnet function ...
Page 39: ... belong to multicast group The router supports IGMP proxy that handles IGMP message When enabled the router will act as a proxy for a LAN host making request to join and leave multicast groups and a multicast router sending multicast packets to multicast groups on WAN side IGMP proxy configuration Click the IGMP sub menu in the left pane The IGMP Proxy Configuration page is opened automatically wh...
Page 40: ...left pane The UPnP Configuration page is opened automatically where you can configure the UPnP UPnP Enable or disable the UPnP function WAN Interface Choose which interface runs the UPnP function DNS DNS configuration Click the DNS sub menu in the left pane The DNS Configuration page is opened automatically where you can configure the IP address of DNS server for DNS relay Attain DNS Automatically...
Page 41: ...tomatically where you can configure the DDNS settings DDNS provider There are two DDNS providers to be selected in order to register your device DynDNS org and TZO Hostname Domain name to be registered with the DDNS server Interface The WAN interface over which your device will be accessed Enable Enable or disable the registration account for the DDNS server Username User name assigned by the DDNS...
Page 42: ...er Service FTP server Click the FTP server sub menu in the left pane FTP server is used for the router s back end firmware upgrade purpose only By default the start checkbox is checked Do not change any setting in this page ...
Page 43: ... filtering rules the router will handle the connection with the default action you have set Direction The direction of the filter entry It can be Outgoing or Incoming Action The action of the filter entry It can be Deny or Allow If the action is Deny the connection matches the filter rule will be denied if the action is Allow the connection matches the filter rule will be allowed Source MAC The so...
Page 44: ...matches the rule will be denied Protocol The protocol of this entry It can be IP ICMP TCP or UDP Direction The direction of this entry It can be Upstream or Downstream Source IP Address Mask Address The source IP address and mask address of the entry Dest IP Address Mask Address The destination IP address and mask address of the entry SPort If the protocol is TCP or UDP you should set the source p...
Page 45: ...age you can enable or disable the URL filtering function and add or delete the filtered keywords URL Blocking Capability Enable or disable the URL filtering function If it is enabled the access to the site which matches the keyword will be blocked by the router if it is disabled nothing will be done Keyword The keyword of the site you want to block The URL Blocking Table shows the current URL filt...
Page 46: ...on of this ACL entry It can be LAN or WAN LAN ACL Switch You can enable or disable the ACL function on LAN side If it is disabled all hosts on LAN side can access the services which your router provide If it is enabled only the hosts on the ACL list can access the specify services IP Address The IP address of the host If the IP is 0 0 0 0 it means any IP Service Allowed LAN side The allowed servic...
Page 47: ...ers to prevent legitimate users of a service from using that service The router provides a protection of DoS attack DoS setting Click the DoS sub menu in the left pane The DoS setting page is opened automatically where you can enable or disable the DoS prevention configure the DoS parameters and specify the hack item ...
Page 48: ...eft pane The Upgrade Firmware page is opened automatically where you can upgrade the firmware to the new version Make sure the firmware or ROM file you want to use is on the local hard drive of your computer Click Browse to find the local hard drive and locate the firmware or ROM file to be used for upgrade To upgrade the router s firmware Download a more recent firmware upgrade file 2 Click the B...
Page 49: ... file is uploaded the system starts a 30 second countdown and then reboots You need to login to the web management page again NOTES After the firmware is upgraded we recommend you reset the router to default settings For the router s back end firmware upgrade purpose please make sure the FTP server option is enabled under the Service menu See FTP server on page 36 for details ...
Page 50: ... this page you can save the current configuration settings to a file or restore the settings from a configuration file To back up the router s current settings Click the Save button 2 Click Save to save the file as the appointed file 1 Configure your router Maintenance ...
Page 51: ...on 2 Choose the file which you have saved and click Open 3 Click Upload 4 A pop up window will appear asking for confirmation of restoring the settings Click OK to proceed 5 After the file is uploaded the system starts a countdown and then reboots You need to login to the web management page again 1 ...
Page 52: ...figuration page is opened automatically where you can add user account to access the web management page and modify the password of the specified user To create an account Type a user name in the User Name input box then fill in the password in the New Password and Confirm Password input boxes 2 Click Add to create the new user account 1 ...
Page 53: ...nt to change the password 2 Fill in the Old Password New Password and Confirm Password input boxes then click Modify to save it NOTE If you login to the web management page by administrative account you can change the password of all accounts The default user name is admin and the password is admin12345 1 ...
Page 54: ...48 Configure your router Maintenance Reboot Click the Reboot sub menu in the left pane In this page you can reboot your system or restore the router to default settings ...
Page 55: ...pane The System Time Configuration page is opened automatically where you can configure the system time Server Server2 The IP address or the host name of the NTP server Interval The interval time of NTP function Time Zone The time zone in which the device resides When you set the NTP configuration correctly press the button Get GMT Time to start the NTP function Then you can see the GMT time obtai...
Page 56: ...e you can configure the parameters of the system log and view the system log information Diagnostics The router provides several useful diagnostic tools Ping diagnostic Click the Diagnostics sub menu in the left pane The Ping Diagnostic page is opened automatically where you can use the ping command to send a message to the host you specified ...
Page 57: ... the left pane In this page you can specify an IP address or host to run trace route command Host An IP address or host name you want to run trace route command NumberofTriers The number of try Timeout The time for the trace route command timeout Datasize Data size of the trace route packet DSCP The value of DSCP MaxHopCount The maximum hop count Interface The interface to which the trace route is...
Page 58: ...your DSL connection of the physical layer and protocol layer for both LAN and WAN sides Click Diag Test in the left pane In this page you can select an interface to run the diagnostic test Click the Run Diagnostic Test button to start the test The test result will display after several minutes ...
Page 59: ...ight be defective Try installing a new one How do I restore my router to its factory default settings When the router is powered on press and hold the RESET button for five seconds and then wait for a few minutes for the router to restart What can I do if I forgot my password Restore the router to factory default settings Then use the default user name and password to login to the web management p...
Page 60: ...n the user is encouraged to try to correct the interference by one or more of the following measures Reorient or relocate the receiving antenna Increase the separation between the equipment and receiver Connect the equipment into an outlet on a circuit different from that to which the receiver is connected Consult the dealer or an experienced radio TV technician for help WARNING Changes or modific...
Page 61: ... remplacer les fiches car ceci peut présenter un danger potentiel Ne laissez aucun objet reposer ni appuyer sur le cordon d alimentation N installez pas cet appareil dans un endroit où l on risque d écraser le cordon d alimentation ou de le piétiner Ne faites fonctionner cet appareil qu avec le type d alimentation indiqué sur l étiquette Si vous ne connaissez pas le type d alimentation que vous po...
Page 62: ...forme à toutes les normes se rapportant aux champs électromagnétiques EMF standard Si vous le manipulez correctement en suivant les instructions de ce guide son utilisation sera sécuritaire pendant de nombreuses années selon les meilleures évidences scientifiques dont nous disposons aujourd hui ...
Page 63: ... the PRODUCT extends for TWO 2 YEARS from the date of purchase If VTech repairs or replaces a materially defective PRODUCT under the terms of this limited warranty this limited warranty also applies to repaired or replacement PRODUCT for a period of either a 90 days from the date the repaired or replacement PRODUCT is shipped to you or b the time remaining on the original two year limited warranty...
Page 64: ... and the date of purchase or receipt and Provide your name complete and correct mailing address and telephone number 7 Other limitations This warranty is the complete and exclusive agreement between you and VTech It supersedes all other written or oral communications related to this PRODUCT VTech provides no other warranties for this PRODUCT The warranty exclusively describes all of VTech s respon...
Page 65: ...59 Appendix Technical specifications Operating temperature 34 F 104 F 0 C 40 C Power requirements Input 100 240V AC 50 60Hz Output 12V DC 500mA Network Ethernet ports 10 100 Mbps RJ 45 Port ...
Page 66: ...guration 35 F Fast configuration 12 Firewall 37 41 Frequently asked questions 53 FTP ALG configuration 26 FTP server 36 G Getting started 1 10 I IGMP proxy configuration 33 Important safety information i ii IP Port filter 38 IP QoS 28 IP QoS traffic shaping 29 L LAN interface setup 16 Limited warranty 57 58 Login to the web management page 11 Log setting 50 M MAC filter 37 Maintenance 42 52 N NAT ...
Page 67: ...p 15 18 Statistics 14 Status 13 14 System time configuration 49 T Technical specifications 59 Telnet configuration 32 Time 49 Traceroute diagnostic 51 U Upgrade firmware 42 43 UPnP configuration 34 URL filter 39 User account configuration 46 V Virtual server 22 W WAN configuration 15 Warranty 57 58 Wizard 12 ...
Page 68: ...S VTech is a registered trademark of VTech Holdings Limited Specifications are subject to change without notice 2016 VTech Communications Inc All rights reserved 02 16 VNT814_WEBCIB_V2 0 Document order number 91 008806 020 100 Designed to fit you home And your life ...