background image

www.vtechphones.com

11

G

ett

in

g s

ta

rte

d

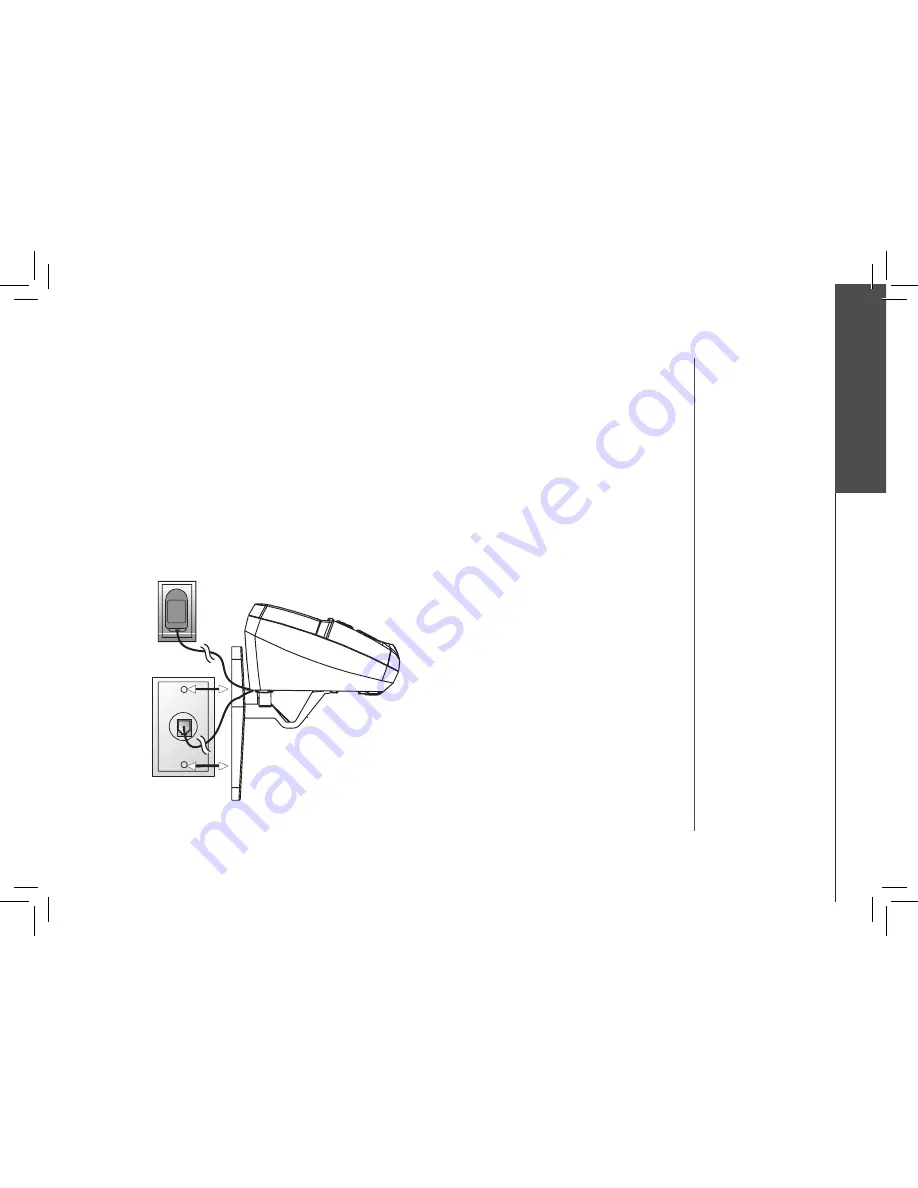
The wall mount brackets are designed for use on standard wall mount plates only. 
1.  Follow the instructions on page 8 to connect the power to telephone base and phone line.
.  Line up the tabs on the wall mount adapter with the holes at the bottom of the telephone base. 

Snap the wall mount bracket firmly in place.

3.  Mount the telephone base on the wall. Position the telephone base

 so that the mounting studs fit 

into the holes on the wall mount bracket. Slide telephone base  down on the mounting studs until 

it locks into place.

Wall mounting 

(optional)

Summary of Contents for mi6885

Page 1: ...User s manual ww w vt e c hp h on e s c o m Models mi6885 mi6889 ...

Page 2: ... 16 Handset main menu 17 Handset operation 19 Making calls 19 Answering calls 19 Flash function 19 Handset volume 19 Redial 19 Mute 20 Intercom 20 Call forward 21 Call transfer 21 Conference call 22 Find handset 22 Voice mail 22 Directory 23 Store a new entry 23 Characters by number 24 Review and dial entries 24 Edit a directory entry 25 Delete a directory entry 25 Caller ID 26 Caller ID call wait...

Page 3: ...n 36 Message alert 38 Announcement only mode 39 Turn the announcement only mode on or off 39 Customize the announcement only message 39 Base ringer 40 Number of rings 40 Message window display 41 Headset operation 42 Headset jack 42 Operating range 42 Batteries 43 Battery care and performance 43 Replace the handset battery 43 Troubleshooting 44 Additional information 45 Maintenance 52 Warranty 52 ...

Page 4: ... all the feature operations and troubleshooting necessary to install and operate your new VTech telephone Please review this manual thoroughly to ensure proper installation and operation of this innovative and feature rich VTech product For support shopping and everything new at VTech visit our website at www vtechphones com In Canada please visit www vtechcanada com ...

Page 5: ...er adapter 10 Wall mount bracket 11 User s manual Parts checklist for mi6885 1 Telephone base 2 Handsets 3 7 Batteries 3 6 Belt clips 3 5 Telephone line cord 9 Base power adapter 11 User s manual 10 Wall mount bracket 8 Quick start guide 4 Chargers 2 3 Charger power adapters 2 To purchase replacement batteries visit us on the web at www vtechphones com or call VTech Communications Inc at 1 800 595...

Page 6: ...s 4 7 Batteries 4 6 Belt clips 4 5 Telephone line cord 9 Base power adapter 11 User s manual Important Before using this telephone Please read Important safety instructions on pages 53 54 10 Wall mount bracket 8 Quick start guide 4 Chargers 3 3 Charger power adapters 3 To purchase replacement batteries visit us on the web at www vtechphones com or call VTech Communications Inc at 1 800 595 9511 In...

Page 7: ...tery 1 2 1 Align the two holes in the plug with the socket pins then snap the plug into place 2 Place the battery in the compartment with the wires in the upper left corner 3 Replace cover by sliding it upwards until it clicks into place 4 Be sure to charge the battery in the handset for a minimum of 16 hours before using your phone Use only the provided VTech battery or equivalent To obtain a rep...

Page 8: ...ace if it is plugged into a ceiling under the table or cabinet outlet Connect power to telephone base handset chargers 1 Plug the power adapter into an electrical outlet not controlled by a wall switch and the connector into the power jack on bottom of the telephone base AC power outlet Telephone outlet Installation 2 Choose the location for your charger and plug its power supply into an electrica...

Page 9: ...s no battery in your handset You need to install the supplied battery into your handset see Install handset battery 2 The battery needs to be replaced 3 The battery has been installed incorrectly Please reinstall see Install handset battery and or see the diagram in the battery compartment of the handset When in LOW BATTERY mode the keypad sounds backlighting and speakerphone features do not work ...

Page 10: ...e during conversations and or your caller ID features are not functioning properly and you subscribe to DSL service from your telephone company install a DSL filter to the telephone line between the telephone base and the telephone line jack Contact your DSL provider to obtain a DSL filter Telephone line cord DSL filter For DSL users To single telephone jack RJ11C Belt clip optional To remove To a...

Page 11: ...se and phone line 2 Line up the tabs on the wall mount adapter with the holes at the bottom of the telephone base Snap the wall mount bracket firmly in place 3 Mount the telephone base on the wall Position the telephone base so that the mounting studs fit into the holes on the wall mount bracket Slide telephone base down on the mounting studs until it locks into place Wall mounting optional ...

Page 12: ...d handset named Handset 1 2 3 4 Additional handsets mi6807 are available from your local authorized dealers or from our website at www vtechphones com in the US or www vtechcanada com in Canada Up to four extension handsets can be registered with the same telephone base and two can be in operation at the same time Each additional handset purchased will have to be registered separately following th...

Page 13: ...e the assigned handset number of your registered handsets you must first de register the handsets then re register all handsets De register all handsets 1 Press and hold FIND HANDSET on the main telephone base for 10 seconds 2 When the IN USE light starts to flash release the FIND HANDSET button 3 Press and release FIND HANDSET again The IN USE light will turn off and in a few seconds all handsets...

Page 14: ...rpiece 2 Caller ID scroll down 3 Headset jack 2 5mm 4 Talk flash 5 Dial keys 0 9 6 Redial pause 7 Mute remove 8 Display 9 Select menu 10 Phonebook scroll up 11 Volume control 12 Off clear 13 Speaker 14 Intercom 1 2 3 5 6 7 9 12 13 14 4 8 10 11 ...

Page 15: ...15 Getting started 1 In use indicator 2 Charge indicator 3 Setup 4 Volume control 5 Answer on off 6 Change 7 Delete skip play stop repeat 8 Time set 9 Find handset 10 Record memo Telephone base layout 1 2 3 4 5 6 7 8 9 10 ...

Page 16: ...E On when the handset is charging in the base ANS ON OFF On when the answering system is on Handset icons Icon Description The microphone is muted NEW Displayed when viewing a missed call that has not been reviewed The handset ringer is off Low battery indicator or charging indicator Flashes to indicate that there are new voicemail messages Service must be subscribed from your telephone company Di...

Page 17: ... telephone numbers Call log Review caller ID data select and dial from the caller ID data Settings Change the language of the menu prompts set dial type and time clear voicemail Sounds Select ringer tone turn key tone on or off Display Choose from the five preset images used as wallpaper or adjust the screen contrast Ringer volume Adjust ringer volume or turn ringer off Press or to reach the desir...

Page 18: ... RINGER MELODY This option allows you to select one of the 10 0 9 different ringer tones for incoming calls KEY TONE This option allows you to turn the key tone on or off DISPLAY WALLPAPER This option allows you to set a wallpaper image Select WALLPAPER in the main menu then press or to view the five available images Once you have selected the image press SEL and you will hear a confirmation tone ...

Page 19: ...eive a call waiting signal Press FLASH again to switch back to the original call Handset volume The volume control is on the right side of the handset During a call press the VOL or keys to adjust the listening volume to a comfortable level When you reach the maximum or minimum setting a double beep will sound Follow these instructions to change the volume for the handset speakerphone or headset R...

Page 20: ...MUTED Press MUTE again to return to normal two way conversation MICROPHONE ON will display briefly Intercom When not on a call press INT The first handset HS1 will display Press the number of the handset to be called using the dial keys 1 4 The second handset HS2 will ring and the screen will display Press SPEAKER INT or any dialing key on HS2 to answer the intercom call The screen will display Pr...

Page 21: ...desired handset HS2 will show INCOMING CALL and start ringing Press on the HS2 to answer If the forwarded call is not answered within 30 seconds the external call will be returned to HS1 and the display will show CALL BACK and ring for 30 seconds If the returned call is not answered within 30 seconds the external call will end automatically CALL BACK INTERCOM ENDED UNABLE TO CALL TRY AGAIN FORWARD...

Page 22: ...e PAGING HS2 can pick up the transferred call by pressing SPEAKER or INT An intercom call is now established the external call is still on hold and HS1 and HS2 are able to talk to each other HS1 or HS2 can hang up and conversation with the external call can be resumed CALL TRANSFERRED is briefly displayed on HS1 If the transferred call is not answered within 100 seconds the intercom attempt will b...

Page 23: ...ILABLE AT THIS TIME will be displayed on the second handset Store a new entry Press MENU SEL on the handset With DIRECTORY highlighted press SEL Press to select STORE Press SEL You will be prompted to ENTER NUMBER Use the dialing keys to enter the number to be stored in the directory Press MUTE REMOVE to backspace and make corrections Press SEL when you are done entering the phone number You will ...

Page 24: ...lar key causes different characters to be displayed in the following order Characters by number of key presses Key 1 2 3 4 5 6 7 8 9 1 A B C 2 a b c D E F 3 d e f G H I 4 g h i J K L 5 j k l M N O 6 m n o P Q R S 7 p q r s T U V 8 t u v W X Y Z 9 w x y z 0 1 2 3 4 5 6 7 8 9 0 ...

Page 25: ... backspace then press the digit keys to correct the number Press and hold REDIAL PAUSE to add pauses if necessary Press SEL Press MUTE REMOVE to backspace and use the digit keys to enter the correct name Press SEL A confirmation tone will sound When reviewing the directory the second line of the display will show the phone number up to 16 digits For numbers longer than 16 digits only the first 13 ...

Page 26: ...l show The NEW icon in the lower left corner indicates the call has not yet been reviewed Your phone can also display the name and number of the call waiting caller call waiting caller ID so you can decide whether to answer the incoming call or continue with the current conversation HANDSET 1 Due to regional incompatibilities CID information may not be available for every incoming call In addition...

Page 27: ... ID above to find the record to be stored The phone number in the caller ID log was sent by the phone company You may have to dial the number differently Press the key repeatedly to see the different dialing options You can add or remove the initial 1 and or the area code The various dialing options are Press SEL to store the displayed number If the caller ID record contains both name and number t...

Page 28: ...will sound and the screen will display If both the name and number are missing for example as in a private listing nothing will be stored and the screen will display If the number already exists in the directory the entry will not be stored and the screen will show If the directory is full the screen will show EDIT NUMBER 800 595 9511 DIRECTORY SAVED CALL LOG UNABLE TO SAVE CALL LOG ALREADY SAVED ...

Page 29: ...rd A confirmation beep will sound and the previous caller ID record will be displayed Delete all caller ID entries To delete all caller ID records when you are reviewing the call log press and hold REMOVE The screen will display DELETE ALL CALLS Press SEL to confirm Press OFF to return to the call log record previously displayed The phone number in the caller ID log was sent by the phone company Y...

Page 30: ...F will light up the system will answer calls and incoming messages can be recorded Day and time announcements To set day and time Before playing each recorded message the answering system announces the day and time the message was received Set the day and time by pressing TIME SET twice You can change settings by pressing CHANGE and you can advance to the next type of setting by pressing TIME SET ...

Page 31: ... base until you hear the correct day 4 Press TIME SET the system announces the current hour setting 5 Press CHANGE until you hear the correct hour 6 Press TIME SET the system announces current minute setting 7 Press CHANGE until you hear the correct minute 8 Press TIME SET the system announces the current year setting 9 Press CHANGE until you hear the correct year 10 Press TIME SET to confirm The ...

Page 32: ...nouncement Your answering system is pre set with an announcements for normal answer and record mode and announcement only mode If the phone is set up to record messages the phone answers calls with Hello Please leave a message after the tone You can use this announcement or replace it with your own Record outgoing announcement 1 Press SETUP the system announces Announcement Press PLAY or press REC...

Page 33: ...PLAY STOP to begin playback 3 During playback press DELETE to delete your announcement 4 The system will confirm deletion and announce Announcement deleted When your announcement is deleted calls will be answered with the programmed announcement Hello Please leave a message after the tone Message playback Press PLAY STOP to listen to new messages The system will announce the number of new messages...

Page 34: ...essage playback 3 Press REPEAT to repeat the message currently playing Press twice to listen to the previous message or press and hold to slow down message playback 4 Press DELETE to delete the message currently playing 5 Press PLAY STOP to stop playback Delete all messages To delete all old messages press and hold DELETE while the phone is idle not during a call or during message playback New mes...

Page 35: ...ving their message before choosing to answer a call 1 Set the playback VOL on the base to a level greater than one by pressing or to adjust the message playback volume 2 If you decide to answer a call while the caller is leaving a message simply press TALK FLASH on the handset The answering system will stop recording Remote access To retrieve new messages from any touch tone phone from a remote lo...

Page 36: ...de by increments of 10 4 When the desired number is heard Press SETUP to save and advance to the next menu option or press PLAY STOP to save and exit Remote answering system operation 1 From any touch tone telephone dial your telephone number 2 While the outgoing announcement is playing enter your two digit remote access code 3 Hang up to end the call and save all undeleted messages If you pause f...

Page 37: ...top Skip a message 1 2 3 3 3 4 4 4 5 6 Listen to new messages If there are no new messages all messages will be played back Delete message currently playing Press when any message is playing to delete all old previously reviewed messages Press to repeat current message Press to repeat previous message Press to stop messages from being played Press to skip to the next message Plays all new not prev...

Page 38: ... to current remote access code Change remote access code When the system announces Answering machine off press 0 again to turn the system back on When the system is off it answers after 10 rings and announces Please enter your remote access code Enter your remote access code Your phone may not respond to remote access commands if tones produced by the telephone are too short Hold the buttons down ...

Page 39: ...ncement only mode callers hear an announcement but cannot leave messages When announcement only is turned on calls are answered with the pre recorded announcement We re sorry Messages to this number cannot be accepted or the customized message Turn the announcement only mode on or off Press SETUP four times the system announces Announcement only Record no messages To change the setting press CHANG...

Page 40: ...Press CHANGE again to change the setting 4 Press SETUP to save your selection and advance to the next setup option or press PLAY STOP to save and exit Number of rings This function sets the number of rings before the answering system picks up the call With toll saver activated the answering system alerts you to new messages when calling remotely by picking up the incoming call after two rings When...

Page 41: ...L or is pressed Current remote access code while setting Elapsed time while recording a memo or announcement up to 90 seconds Memo or announcement recording exceeds maximum time of 99 seconds Memory is full Messages must be deleted before new messages can be recorded Clock needs to be set Announcement only mode is on Answering system is answering a call or being accessed from a remote location Sys...

Page 42: ...n the maximum power allowed by the Federal Communications Commission FCC Even so this handset and telephone base can communicate only over a certain distance which can vary with the locations of the telephone base and handset the weather and the construction of your home or office If you receive a call while you are out of range the handset might not ring or if it does ring the call might not conn...

Page 43: ...the battery should be replaced To reduce the risk of fire or injury to persons or damage to the telephone read and follow these instructions carefully Charge the battery provided with or identified for use with this product only in accordance with the instructions and limitations specified in the user s manual Replace the handset battery 1 Remove the battery compartment cover on the handset by pre...

Page 44: ...For optimum daily performance return the handset to its telephone base when not in use Reset the telephone base Unplug the unit s electrical power Wait for 15 seconds then plug it back in Allow up to one minute for the handset and telephone base to reset You may need to purchase a new battery please refer to the battery sections in this user s manual I cannot get a dial tone Try all the suggestion...

Page 45: ...t you have pulse or touchtone Refer to the Setup section of this user s manual to set the dial mode If the other phones in your home are having the issue the problem is in your wiring or local service Contact your local telephone company Eliminate any background noise Noise from a television radio or other appliance may cause the phone not to dial out properly If you cannot eliminate the backgroun...

Page 46: ...hen appliances and other cordless phones The battery does not hold a charge Charge the battery in the handset for 16 hours For optimum daily performance return the handset to its telephone base when not in use You may need to purchase a new battery please refer to the battery sections in this user s manual Your phone might be malfunctioning Please refer to the Warranty section of this user s manua...

Page 47: ...nterference with your cordless phone Try installing your phone as far away from these types of electronic devices as possible wireless routers radios radio towers pager towers cell phones intercoms room monitors televisions personal computers kitchen appliances and other cordless phones Microwave oven operates on the same frequency as your phone It is normal to experience static on your phone whil...

Page 48: ...home or office might be limiting the operating range Try moving the telephone base to another location preferably on an upper floor If the other phones in your home are having the issue the problem is in your wiring or local service Contact your local telephone company charges may apply Test a working phone at the phone jack If another phone has the same problem the problem is the phone jack Conta...

Page 49: ... or surge protector plug the phone or modem surge protector into a different location If this solves the problem re locate your phone or modem farther apart from one another or use a different surge protector Relocate your phone to a higher location The phone will get better reception not installed in a low area If the other phones in your home are having the issue the problem is in your wiring or...

Page 50: ... to a comfortable listening level CL is flashing in the telephone base message display window You need to set the day and time Refer to the section s on setting day and time in this user s manual Make sure announce only feature is set to OFF Common cure for electronic equipment If the unit does not seem to be responding normally then try putting the handset in its telephone base If it does not see...

Page 51: ...in its charger connected to a power outlet If PRESS FIND HNDST 4 SECS ON BASE does not appear on the screen after a few seconds lift up handset and place in the charger again On the main telephone base Press and hold FIND HANDSET key for four seconds Release FIND HANDSET key when IN USE light is on The LCD screen on the telephone base will show HS REGISTERED The handset will show HS REGISTERED and...

Page 52: ...furbished replacement parts If we choose to replace the Product we may replace it with a new or refurbished Product of the same or similar design We will retain defective parts modules or equipment Repair or replacement of the Product at VTech s option is your exclusive remedy VTech will return repaired or replacement Products to you in working condition You should expect the repair or replacement...

Page 53: ...culty and 2 Include valid proof of purchase sales receipt identifying the Product purchased Product model and the date of purchase or receipt and 3 Provide your name complete and correct mailing address and telephone number Other Limitations This warranty is the complete and exclusive agreement between you and VTech It supersedes all other written or oral communications related to this Product VTe...

Page 54: ...ctric shock Never spill liquid of any kind on the product 10 To reduce the risk of electric shock do not disassemble this product but take it to an authorized service facility Opening or removing parts of the telephone base or handset other than specified access doors may expose you to dangerous voltages or other risks Incorrect reassembling can cause electric shock when the product is subsequentl...

Page 55: ...y upon request The plug and jack used to connect this equipment to premises wiring and the telephone network must comply with applicable Part 68 rules and technical requirements adopted by ACTA A compliant telephone cord and modular plug is provided with this product It is designed to be connected to a compatible modular jack that is also compliant An RJ11 jack should normally be used for connecti...

Page 56: ...ral resources RBRC is a registered trademark of Rechargeable Battery Recycling Corporation The RBRC seal FCC ACTA and IC regulations Remain on the line and briefly explain the reason for the call before hanging up Perform such activities in off peak hours such as early morning or late evening Industry Canada This equipment complies with regulations RSS210 and CS 03 of Industry Canada Operation is ...

Page 57: ...time of use Size Handset 141mm X 49mm X 35mm Telephone base 130mm X 120mm X 68mm Charger 89mm X 78mm X 53mm Weight Handset 141 grams Telephone base 267 grams Charger 76 grams Power requirements Handset 600mAH Ni MH battery Telephone base 9V DC 600mA Charger 9V DC 200mA Memory Directory 50 memory locations up to 32 digits 16 characters per location Caller ID 50 memory locations Enhanced 5 8GHz tech...

Page 58: ...uncements 30 De register all handsets 13 Delete a caller ID record 29 Delete a directory entry 25 Delete all messages 34 Delete outgoing announcement 33 Dial from caller ID 29 Directory 23 DSL 10 E Edit a directory entry 25 F FCC ACTA and IC regulations 56 Find handset 22 Flash function 19 G Getting started 5 H Handset icons 16 Handset layout 14 Handset lights 16 Handset main menu 17 Handset opera...

Page 59: ...ote answering system operation 36 Replace the handset battery 43 Review and dial entries 24 Review caller ID 27 S Set the remote access code 36 Store a new entry 23 Store caller ID in your directory 27 T Technical specifications 57 Telephone base display 16 Telephone base layout 15 Telephone base volume 34 35 Telephone settings 16 The RBRC seal 56 To check day and time 31 Troubleshooting 44 Turn t...

Page 60: ...ECH GROUP OF COMPANIES Distributed in the U S A by VTech Communications Inc Beaverton Oregon Distributed in Canada by VTech Telecommunications Canada Ltd Richmond B C Copyright 2007 for VTECH TELECOMMUNICATIONS LTD Printed in China 91 000869 030 100 ...

Reviews: