background image

4

ca6155 Owners revA

 Two Stage Door Unlock (Optional) 


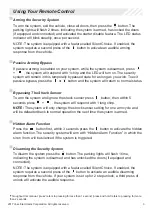
If this feature is enabled on your system, pressing the    button one time will unlock 

only the driver’s door. Press   again within three seconds to unlock the remaining 

doors.

 Activating the Trunk Release Feature (Optional) 


If this feature is enabled on your system, pressing and holding the 

 button for 3 

seconds will open the vehicle’s trunk or hatch.

 Activating the AUX 1 Output (Optional) 


If this feature is enabled on your system, pressing the 

 and   buttons 

simultaneously will activate an optional feature. This feature can be programmed for a 

wide range of functions like power window or sunroof automation, please consult your 

installing dealer to determine the functionality of your system.

 Entering AUX Mode and Activating the Additional AUX 2 - 5 Outputs (Optional)


To access the additional AUX outputs, AUX 2, AUX 3, AUX 4, and AUX 5, you must 

first enter the transmitters AUX Mode. This will “shift” the functions of the transmitter 

buttons from their standard operation to control of the AUX outputs.


AUX Mode - 4 button transmitter:

 Press and Hold  

  and  

  for 2  


seconds, the transmitter LED will flash 1 time. AUX Mode will remain active  


for 15 seconds. AUX Mode will exit after 15 seconds of inactivity or by    


pressing 

  and  

  again for 2 seconds, the transmitter LED will flash 2  


times to confirm exit. 


Activating outputs while in AUX Mode:


AUX 2: 

Press and Hold  

  for 3 seconds.


AUX 3: 

Press and Hold  

  for 3 seconds.


AUX 4: 

Press and Hold  

  for 3 seconds.


AUX 5: 

Press and Hold  

  for 3 seconds.

Summary of Contents for Code Alarm Professional Series ca6155

Page 1: ...NT NOTE The operation of the Security and Convenience System as described in this manual is applicable to most vehicles However due to the configuration of some vehicles some functions AND OR SAFETY P...

Page 2: ...System 6 Carjack Mode 6 Using Your Remote Vehicle Starter 7 Remote Start Ready Mode 7 Cancelling Remote Start Ready Mode 7 Remote Starting Your Vehicle 8 Remote Start Shutdown 8 Entering Your Vehicle...

Page 3: ...and ignore the shock sensor press button then within 5 seconds press the system will respond with 1 long chirp NOTE The system will only change the shock sensor setting for one arm cycle and will be d...

Page 4: ...lease consult your installing dealer to determine the functionality of your system Entering AUX Mode and Activating the Additional AUX 2 5 Outputs Optional To access the additional AUX outputs AUX 2 A...

Page 5: ...ignition is turn on the status LED light with flash the number of transmitters programmed into the system This helps to identify unauthorized transmitters from accessing your vehicle If you believe an...

Page 6: ...REMAIN IN THIS STATE UNTIL THE BATTERY IS DEPLETED OVERRIDE THE SYSTEM TO TURN OFF CARJACK MODE Turn the ignition OFF then On and press the valet button within 10 seconds Manually Overriding the Secu...

Page 7: ...s and the parking lights will turn on to confirm the system has remote started 3 Remove the keys from the ignition the vehicle will remain running 4 Exit the vehicle and close all vehicle doors 5 With...

Page 8: ...r the vehicle DO NOT PRESS THE BRAKE PEDAL 3 Insert the key into the ignition switch and turn to the ON or RUN position 4 Press the brake pedal The remote vehicle starter will disengage and the vehicl...

Page 9: ...onfirm quick stop is entered 3 Remove the keys from the ignition and exit the vehicle Press the button to lock the vehicle s doors if desired To engage Quick Stop Manual Transmission Vehicles 1 With t...

Page 10: ...hat the run time has been reset Turbo Timer This option will keep the engine running to allow the vehicle s turbo to properly cool down before shutting the engine off To engage the Turbo Timer feature...

Page 11: ...this or any remote starting device A running engine produces dangerous carbon monoxide fumes which can be harmful or fatal if prolonged exposure occurs DO NOT remote start the vehicle if it is garage...

Page 12: ...om this time Next When you are finished operating the vehicle for the day perform the following steps to complete the process 1 Turn the ignition ON OFF vehicle must be disarmed 2 Within 10 seconds wh...

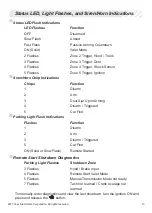
Page 13: ...iren Horn Chirp Indications Chirps Function 1 Disarm 2 Arm 3 Door Ajar Upon Arming 4 Disarm Triggered 5 Car Find Parking Light Flash Indications Flashes Function 1 Disarm 2 Arm 3 Disarm Triggered 5 Ca...

Page 14: ...ress and Release 4 times AUX 1 X X Push and Hold 3 Sec Shock Bypass X X Press and Release Lock then Press Lock Car Find Hidden Alarm X X Press and Release Car Find then Press Lock Passive Arming Bypas...

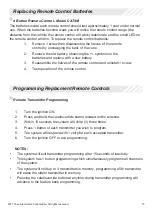
Page 15: ...ote control and reinstall 1 screw 4 Test operation of the remote control Programming Replacment Remote Controls Remote Transmitter Programming 1 Turn the ignition ON 2 Press and hold the valet overrid...

Page 16: ...the Company has suffered or been damaged through alteration improper installation mishandling misuse abuse neglect accident or by removal or defacement of the factory serial number bar code label s T...

Page 17: ...17 2017 Voxx Electronics Corporation All rights reserved...

Page 18: ...18 ca6155 Owners revA...

Page 19: ...19 2017 Voxx Electronics Corporation All rights reserved...

Page 20: ...tion is subject to the following two conditions 1 This device may not cause harmful interference and 2 This device must accept any interference received including any interference that may cause undes...

Reviews: