25
Installation
N.B.
If the unit is equipped with a plug ignore the instructions describing the electrical connections.
• Use a single-phase alternating rated voltage supply, (Do not used with a power supply exceeding rated voltage ±10% ).
• Use a power cord which is between 2 mm
2
and 2.5 mm
2
thick, (Cords other than 2mm
2
- 2.5 mm
2
single-core cords cannot
be used).
(A drop in voltage is possible if the power cord exceeds
11m in length, so we recommend using a 2.5mm2
cord.).
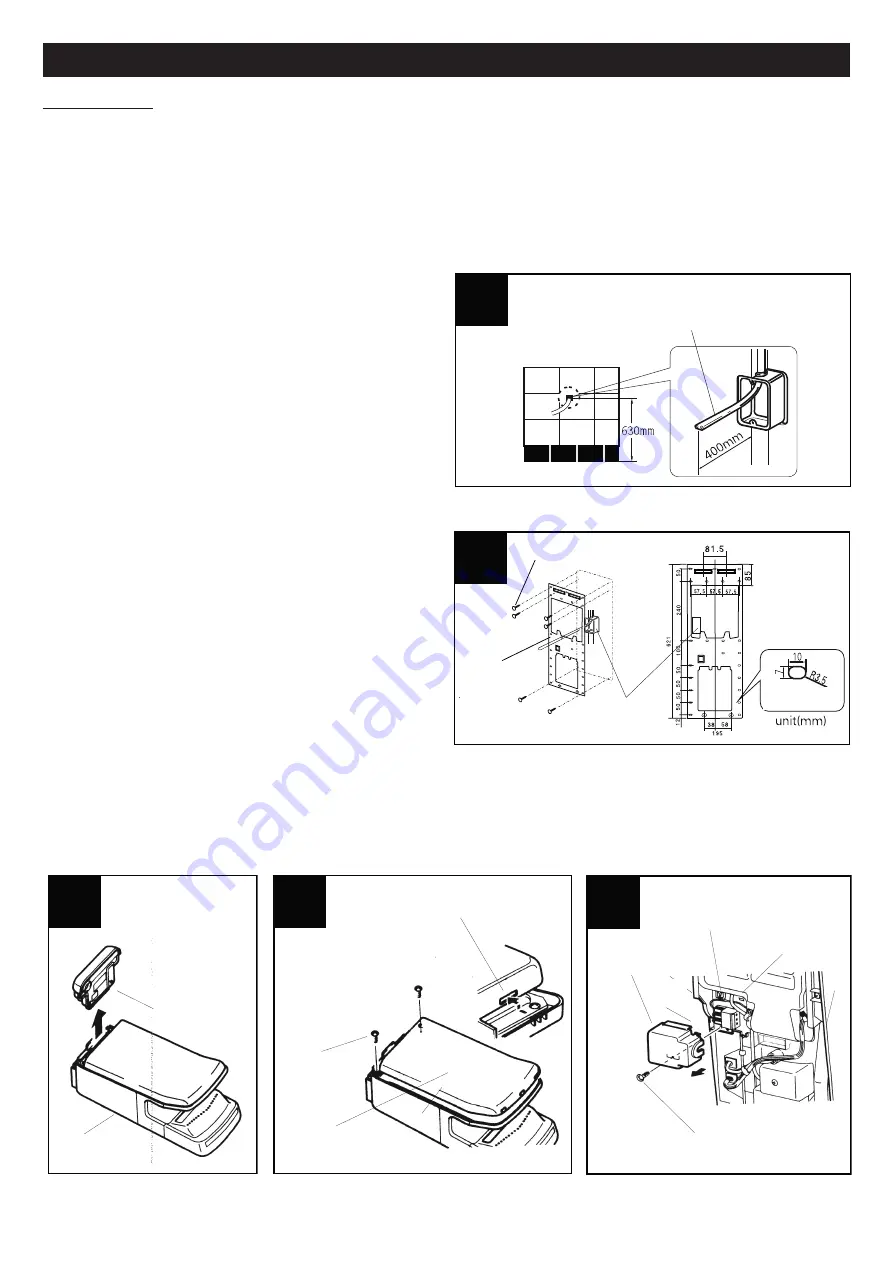
Wire the unit
(Fig.19)
Embed the switch box in the installation location
(1 switchbox no cover)and wire the power cord
(with the green and yellow combined is ground line).
• If no switchbox is used, the power cord will be pushed out,
and prevent the unit from being installed firmly against the
wall.
Attach the installation panel to the wall using the 6
installation screws.
(Fig.20)
• If the wall is concrete, use commercially available metal
screw plugs(curl plugs, etc.)
• If the wall is not concrete, reinforce it before installation.
ENGLISH
19
19
cavi di alimentazione
(con linea di terra)
20
20
viti di montaggio
pannello di
installazione
scatola fusibili
dettaglio dei fori
di montaggio
Remove the drain tank
(Fig.21)
Remove the front panel
• Remove the two screws.
• Remove the terminal box cover screw.
(Fig.22)
Remove the terminal box cover
• Remove the terminal box cover screw
and pull the cover other towards you.
(Fig.23)
21
21
22
22
23
23
drain tank
unit
chuckhole
front panel
installation
screw
front panel
unit
terminal box screw
terminal box
cover
l
ock
clutch
unit
terminal box
lock clutch hole
Power cords
(with ground line)
Installation screws
Installation
panel
Switchbox
Installation hole
details
Summary of Contents for VORT SUPER DRY
Page 42: ...42 Note ...
Page 43: ...43 Note ...


