sports. The more you increase ballast weight, the larger
wake you create.
1
From the
Water Sports
screen, select
Tank Controls
.
2
Select an option:
• To fill a specific tank, select
next to the tank.
• To drain a specific tank, select
next to the tank.
• To fully fill all of the tanks, select
FILL ALL
.
• To fully drain all of the tanks, select
DRAIN ALL
.
• To cease draining or filling, select
Stop
.
Ballast Tank Tips
• If the tanks do not fill or drain completely, select
or
to fill or drain for an additional 30 seconds.
• Do not run the pumps without water, or you might
damage them.
• If the fill time is not correctly set by the manufacturer,
you can adjust the fill and drain times (
).
Adjusting Ballast Tank Drain and Fill Times
Ballast tank fill and drain times are determined by
your boat builder, but can degrade over time as pump
efficiencies change. You can adjust the data for accuracy.
1
From the
Water Sports
screen, select
Options
>
Installation
.
2
Select an option:
• To enter the amount of time it takes your ballast tank
to fill from empty to full, select
Tank Fill Times
.
• To enter the amount of time it takes your ballast
tank to drain from full to empty, select
Tank Drain
Times
.
Turning on the Trim Assist Feature
The Trim Assist feature adjusts the trim tabs to the optimal
position to enable the boat to come up to plane more
easily. When you are in Surf Left or Surf Right mode, the
Trim Assist feature automatically deactivates.
From the
Water Sports
screen, select
Options
>
Trim
Assist
>
On
.
Adjusting the Boat Load
You can use the Boat Load feature when your boat is
heavily loaded and the boat does not accelerate quickly
enough when in Surf Left or Surf Right mode.
1
From the
Water Sports
screen, select
Options
>
Water Sports Control
>
Boat Load
.
2
Adjust the boat load percentage.
Sonar Fishfinder
When properly connected to a transducer, your
compatible chartplotter can be used as a fishfinder.
Chartplotter models without an xsv or xs in their names
require a Garmin sounder module and transducer to
display sonar information.
For more information about which transducer is best for
your needs, go to
Different sonar views can help you view the fish in the
area. The sonar views available vary depending on the
type of transducer and sounder module connected to the
chartplotter. For example, you can view certain Panoptix
™
sonar screens only if you have a compatible Panoptix
transducer connected.
There are four basic styles of sonar views available: a
full-screen view, a split-screen view that combines two
or more views, a split-zoom view, and a split-frequency
view that displays two different frequencies. You can
customize the settings for each view in the screen. For
example, if you are viewing the split-frequency view, you
can separately adjust the gain for each frequency.
If you do not see an arrangement of sonar views to suit
your needs, you can create a custom combination screen
(
Creating a New Combination Page
). You can
also add sonar views to SmartMode layouts (
).
Stopping the Transmission of Sonar Signals
• To disable the active sonar, from the sonar screen,
select
Options
>
Transmit
.
• To disable all sonar transmissions, press , and select
Disable All Sonar Trans.
.
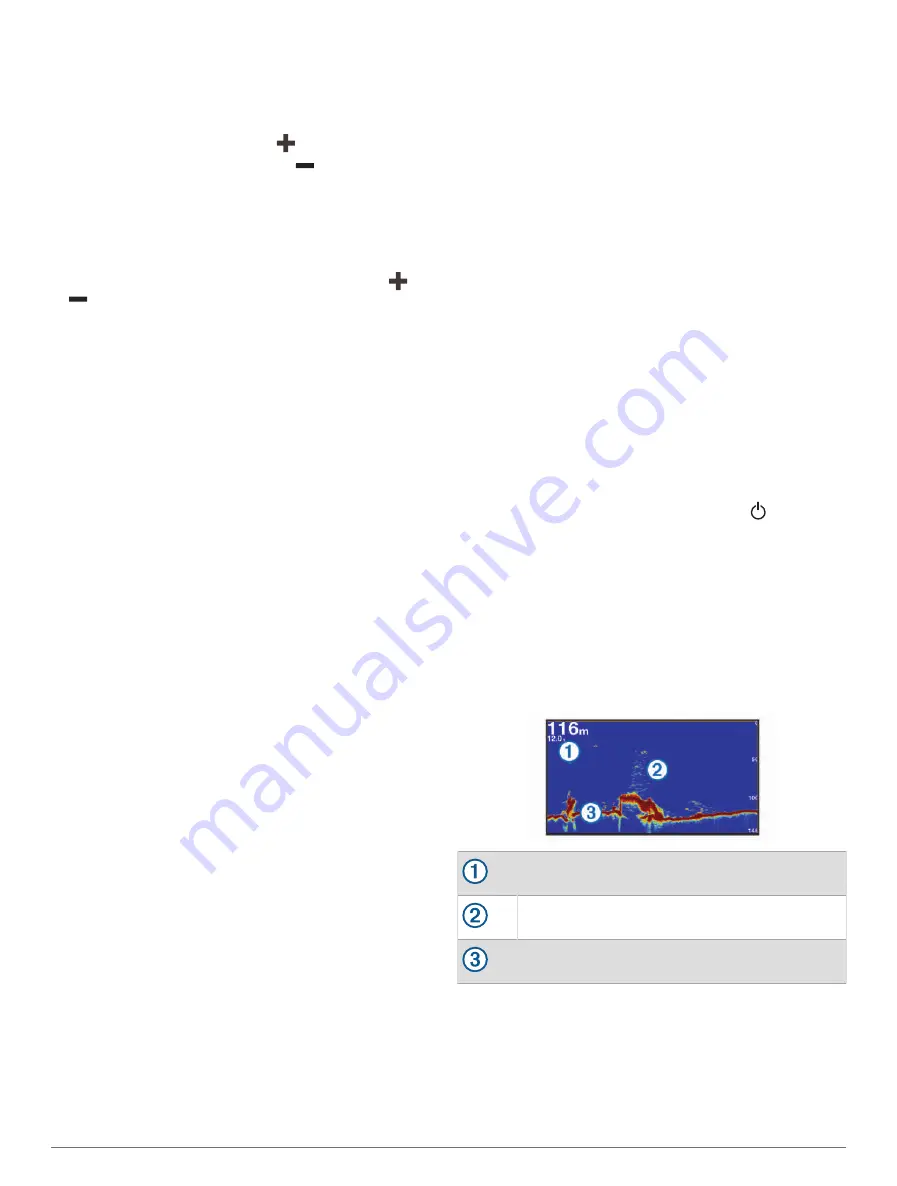
Traditional Sonar View
There are several full-screen views available, depending
on the transducer that is connected.
The full-screen Traditional sonar view shows a large
image of the sonar readings from a transducer. The range
scale along the right side of the screen shows the depth of
detected objects as the screen scrolls from the right to the
left.
Depth information
Suspended targets or fish
Bottom of the body of water
Split-Frequency Sonar View
In the split-frequency sonar view, the two sides of the
screen show a full-view graph of sonar data of different
frequencies.
NOTE:
The split-frequency sonar view requires the use of
a dual-frequency transducer.
Sonar Fishfinder
37


