79
11.11 Measuring capacitance
Make sure that all objects that you wish to measure (including cir-
cuit components, circuits and component parts) are disconnected
and discharged.
Always pay attention to the polarity when using electrolytic capaci-
tors.
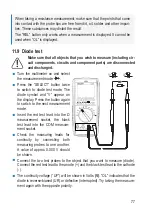
Turn the multimeter on and select
the measurement range
.
Plug the red test lead into the V
measurement socket and the black
test lead into the COM measure-
ment socket.
The display shows “nF”.
Connect the two test probes (red
= positive, black = negative) to the
object that you want to measure
(capacitor). The capacitance will
be shown on the display after a
few seconds. Wait until the display
stabilises. This may take a few sec-
onds for capacitances greater than
60 µF.
“OL” (overload) indicates that the measuring range has been exceeded.
After measuring, remove the test leads from the measured object and turn the
multimeter off.
Due to the sensitive measuring input, the display may show a value if the test
leads are “open”. Press the “REL” button to measure small capacities (<600
nF). The display then shows “0”. The Autorange function is thus deactivated.


