background image

9. Affichage et symboles

Icône

Description

Batterie faible

Mise hors tension automatique

Auto

Plage automatique

Conservation des données

Tension élevée

AC

Signal CA

DC

Signal CC

mV, V

Unités de tension : millivolt, volt

µA, mA, A

Unités de courant : microampère, milliampère, ampère

Ω, kΩ, MΩ

Unités de résistance : ohm, kilo ohm, mégaohm

nF, µF, mF

Unités de capacité : nanofarad, microfarad, millifarad

Hz, kHz, Mhz

Unités de fréquence : hertz, kilohertz, mégahertz

%

Mesure du rapport cyclique

OL

Dépassement de limite (supérieur au plafond)

Mesure de la valeur relative

NCV

Test de tension CA sans contact « NCV »

74

Summary of Contents for 2446478

Page 1: ...Nr 2446478 Seite 2 33 Operating Instructions VC171 Digital Multimeter Item No 2446478 Page 34 63 Notice d emploi VC171 Multim tre Num rique N de commande 2446478 Page 64 95 Gebruiksaanwijzing VC171 D...

Page 2: ...eter 8 f Messspitzen 9 8 Bedienelemente und Komponenten 10 a bersicht 10 b Funktionswahlschalter 11 9 Display und Symbole 12 10 Einsetzen Ersetzen der Batterie bzw des Akkus 13 11 Inbetriebnahme und V...

Page 3: ...Reinigung 26 b Wartung 26 16 Entsorgung 27 a Produkt 27 b Batterien Akkus 27 17 Technische Daten 28 a Allgemeines 28 b Sicherungen 29 c Messtoleranzen 29 d Messung der Kapazit t 29 e Durchgangspr fun...

Page 4: ...diesem Produkt Sie enth lt wichtige Hinweise zur Inbetriebnahme und Handhabung Daran sollten Sie auch denken wenn Sie die ses Produkt an Dritte weitergeben Heben Sie deshalb diese Bedienungsanleitung...

Page 5: ...anlage des Geb udes angeschlossenen Stromkreise Gleichstrom Wechselstrom 4 Bestimmungsgem e Verwendung Bei diesem Produkt handelt es sich um ein Digital Multimeter DMM bei dem die Messwerte auf einem...

Page 6: ...ten Sie die in dieser Bedienungsanleitung aufgef hrten Sicherheitshinweise und Informationen f r einen ordnungsgem en Gebrauch nicht beachten bernehmen wir keine Haftung f r daraus resultierende Perso...

Page 7: ...die in dieser Bedienungsanleitung nicht beantwortet wurden wenden Sie sich an unseren technischen Kundendienst oder anderes Fachpersonal In gewerblichen Einrichtungen sind die Unfallverh tungsvorschr...

Page 8: ...ehmen Sie das das Messger t niemals unmittelbar nachdem es von einer kalten in eine warme Umgebung gebracht wurde in Betrieb Das dabei entstehende Kondenswasser kann zu irreparablen Sch den am Produkt...

Page 9: ...der Messspitzen ohne Abdeckkappen d rfen Messungen zwischen dem Messger t und dem Erdpotential nicht oberhalb der Messkategorie CAT II durchgef hrt werden Bei Messungen in der Messkategorie CAT III d...

Page 10: ...4 1 Taste HOLD 2 Messbereich f r kontaktlose Spannungs messung 3 Taschenlamp 4 Dreifarbige LED Anzeige 5 Display 6 Taste SEL 7 Taste RANGE 8 Funktionswahlschalter 9 10 A max Buchse 10 COM Buchse 11 Bu...

Page 11: ...ie rot gekennzeichnet sind und durch Dr cken der Taste SEL verwendet werden k nnen Bringen Sie de Funktionswahlschalter bei Nichtgebrauch stets in die Stellung OFF Funktion Beschreibung V V mV Messung...

Page 12: ...der elektrischen Spannung Millivolt Volt A mA A Einheiten der elektrischen Stromst rke Mikroampere Milliampere Am pere k M Einheiten des elektrischen Widerstands Ohm Kiloohm Megaohm nF F mF Einheiten...

Page 13: ...icher entfernen und die Batterie austauschen bzw denAkku aufladen 11 Inbetriebnahme und Verwendung Ersetzen Sie die Batterie durch eine neue bzw laden Sie den Akku wieder auf sobald das Symbol f r ein...

Page 14: ...e RANGE wechseln Sie zwischen den Messbereichen erkennbar an der Verschiebung der Dezimalstelle 2 Schlie en Sie nun die Messleitungen an die Anschl sse an Die rote Messleitung muss an den Anschluss an...

Page 15: ...en Sie dann die Messspitzen an die richtigen Pr fstellen in der Schaltung an Rot Pluspol Schwarz Minuspol Pr fen Sie die Leitungen auf Durchgang indem Sie die beiden Messleitungen miteinander verbind...

Page 16: ...n werden Die schwarze Messleitung ist an den COM Anschluss anzuschlie en 4 Schlie en Sie dann die Messspitzen an die richtigen Pr fstellen in der Schaltung an 5 Bei einem Widerstand von 10 werden Sie...

Page 17: ...rote Messleitung muss an den Anschluss angeschlossen werden Die schwarze Messleitung ist an den COM Anschluss anzuschlie en 4 Pr fen Sie die Leitungen auf Durchgang indem Sie die beiden Messleitungen...

Page 18: ...Messleitungen an die Anschl sse an Die rote Messleitung muss an den Anschluss angeschlossen werden Die schwarze Messleitung ist an den COM Anschluss anzuschlie en 4 Schlie en Sie dann die Messspitzen...

Page 19: ...f die SEL Taste um zwischen den Funktionen f r die Messung der Frequenz Hz und des Tastverh ltnisses zu w hlen 3 Schlie en Sie nun die Messleitungen an die Anschl sse an Die rote Messleitung muss an d...

Page 20: ...tungen an Liegen die Messwerte au erhalb des Messbereichs 10 A werden Sie durch einen Signalton darauf hingewiesen Messungen an Schaltungen die eine Stromst rke von 5 A aufweisen d rfen nur f r max 30...

Page 21: ...ssungen stets zuerst die Spannungsfreiheit berpr fen Testen Sie zun chst einmal diese Funktion an einer Ihnen bekannten Wechselspan nungsquelle 1 Bringen Sie dann den Drehschalter in die Stellung die...

Page 22: ...icht mehr automatisch den Messbereich fest und erm glicht es Ihnen den Bereich manuell einzustellen Dieser Modus steht Ihnen jedoch nur bei den folgenden Messfunktionen zur Verf gung V V A mA und A We...

Page 23: ...pe ein bzw auszuschalten d Abschaltautomatik Bei der Abschaltautomatik handelt es sich um eine effektive Energiesparfunktion Bei Aktivierung versetzt sich das Ger t automatisch in den Ruhezustand wenn...

Page 24: ...er Sicherung Verwenden Sie das Messger t unter keinen Umst nden bei ge ffnetem Geh use LEBENSGEFAHR 1 Bringen Sie zun chst den Funktionswahlschalter in die Stellung OFF 2 Trennen Sie die Messleitungen...

Page 25: ...rt berpr fen Sie das Display AC DC und wechseln Sie ggf die Funktion Verwenden Sie die falschen Messleitungen berpr fen Sie die Anschlussbe legung bzw den Anschluss der Messleitungen Ist die HOLD Funk...

Page 26: ...t eine St rung aufweisen sehen Sie von der weiteren Verwendung unbedingt ab und schicken Sie es zur Wartung ein Wartungs und Servicearbeiten d rfen nur von qualifiziertem Fachpersonal durchgef hrt wer...

Page 27: ...n Daten auf dem zu entsorgenden Altger t ist der End nutzer verantwortlich Beachten Sie dass in L ndern au erhalb Deutschlands evtl andere Pflichten f r die Altger te R ckgabe und das Altger te Recycl...

Page 28: ...iedrigen Batterie Akkustand 6 V 0 2 V Durchmesser des Messanschlusses 19 mm COM V Abschaltautomatik Aktivierung nach etwa 15 Minuten Dauer der HOLD Funktion max 15 Minuten Messkategorie CAT III bis 60...

Page 29: ...ingungen ein Jahr lang garantiert Umgebungstemperatur 3 C 5 C 75 rF nicht kondensierend Betriebstemperatur 18 bis 28 C 1 C Au erhalb dieses Temperaturbereichs gilt der folgende Temperaturkoeffizient 0...

Page 30: ...10 sich durchgehend wieder holende Signalt ne 1 mV Spannung bei nicht verbundenen Messleitungen etwa 3 2 V In Durchlassrichtung gemessener Spannungsabfall bei Silizium Dioden etwa 0 5 0 8 V berlastsch...

Page 31: ...s erlaubt niederwertigste Stelle 5 F r nicht sinusf rmige Wechselgr en gilt Betr gt der Scheitelfaktor 1 0 bis 2 0 muss die Genauigkeit um 4 0 erh ht werden Betr gt der Scheitelfaktor 2 0 bis 2 5 muss...

Page 32: ...angsamplitude 30 Vss Frequenz 1 kHz Tastverh ltnis 10 0 90 0 Frequenz 1 kHz Tastverh ltnis 30 0 70 0 j Messung von Gleichstrom DC Bereich Aufl sung Genauigkeit A 400 0 A 0 1 A 1 0 6 4000 A 1 A mA 40 0...

Page 33: ...RMS Frequenzgang 40 400 Hz Messgenauigkeit garantierter Bereich 5 100 des Messbereichs offener Stromkreis erlaubt niederwertigste Stelle 5 F r nicht sinusf rmige Wechselgr en gilt Betr gt der Scheite...

Page 34: ...vices 39 c Fuse 39 d Rechargeable batteries 39 e Multimeter 39 f Probes 40 8 Operating elements 41 a Overview 41 b Dial 42 9 Display and symbols 43 10 Insert replace batteries 44 11 Operation 44 a Pow...

Page 35: ...a Cleaning 56 b Maintenance 56 16 Disposal 57 a Product 57 b Rechargeable batteries 57 17 Technical data 58 a General 58 b Fuses 59 c Measurement tolerances 59 d Capacitance measurement 59 e Continui...

Page 36: ...our health e g due to an electric shock The symbol with the exclamation mark in the triangle is used to indi cate important information in these operating instructions Always read this information car...

Page 37: ...the instructions carefully and store them in a safe place Make this product available to third parties only together with its operating instructions All company names and product names are trademarks...

Page 38: ...can no longer be guaranteed if the product is visibly damaged is no longer working properly has been stored for extended periods in poor ambient conditions or has been subjected to any serious transpo...

Page 39: ...le batteries lying around as there is risk that children or pets swallow them All rechargeable batteries should be replaced at the same time Mixing old and new rechargeable batteries in the device can...

Page 40: ...grip beyond the grip range markings indicated on the measuring probes When using the measuring probes without cover caps measurements between the meter and the earth potential must not be performed a...

Page 41: ...14 1 HOLD torch button 2 Non contact voltage measuring area 3 Torch 4 Tri color indicator LED 5 Display 6 SEL button 7 RANGE button 8 Function dial 9 10 A max terminal 10 COM terminal 11 terminal 12...

Page 42: ...ked in red can be accessed by pressing the SEL button Always set the dial to OFF when not in use Function Description V V mV AC DC voltage measurement Resistance measurement Diode test Continuity test...

Page 43: ...ts millivolt volt A mA A Current units microampere milliampere ampere k M Resistance units ohm kilo ohm megaohm nF F mF Capacitance units nanofarad microfarad millifarad Hz kHz Mhz Frequency units her...

Page 44: ...11 Operation Replace the battery if the low battery warning shows Pay attention to the information besides the warning signs marked on the DMM beside the test lead terminals The measured voltage or cu...

Page 45: ...osition 2 Connect the test leads to the terminals Red test lead to the terminal Black test lead to the COM terminal 3 Connect the test lead probes to the correct test points in the circuit Red Positiv...

Page 46: ...lead probes to the correct test points in the circuit Red Positive polarity Black Negative polarity Check the lines for continuity by connecting the two test leads The impedance value should be 0 5 i...

Page 47: ...est leads to the terminals Red test lead to the terminal Black test lead to the COM terminal 4 Connect the test lead probes to the correct test points in the circuit 5 A resistance of 10 is considered...

Page 48: ...t the test leads to the terminals Red test lead to the terminal Black test lead to the COM terminal 4 Check the lines for continuity by connecting the two test leads The value should be approximately...

Page 49: ...ce will show on the display 3 Connect the test leads to the terminals Red test lead to the terminal Black test lead to the COM terminal 4 Connect the test lead probes to the correct test points on the...

Page 50: ...to Hz Hz will appear on the display 2 Short press the SEL button to switch between frequency Hz and duty ratio measurement 3 Connect the test leads to the terminals Red test lead to the terminal Black...

Page 51: ...ing will sound when measured values are out of range 10 A Measuring 5 A must only be performed for max 30 seconds and at 15 minute intervals 1 Set the function dial to A mA or A the corresponding unit...

Page 52: ...the test location max 5 mm For twisted cables it is recommended to touch the cable with the end of non contact voltage sensor If AC power is sensed the tri color indicator LED will light up and the b...

Page 53: ...o read or record it If you test live wires make sure this function is deactivated before the measurement starts Otherwise the measurement will not be correct Short press the HOLD button to activate de...

Page 54: ...ions V V A mA A ACmV Short press the REL button to enter or exit REL measurement function The symbol will show 13 Replacing the Fuse Never operate the meter if the case is open DANGER TO LIFE 1 Turn t...

Page 55: ...ch the function if required Are the incorrect leads used Check the terminal assignment or connection of the probe leads Is the HOLD function activated Deactivate the HOLD function No measurement possi...

Page 56: ...cleaning Clean the product with a dry fibre free cloth If there is any malfunction stop using the meter and send it for maintenance Maintenance and service must only be carried out by qualified profes...

Page 57: ...d that different obligations about the return or recycling of WEEE may apply in countries outside of Germany b Rechargeable batteries Remove batteries rechargeable batteries if any and dispose of them...

Page 58: ...s distance 19 mm COM V Auto power off approx 15 minutes Data hold approx 15 minutes Measuring category CAT III 600 V Degree of contamination 2 Direct voltage max 600 0 V DC Alternating voltage max 600...

Page 59: ...d for one year at Ambient temperature 3 C 5 C 75 RH non condensing Operating temperature 18 to 28 C 1 C A temperature coefficient applies outside of this temperature range 0 1 x specified accuracy C T...

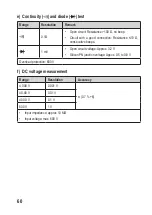
Page 60: ...ction Resistance 10 consecutive beeps 1 mV Open circuit voltage Approx 3 2 V Silicon PN junction voltage Appox 0 5 to 0 8 V Overload protection 600 V f DC voltage measurement Range Resolution Accuracy...

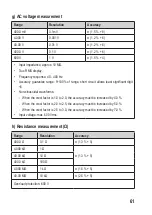
Page 61: ...allows least significant digit 5 Non sinusoidal waveforms When the crest factor is 1 0 to 2 0 the accuracy must be increased by 4 0 When the crest factor is 2 0 to 2 5 the accuracy must be increased...

Page 62: ...h frequency 10kHz 1 Vpp Input amplitude 30 Vpp Frequency 1 kHz duty ratio 10 0 to 90 0 Frequency 1 kHz duty ratio 30 0 to 70 0 j DC current measurement Range Resolution Accuracy A 400 0 A 0 1 A 1 0 6...

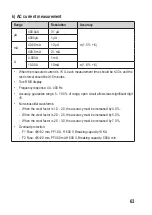
Page 63: ...ncy response 40 400 Hz Accuracy guarantee range 5 100 of range open circuit allows least significant digit 5 Non sinusoidal waveforms When the crest factor is 1 0 2 0 the accuracy must be increased by...

Page 64: ...le 70 d Piles accumulateurs 70 e Multim tre 70 f Sondes 71 8 l ments de fonctionnement 72 a Vue d ensemble 72 b Molette 73 9 Affichage et symboles 74 10 Insertion remplacement des piles 75 11 Fonction...

Page 65: ...e 87 b Entretien 87 16 limination des d chets 88 a Produit 88 b Piles accumulateurs 88 17 Caract ristiques techniques 89 a G n ralit s 89 b Fusibles 90 c Tol rances de mesure 90 d Mesure de la capacit...

Page 66: ...rmations importantes concernant la mise en service et l utilisation Vous devez prendre cela en consid ration si vous devez fournir ce produit un tiers Par cons quent conservez ce mode d emploi afin de...

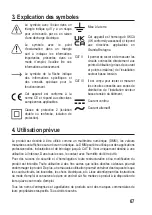
Page 67: ...urer les circuits connect s aux zones de distribution de l installation secteur basse tension du b timent Courant continu Courant alternatif 4 Utilisation pr vue Le produit est destin tre utilis comme...

Page 68: ...de s curit Nous d clinons toute responsabilit en cas de dommages corporels ou mat riels r sultant du non respect des consignes de s curit et des informations relatives la manipulation correcte conten...

Page 69: ...t par un technicien ou un centre de r paration agr Si vous avez des questions qui sont rest es sans r ponse apr s avoir lu toutes les instructions d utilisation contactez notre service de support tech...

Page 70: ...piles accumulateurs anciennes et de nouvelles piles accumulateurs dans l appareil peut entra ner la fuite d accumulateurs et endommager l appareil Les piles accumulateurs ne doivent pas tre d mantel...

Page 71: ...r hension indiqu es sur les sondes de mesure En cas d utilisation des sondes de mesure sans capuchon les mesures entre le multim tre et le potentiel de terre ne doivent pas tre effectu es au del de la...

Page 72: ...14 1 Bouton HOLD Torche 2 Zone de mesure de tension sans contact 3 Torche 4 Indicateur LED Tri color 5 cran 6 Bouton SEL 7 Bouton RANGE 8 Molette de fonctions 9 Borne de 10 A max 10 Borne COM 11 Born...

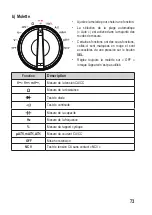
Page 73: ...rouge et sont accessibles via une pression sur le bouton SEL R glez toujours la molette sur OFF lorsque l appareil n est pas utilis Fonction Description V V mV Mesure de la tension CA CC Mesure de la...

Page 74: ...de tension millivolt volt A mA A Unit s de courant microamp re milliamp re amp re k M Unit s de r sistance ohm kilo ohm m gaohm nF F mF Unit s de capacit nanofarad microfarad millifarad Hz kHz Mhz Uni...

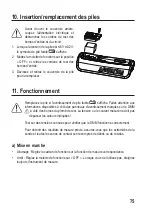
Page 75: ...e pile faible s affiche Faites attention aux informations disponibles c t des panneaux d avertissement marqu s sur le DMM c t des bornes du plomb de test La tension ou le courant mesur ne doit pas d p...

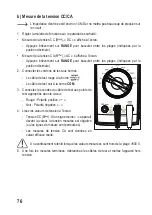
Page 76: ...ale 2 Connecter les cordons de test aux bornes Le c ble de test rouge la borne Le c ble de test noir la borne COM 3 Connectez les sondes du c ble de test aux points de test appropri s dans le circuit...

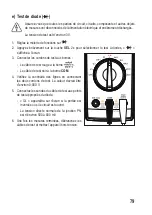
Page 77: ...u c ble de test aux points de test appropri s dans le circuit Rouge Polarit positive Noir Polarit n gative V rifiez la continuit des lignes en connectant les deux cordons de test La valeur de l imp da...

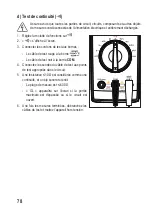
Page 78: ...test aux bornes Le c ble de test rouge la borne Le c ble de test noir la borne COM 4 Connectez les sondes du c ble de test aux points de test appropri s dans le circuit 5 Une r sistance 10 est consid...

Page 79: ...onnecter les cordons de test aux bornes Le c ble de test rouge la borne Le c ble de test noir la borne COM 4 V rifiez la continuit des lignes en connectant les deux cordons de test La valeur devrait t...

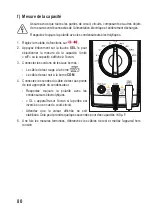
Page 80: ...ou la capacit s affiche l cran 3 Connecter les cordons de test aux bornes Le c ble de test rouge la borne Le c ble de test noir la borne COM 4 Connectez les sondes du c ble de test aux points de test...

Page 81: ...fonctions sur Hz Hz appara t l cran 2 Appuyez bri vement sur le bouton SEL pour passer de la mesure de la fr quence Hz celle du rapport cyclique 3 Connecter les cordons de test aux bornes Le c ble de...

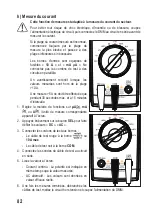
Page 82: ...rs mesur es sont hors de la plage 10 A Une mesure 5 A ne doit tre effectu e que pendant 30 secondes max et 15 minutes d intervalle 1 R glez la molette de fonctions sur A mA ou A l unit de mesure corre...

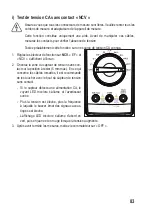
Page 83: ...n sur NCV EF et NCV s affichent l cran 2 Orientez la zone du capteur de tension sans con tact sur la position tester 5 mm max En ce qui concerne les c bles torsad s il est recommand de les toucher ave...

Page 84: ...ement sur le bouton RANGE Auto dispara t de l cran Appuyez bri vement sur RANGE pour basculer entre les plages indiqu es par la position d cimale Quitter la plage manuelle Appuyez longuement sur la to...

Page 85: ...tenant la touche SEL enfonc e tournez la molette de fonctions sur n importe quelle position 3 Le symbole dispara t 2Activer l arr t automatique Red marrez l appareil en r glant le s lecteur de fonctio...

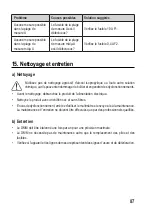
Page 86: ...r plus d informations voir la section Caract ristiques techniques 6 Remettez les couvercles en place avec pr caution 14 D pannage Probl me Causes possibles Solution sugg r e La DMM ne s allume pas Pil...

Page 87: ...carilspeuventendommagerlebo tieretengendrerdesdysfonctionnements Avant le nettoyage d branchez le produit de l alimentation lectrique Nettoyez le produit avec un chiffon sec et sans fibres En cas de...

Page 88: ...ponsable de l effacement des donn es personnelles sur l quipement usag mettre au rebut Veuillez noter que dans les pays autres que l Allemagne d autres obligations peuvent s appliquer pour la remise e...

Page 89: ...ile faible 6 V 0 2 V Mesurer la distance entre les prises 19 mm COM V Arr t automatique env 15 minutes Maintien des donn es env 15 minutes Cat gorie de mesure CAT III 600 V Degr de contamination 2 Ten...

Page 90: ...e pendant un an Temp rature ambiante 3 C 5 C 75 HR sans condensation Temp rature de fonctionnement 18 28 C 1 C Un coefficient de temp rature s applique en dehors de cette plage de temp rature 0 1 x pr...

Page 91: ...R sistance 10 bips cons cutifs 1 mV Tension de circuit ouvert env 3 2 V Tension de jonction PN en silicone env 0 5 0 8 V Protection contre les surcharges 600 V f Mesure de la tension CC Port e R solut...

Page 92: ...le moins significatif 5 Formes d ondes non sinuso dales Lorsque le facteur de cr te est de 1 0 2 0 la pr cision doit tre augment e de 4 0 Lorsque le facteur de cr te est de 2 0 2 5 la pr cision doit...

Page 93: ...le aux passage par z ro ondes carr es de fr quence 10 kHz 1 Vpp Amplitude d entr e 30 Vpp Fr quence 1 kHz rapport cyclique 10 0 90 0 Fr quence 1 kHz rapport cyclique de 30 0 70 0 j Mesure du courant C...

Page 94: ...rantie de la pr cision 5 100 de la port e un cirquit ouvert permet le chiffre le moins significatif 5 Formes d ondes non sinuso dales Lorsque le facteur de cr te est de 1 0 2 0 la pr cision doit tre a...

Page 95: ...95...

Page 96: ...ten 101 c Zekering 102 d Batterij accu s 102 e Multimeter 102 f Sondes 103 8 Bedieningselementen 104 a Overzicht 104 b Draaiknop 105 9 Display en symbolen 106 10 Batterijen plaatsen vervangen 107 11 B...

Page 97: ...en onderhoud 119 a Reiniging 119 b Onderhoud 119 16 Verwijdering 120 a Product 120 b Batterijen accu s 120 17 Technische gegevens 121 a Algemeen 121 b Zekeringen 122 c Meettoleranties 122 d Capaciteit...

Page 98: ...Deze bevat belangrijke informatie over de werking en hantering van het product Als u dit product aan derden overhandigt doe dan tevens deze gebruiksaanwijzing erbij Bewaar deze gebruiks aanwijzing vo...

Page 99: ...allatie CAT III Het is van toepassing op test en meetcircuits die zijn aangesloten op het distributiegedeelte van de laagspanning netinstallatie van het gebouw Gelijkstroom Wisselstroom 4 Beoogd gebru...

Page 100: ...dien de veiligheidsinstructies en de aanwijzingen voor een juiste bediening in deze gebruiksaanwijzing niet worden opgevolgd aanvaarden wij geen verantwoordelijkheid voor hieruit resulterend persoonli...

Page 101: ...eparaties mogen alleen uitgevoerd worden door een technicus of een daartoe bevoegd servicecentrum Als u nog vragen heeft die niet door deze gebruiksaanwijzing worden beantwoord kunt u contact opnemen...

Page 102: ...oor elkaar gebruiken van oude en nieuwe batterijen accu s in het apparaat kan leiden tot batterijlekkage en beschadiging van het apparaat Batterijen accu s mogen niet worden ontmanteld kortgesloten of...

Page 103: ...ng niet vast buiten de gripbereikmarkeringen die op de meetsondes staan aangegeven Wanneer u de meetsondes gebruikt zonder afdekdoppen dan mogen metingen tussen de meter en aardingspotentiaal niet wor...

Page 104: ...4 1 HOLD toets 2 Contactloos spanningsmeetpunt 3 Zaklantaarn 4 Driekleurige indicatie led 5 Display 6 SEL toets 7 RANGE toets 8 Functiedraaiknop 9 10 A max aansluitklem 10 COM aansluitklem 11 aansluit...

Page 105: ...in het rood gemarkeerd en kunnen worden geopend door op de toets SEL te drukken Stel de draaiknop altijd in op OFF wanneer niet in gebruik Functie Beschrijving V V mV AC DC spanningsmeting Weerstands...

Page 106: ...V Spanningseenheden millivolt volt A mA A Stroomeenheden microamp re milliamp re amp re k M Weerstandseenheden ohm kilo ohm megaohm nF F mF Capaciteitseenheden nanofarad microfarad millifarad Hz kHz M...

Page 107: ...nneer de lage batterij waarschuwing verschijnt Let goed op de informatie naast de waarschuwingsmarkeringen gemarkeerd op de DMM naast de aansluitingen voor de testkabels De gemeten spanning of stroom...

Page 108: ...uit de testkabels aan op de aansluitklemmen Rode testkabel op aansluitklem Zwarte testkabel op aansluitklem COM 3 Sluit de sondes van de testkabels aan op de juiste testpunten in het circuit Rood Posi...

Page 109: ...testkabels aan op de juiste testpunten in het circuit Rood Positieve polarieity Zwart Negatieve polariteit Controleer de kabels op continu teit door de twee testkabels aan te sluiten De impedantiewaa...

Page 110: ...abels aan op de aansluitklemmen Rode testkabel op aansluitklem Zwarte testkabel op aansluitklem COM 4 Sluit de sondes van de testkabels aan op de juiste testpunten in het circuit 5 Een weerstand van 1...

Page 111: ...estkabels aan op de aansluitklemmen Rode testkabel op aansluitklem Zwarte testkabel op aansluitklem COM 4 Controleer de kabels op continu teit door de twee testkabels aan te sluiten De waarde dient on...

Page 112: ...display worden weergegeven 3 Sluit de testkabels aan op de aansluitklemmen Rode testkabel op aansluitklem Zwarte testkabel op aansluitklem COM 4 Sluit de sondes van de testkabels aan op de juiste tes...

Page 113: ...al op de display verschijnen 2 Druk kort op de toets SEL om te wisselen tussen de frequentiemeting Hz en bedrijfscyclusmeting 3 Sluit de testkabels aan op de aansluitklemmen Rode testkabel op aansluit...

Page 114: ...n waarschuwing klinken wanneer gemeten waarden buiten het bereik 10 A vallen Metingen 5 A mogen alleen max 30 seconden lang en op intervallen van 15 minuten worden uitgevoerd 1 Draai de functiedraaikn...

Page 115: ...CV en de display zal EF en NCV weergeven 2 Richt het contactloze spanningssensorpunt op de testplek max 5 mm Voor getwiste kabels wordt het aanbevolen om de kabel aan te raken met het uiteinde van de...

Page 116: ...nen Druk kort op RANGE om de bereiken te doorlopen aangegeven door de decimaalpositie Handmatige bereikmodus verlaten Druk lang op de toets RANGE of draai de functiedraaiknop Auto zal op de display ve...

Page 117: ...raai de functiedraaiknop tegelijkertijd naar een willekeurige positie 3 Het symbooltje zal verdwijnen 2Automatische uitschakelfunctie activeren Herstart het apparaat door de functiedraaiknop naar OFF...

Page 118: ...ragraaf Technische gegevens voor meer informatie 6 Plaats de covers voorzichtig terug 14 Problemen oplossen Probleem Mogelijke oorzaak Aanbevolen oplossing De DMM schakelt niet in Uitgeputte batterij...

Page 119: ...kunnen brengen aan de behuizing en zelfs afbreuk kan doen aan de werking van het product Koppel het product v r iedere reiniging los van de stroomvoorziening Reinig het product met een droog pluisvrij...

Page 120: ...nsgegevens op het te verwijderen oude apparaat is de eindge bruiker verantwoordelijk Houd er rekening mee dat in landen buiten Duitsland andere verplichtingen kunnen gelden voor het inleveren van oude...

Page 121: ...V Afstand meetaansluitingen 19 mm COM V Automatische uitschakeling ong 15 minuten Gegevens behouden ong 15 minuten Meetcategorie CAT III 600 V Verontreinigingsgraad 2 Gelijkspanning max 600 0 V DC Wi...

Page 122: ...bij Omgevingstemperatuur 3 C 5 C 75 RH niet condenserend Bedrijfstemperatuur 18 tot 28 C 1 C Een temperatuurco ffici nt is van toepassing buiten dit temperatuurbereik 0 1 x gespecificeerde nauwkeurigh...

Page 123: ...ng Weerstand 10 opeenvolgende pieptonen 1 mV Spanning open circuit ong 3 2 V Spanning siliconen PN knooppunt ong 0 5 tot 0 8 V Overbelastingsbescherming 600 V f DC spanningsmeting Bereik Resolutie Nau...

Page 124: ...ante cijfer 5 toe Niet sinusvormige golfvormen Wanneer de piekfactor 1 0 tot 2 0 is dan moet de nauwkeurigheid met 4 0 worden verhoogd Wanneer de piekfactor 2 0 tot 2 5 is dan moet de nauwkeurigheid m...

Page 125: ...frequentie 10kHz 1 Vpp Ingangsamplitude 30 Vpp Frequentie 1 kHz bedrijfscyclus 10 0 tot 90 0 Frequentie 1 kHz bedrijfscyclus 30 0 tot 70 0 j DC stroommeting Bereik Resolutie Nauwkeurigheid A 400 0 A...

Page 126: ...urigheid bereik 5 100 van bereik open circuit laat het minst sig nificante cijfer 5 toe Niet sinusvormige golfvormen Wanneer de piekfactor 1 0 2 0 is dan moet de nauwkeurigheid met 4 0 worden verhoogd...

Page 127: ...127...

Page 128: ...esent the technical status at the time of printing Copyright 2022 by Conrad Electronic SE Ceci est une publication de Conrad Electronic SE Klaus Conrad Str 1 D 92240 Hirschau www conrad com Tous droit...

Reviews: