background image

VoloAccess™ 

User Manual 

Copyright © Vololink Pty Ltd 2006-2010 

V1.43 July 2010 

Page 68 of 78 

Voice/Data Problems 

No voice 


Does your account with your Service Provider have voice support? 


Check the 

Telephone handset


Low Data Throughput 


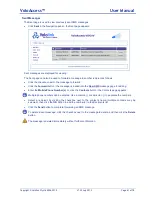
From  the 

Admin  >  Status

  page,  check  the 

Cellular  Network  Status

.  The  best  connection  speed 

will be available if it reports 

Logged on


WCDMA

. There is nothing that can be done to improve data 

throughput if the area you are using the VoloAccess in is not serviced by a high speed network. 

LAN Problems 

No LAN Connection 


If you cannot access the local network from a computer that is connected to the VoloAccess, perform 
the following actions to identify and solve the problem: 


Check that at least one of the LAN connector indicators is On. If not, check that the Ethernet cable is 
properly  connected  or  try  using  another  Ethernet  cable.  Also,  the  yellow  Activity  light  on  the 
computer‟s Network Interface Card (NIC) should flash if network traffic is present. 


Check  that  the  computer  is  configured  to  obtain  an  IP  address  automatically  using  DHCP.  If  not, 
change  the 

computer‟s  TCP/IP  settings.  For  further  information,  see 

C

hecking  the  Computer‟s 

network configuration

 or the manual of your operating system. 


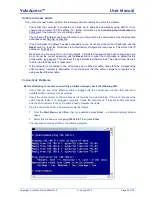
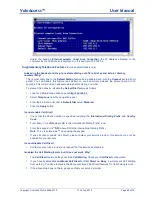
Check  that  an  IP  Address  has  been  allocated  to  your  computer  by  the  VoloAccess.  To  do  this, 
proceed as follows: 


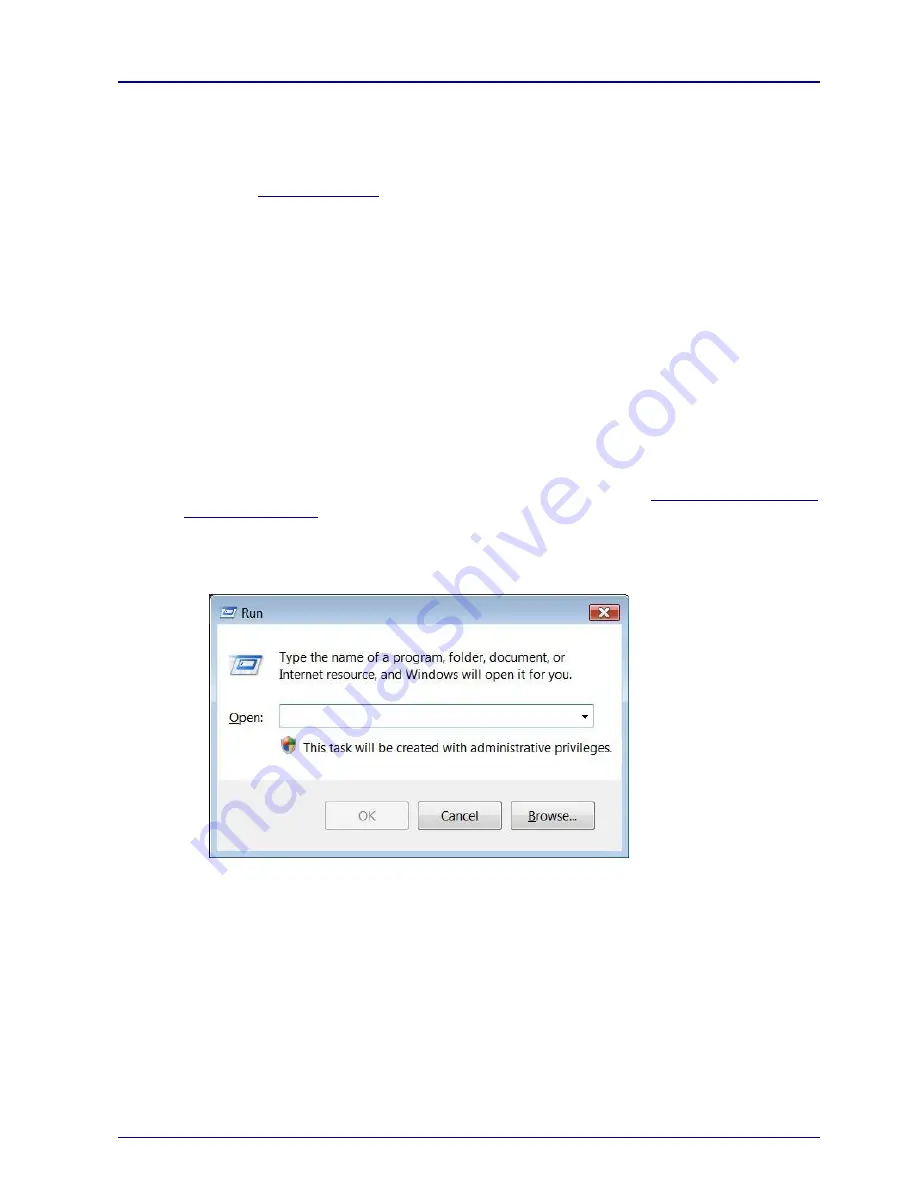
From the Windows Start menu select 

Run

 - The Run dialog appears. 


Enter 

cmd

 as the command to run and press 

Enter

.  


The Windows Cmd window appears. 


Type 

ipconfig

 and press 

Enter

.  

The 

Windows IP Configuration

 is displayed. 

Summary of Contents for VoloAccess

Page 1: ...3G Convergent Wireless Terminal Voice SMS Data USER MANUAL ...

Page 2: ...on 9 Resetting the VoloAccess 9 VoloAccess Indicators 10 Power Supply 10 Mobile Network Connection 10 Received Signal Strength 10 Wireless Local Area Network WLAN 10 Local Area Network LAN 11 Wide Area Network WAN 11 Phone 1 Phone 2 11 Power up sequence 11 Setting up the VoloAccess 12 VoloAccess Location 12 Recommendations 12 Mounting Position 12 Connecting the VoloAccess to a Computer 13 Preparat...

Page 3: ... 53 Event Log 54 Factory Defaults 55 Restarting the VoloAccess 56 SMS Services 57 Reply to an SMS message 57 Forward an SMS message 57 Delete an SMS message 57 Creating a new SMS message 58 Adding new entries to the Contacts page 58 Editing an entry in the Contacts list 59 Deleting an entry in the Contacts list 59 Saving a Draft Copy of a Message 60 Sent Messages 61 Troubleshooting 62 Indicators 6...

Page 4: ...the purposes of and subject to the conditions prescribed under the Copyright Act no part of it may in any form or by any means electronic mechanical micro copying photocopying recording or otherwise be reproduced stored in a retrieval system or transmitted without prior written permission from Vololink Pty Ltd Product or company names are trademarks or registered trademarks of their respective hol...

Page 5: ...terminals are designed to operate within the limits for exposure to RF energy set by national authorities and international health agencies These limits are verified by SAR Specific Absorption Rate measurements which are usually performed on products that are intended for use at the ear As the VoloAccess is not intended to be used close to the human body SAR measurements are not applicable to the ...

Page 6: ...nd Internet connections are all simultaneously available The VoloAccess enables simultaneous HSPA or HSPA data access for multiple users via the Ethernet ports or wirelessly using WiFi Once the VoloAccess has been connected and powered up the following services are available Voice Services Voice enabled models of the VoloAccess provide the equivalent of a PSTN or fixed line connection via the 3G m...

Page 7: ...essages As with computers there is a lot of jargon and acronyms associated with wireless communications To make understanding this manual easier a Glossary of Terms is included For the technically minded a full Specification Sheet is included at the end of this manual There is a Troubleshooting section to assist with any difficulties that you may have with the VoloAccess Conventions used in this M...

Page 8: ...hroughout this manual Before attempting to install the SIM disconnect the power supply The SIM is installed in the side of the VoloAccess as follows Remove the side panel the one without the Indicators on by slipping a narrow object like a credit card or a small screwdriver under the edge and gently prise it off to reveal the SIM compartment Latch Press the cover latch and remove the cover to reve...

Page 9: ...tting the VoloAccess PHONE Phone ports Connect a phone here Voice enabled models only WAN By default the WAN port can be used as a LAN port In this configuration the VoloAccess is a five port switch If the WAN port is configured to connect the VoloAccess to an external modem for alternative WAN access the VoloAccess is then a four port switch The WAN port can be disabled See Operating Mode under S...

Page 10: ...tors sequence is finished and the unit enters normal operation This is done by pressing and holding down the reset button at the back of the unit The VoloAccess reset button has three functions described in the following table see notes below Reboot the VoloAccess Same as switching off and on Reset the VoloAccess Reset to factory configuration Clear VoloAccess flash memory Reset and clear saved da...

Page 11: ... power or it is switched OFF OFF Mobile Network Connection Status Mobile Network Indicator SIM is not available missing or locked OFF Searching for a mobile network ON flashing at 1 second intervals Connected to a mobile network voice and SMS available but no data service ON flashing at 2 second intervals Broadband data service established all services available ON solid Received Signal Strength S...

Page 12: ...able is not connected to the WAN port OFF Network cable is connected to the WAN port and a WAN is present ON solid WAN network traffic is detected ON flashing Phone 1 Phone 2 Status Phone 1 Phone 2 Indicators Phone is On Hook and idle OFF Phone is Off Hook ON flashing at 1 second intervals Phone is receiving a call or dialling out ON flashing at 1 second intervals Power up sequence During start up...

Page 13: ... locations Position the VoloAccess antennas as high as possible for better reception Do not install the VoloAccess in a bathroom a wet or damp environment or an outdoor location Do not install the VoloAccess in locations or rooms that contain large amounts of metal steel or wiring Locations that contain large amounts of metal inhibit the transmission of Radio Frequency RF Do not expose the VoloAcc...

Page 14: ...for connection to the VoloAccess do the following In Windows XP Load the Windows Control Panel and double click Network Connections Under the heading LAN or High Speed Internet right click Local Area Connection and select Properties Select Internet Protocol TCP IP and click the Properties button A dialog box similar to the one below appears In Windows Vista Load the Windows Control Panel and doubl...

Page 15: ...connect to the Admin interface as follows Loading the Admin page Open your browser and enter the address http 192 168 0 1 in the Address line shown below then press Enter The VoloAccess Log In dialog appears Type the User name the User name is admin Type the Password the default password is password you can change this later Click the OK button the VoloAccess Index page appears Click Admin the Adm...

Page 16: ...the VoloAccess as a wireless telephone connection Plug the phone lead into one of the Phone ports on the back of the VoloAccess Lift the handset you should hear a dial tone and dial the number you wish to call The Phone Indicator for the selected line on the front of the VoloAccess will flash when the handset is off hook If Power on PIN Lock has been enabled the dial tone will be different an inte...

Page 17: ...rom your service provider in the event it is lost due to a configuration error or a reset sometime in the future What is the APN The APN is the name of your 3G services provider s wireless access point To configure the APN for your 3G services provider start by loading Admin as described above From the Navigation panel on the left select Quick Setup the Quick Setup page appears Enter your 3G servi...

Page 18: ... The WAN Ethernet interface may be used if Failover is enabled To view the WAN status click WAN in the Navigation panel the WAN page appears Following is a description of the items displayed Interface The name of the Interface Status Displays the current status of the interface Verified Displays the Verified status Active The active interface has a blue icon in this field ...

Page 19: ...description of the information displayed together with the settings Network Status Displays the 3G interface connection status as follows State Connection Status click Refresh to update the display IP Address The IP address allocated to the VoloAccess Subnet Mask the network Subnet Mask Primary DNS IP address of the Primary Domain Name Server Secondary DNS IP address of the Secondary Domain Name S...

Page 20: ... button PPP authentication can also be configured on the Quick Setup page Module IMSI International Mobile Subscriber Identity The IMSI number is a unique 15 digit code that is attached to every SIM and makes it possible for mobile networks to identify the home country and network of a subscriber IMEI The International Mobile Equipment Identity number A number unique to every GSM and UMTS mobile d...

Page 21: ...s to reflect the Enabled state and provide the Change PIN facility as follows When Power on PIN Lock is enabled all services except emergency calls voice enabled models only are not available until the SIM is unlocked To unlock the SIM using the telephone keypad on a voice enabled VoloAccess Lift the handset and enter NNNN where NNNN is the SIM PIN then Replace the handset To unlock the SIM using ...

Page 22: ...nge the PIN Enter the new PIN in the editbox provided Re enter the new PIN in the Repeat new PIN editbox Click the Apply button to make the change You are prompted to enter the current old PIN as confirmation Enter the current old PIN in the editbox provided and click the Apply button The PIN is now changed ...

Page 23: ... is necessary to contact your service provider to obtain the PUK Personal Unlocking Key for your SIM To unlock the SIM Enter the PUK in the editbox provided Enter a new PIN in the editbox provided Click the Apply button After about 5 10 seconds The Mobile Network Connection indicator on the VoloAccess turns ON On the Admin Status page the WAN Status State changes from Not Connected to Connected ...

Page 24: ...s module as the secondary interface The preference primary or secondary of the WAN interfaces is configurable Factors that may contribute to the selection of the primary interface are items like cost reliability and speed The following diagram shows the VoloAccess utilizing both a 3G wireless broadband connection and a wired connection ADSL modem to implement automatic failover The connectivity of...

Page 25: ... order to provide sufficient time to receive a reply The range of values is Min 1 second to Max 3 minutes Poll Failure Count The number of successive DNS resolution failures before the interface is considered to have failed Once the specified number of failures has been reached the next available interface will become the active interface The range of values is Min 1 to Max 100 Interface Order Def...

Page 26: ...may be displayed depending on the interface type A connected interface has the status Connected Other status messages will depend on the type of interface For example a 3G interface may have a status of Connected Not connected network not online Not connected A WAN interface may have a status of Connected Bridged Disabled Connecting By default the WAN port is Bridged see Enable WAN Ethernet Port f...

Page 27: ...ess of the external Ethernet WAN Secondary DNS server The above information can be obtained by accessing the configuration page s of the external WAN modem router Refer to the modem router documentation for further information Configure the WAN Ethernet port to obtain an IP address automatically as follows In the navigation panel select WAN Ethernet the WAN Ethernet page appears Use the drop down ...

Page 28: ...gs The Operating Mode of DHCP should be suitable for most users however these items can be configured if necessary To configure these settings select Manual as the Operating Mode Operating Mode From the drop down list box select the Operating Mode The options are Disabled The Ethernet interface is disabled Bridged The WAN Ethernet port is bridged and operates as a LAN port In this configuration th...

Page 29: ...rnet Primary DNS server DNS 2 The IP address of the WAN Ethernet Secondary DNS server Review the implementation of Failover by returning to the WAN page in the navigation panel select WAN Observe the Connection and Verification status of the WAN interfaces When all interfaces are fully operational they are shown as being Connected and Verified with the primary interface Active ...

Page 30: ...P address automatically by having your DNS records changed when your IP address changes Admin allows you to configure Dynamic DNS using a third party provider It is necessary to register with a Dynamic DNS provider before configuring the VoloAccess to use Dynamic DNS To access the Dynamic DNS page select Dynamic DNS in the navigation panel the Dynamic DNS page appears Dynamic DNS is configured as ...

Page 31: ...P Address and Netmask The IP Internet Protocol Address and Netmask of the VoloAccess MTU MTU Maximum Transmission Unit the size of the largest packet that a network protocol can transmit DHCP Server The status of the DHCP Dynamic Host Configuration Protocol Server in the VoloAccess with an option to View leases see below Traffic Statistics displays the following RX Packets and Bytes The number of ...

Page 32: ...e displayed Settings To view or edit the LAN Settings select LAN followed by Settings in the Navigation panel the LAN Settings page appears Most users will not need to change anything on this page However if necessary you can Define the IP Address and Netmask of the VoloFone Enable or Disable the DHCP Server Define the IP Range assigned by the DHCP Server Set the Lease Time of the IP Address ...

Page 33: ...gured Static DHCP Static DHCP configures the DHCP server on your VoloAccess to always assign the same static IP address to a specific network adapter installed in a computer on the LAN Every network card has its own unique address the MAC Media Access Control address that is used to identify it on the LAN At boot time the computer requests its IP address from the VoloAccess DHCP server The DHCP se...

Page 34: ...PN Click the Apply button You will need to obtain the following information from the administrator of the remote server Remote Host Address Remote Network Address Remote Network Mask Remote Network Gateway Authentication Key A Pre Shared Key PSK The VPN is implemented using IPsec in Network to Network mode This means that the VoloAccess is a VPN router providing connectivity between two LANs Curre...

Page 35: ...rward in the Navigation panel the Port Forward page is displayed Enter the Server IP address and Server Port s select the Protocol from the drop down list and enter the NAT Port s then click the Add button Example In this example port forward is used to allow incoming access to an internal web server Configuration Item Explanation Server IP 192 168 0 100 The IP address of the server on the interna...

Page 36: ...g diagram WiFi is also referred to as WLAN By default WiFi is Disabled To set up a wireless network it is necessary to configure both the VoloAccess and the computer or computers that will be connecting wirelessly Configuring WiFi WiFi on the VoloAccess is configured as follows Select WiFi from the navigation panel the WiFi page appears Use the drop down list next to WiFi Access Point and select E...

Page 37: ...ings and is not recommended There are three settings available for Security Mode they are WEP Wired Equivalent Privacy is a protocol used to secure WiFi networks To configure WEP as the Security Mode select WEP from the drop down list the page reloads automatically and displays the WEP Authentication and WEP Encryption Key edit boxes Select the WEP Authentication method OPEN or SHARED from the dro...

Page 38: ...page appears From the drop down list next to MAC Address Filtering select Enabled From the drop down list next to Filter Mode select Allow or Deny You can choose to allow or deny all specified clients that is all allowed or all denied access Enter the MAC address of the client in the format nn nn nn nn nn nn and click the Add button Continue adding MAC addresses and when complete click the Apply b...

Page 39: ... run the Setup program supplied with the WPS capable device This usually involves inserting the supplied CD into the computer s DVD CD drive and allowing it to run automatically If this is not the case refer to the user manual supplied with the WPS capable device on how to install the software The Setup program should take you through the steps required to connect to a WPS capable Access Point in ...

Page 40: ...able device on how to install the software The Setup program should take you through the steps required to connect to a WPS capable Access Point in this case the VoloAccess If an option for PIN or PBC method of connection is offered select PBC Continue by following the steps offered by the Setup program If prompted by the Setup program to initiate WPS on the Access Point press the WPS button shown...

Page 41: ...u defined when setting up WiFi on the VoloAccess and click Connect If security is configured on the VoloAccess a dialog box is displayed requesting a Network key Type in the same pre shared key that was entered when setting up WiFi on the VoloAccess Re enter the key as confirmation then click Connect After a delay of approximately 5 to 10 seconds the message Connected should display in the dialog ...

Page 42: ...t then Control Panel Click Network and Internet Click Network and Sharing Center Click Connect to a network the following dialog box appears for you to select a network Select the network name SSID that you defined when setting up WiFi on the VoloAccess and click Connect the Connect to a network dialog box appears ...

Page 43: ...on the VoloAccess then click Connect please wait while Windows networking connects to the VoloAccess After a delay of approximately 5 to 10 seconds the following dialog box appears Click the Close button Open your web browser you should be online and able to access the Internet If you are unable to access the Internet please refer to the Troubleshooting guide ...

Page 44: ...lect from the drop down list Line Reversal If a Private Automatic Branch eXchange PABX is connected to one of the VoloAccess phone ports it may be necessary to enable this feature as some features of a PABX require Line Reversal to clear down the line or help hang up the call This feature is required when a PABX is using PSTN as opposed to ISDN To enable Line Reversal select Enabled from the drop ...

Page 45: ...le these settings use the drop down list then click the Apply button Call Divert To configure Call Divert select Telephone followed by Call Divert in the Navigation panel the Call Divert page is displayed The following can be configured Divert All Voice Calls Unconditional Call Diversion Divert Voice Calls when Busy Busy Call Diversion Divert Voice Calls when Not Reachable Phone Not Reachable Call...

Page 46: ...ing Call Barring Disabled All Incoming Call Barring is disabled All Incoming Calls Barred All Incoming Calls to the VoloAccess are Barred All Incoming International Calls when Roaming Barred All Incoming International Calls are barred when the VoloAccess is Roaming Outgoing Calls All Outgoing Call Barring Disabled All Outgoing Call Barring is disabled All Outgoing Calls Barred All Outgoing Calls f...

Page 47: ...ound Caller ID Outbound Caller ID Call Waiting Call Divert Call Barring Multi party Calls Call Transfer Call Holding Call Waiting Throughout this section the instructions will refer to the Flash key which can be labelled as Flash or Recall on a telephone Not all telephones have a Flash key In which case use the Telephone page in Admin to configure Telephone Supplementary Services When you see this...

Page 48: ... when No Reply enable Divert Call when No Reply disable 61 number delay Flash where delay is 5 to 30 seconds 61 Flash Divert Call when Not Reachable enable Divert Call when Not Reachable disable 62 number Flash 62 Flash Call Diversion Notes 1 If diversion of all voice calls is enabled and call diversion when either Phone is Busy or No Reply or Not Reachable is enabled it will first disable All Voi...

Page 49: ... is in progress Feature Keypad sequence Answer a Call in Waiting Flash2 Alternates between the calls Multiparty Call A call is in progress and there is another incoming call Flash2 to put current call on hold and pick up the incoming call then Flash3 to connect all calls Multiparty Call A call is in progress and you make another call Flash2 to put current call on hold make another call by Flash nu...

Page 50: ...Defaults Under the System Settings heading the following items appear Admin Password The default password for the VoloAccess is password This should be changed to protect access to your VoloAccess see below Remote access to Admin Enable disable remote access to Admin using the WAN IP Address see below Language Select the Language from the drop down list To change the Admin Password Enter the new p...

Page 51: ...he VoloAccess this is known to happen in some cases then Remote Access to Admin will not work A private IP address is in one of the following ranges 10 0 0 0 10 255 255 255 172 16 0 0 172 31 255 255 192 168 0 0 192 168 255 255 Setting the Date and Time To set the Date and Time on the VoloAccess follow these steps From the Navigation panel select System followed by Date Time the Date Time page appe...

Page 52: ...ect your Local Timezone Offset from the drop down list Click the Apply button To select the NITZ Time Server From the drop down list select NITZ then click the Apply button It is not necessary to specify a Local Timezone Offset as the NITZ protocol automatically determines this in conjunction with the mobile network NITZ support is network operator dependent ...

Page 53: ...mware the Firmware page appears Click the Browse button to locate the Firmware Update file a browse box opens Select the Firmware Update file Click the Open button to select the update Click the Update Firmware button to start the process The Firmware update will take between 3 and 8 minutes to complete Make sure that you click Update Firmware only once Do not attempt to cancel or interrupt the fi...

Page 54: ...Configuration button A confirmation dialog appears Click the Save button The Save As dialog appears Select a location to save the backup configuration file Click the Save button to complete the task A Download Complete dialog appears click Close To Restore a saved configuration Under the heading Restore Configuration click the Browse button a dialog opens for you to locate and select the previousl...

Page 55: ...ms Use the Back Forward keys see below at the bottom of the page to move through the Event Log Move to the first page of the Event Log Move to the previous page of the Event Log Move to the next page of the Event Log Move to the last page of the Event Log If you lodge a support request you may be asked to view the Event Log to assist in diagnosis To save a copy of all VoloAccess logs Click the Sav...

Page 56: ...ture This saved file can be restored once the VoloAccess has restarted To restore the VoloAccess to the factory settings select Factory Defaults from the Navigation panel the Factory Defaults page appears Select Yes from the drop down list Click the Apply button The VoloAccess will restart and display the Restarting page containing a prompt to click here to refresh If JavaScript is enabled in your...

Page 57: ...start page is displayed Select Restart now from the Drop down list Click the Apply button the Restarting page appears The VoloAccess will restart automatically and display the Index page If JavaScript is enabled in your Web browser it is not necessary to click here refresh to reload the page the refresh will happen automatically The VoloAccess can also be restarted using the Reset button ...

Page 58: ...he Inbox The Date time column shows the Date and Time the SMS message was received The From column displays the sending mobile number The Message column displays the text of the message From this page you can Reply Forward or Delete a message see below Reply to an SMS message Click the Reply button next to the message to reply to The New SMS page appears with the recipient s number in the Phone Nu...

Page 59: ...tiple recipients may be selected then click the OK button to add the number s to the Recipients list Type the message in the Message edit box As the message is entered the Message Size in characters is displayed The maximum number of characters per message is 160 Longer messages are split into smaller messages and combined at the receiving end Click the Send button to complete sending an SMS messa...

Page 60: ...w contact to the Contacts list Contacts are arranged in alphabetical order Contacts that you add can be edited or deleted those added by the SIM provider are read only and cannot be edited or deleted Editing an entry in the Contacts list To edit an existing contact Make the required changes to the Contact Name or Phone Number then click the Save button Deleting an entry in the Contacts list Click ...

Page 61: ...ick the Save button the message is saved in the Drafts area for later use To use a previously saved Draft message In the Navigation Panel select Drafts the Drafts page appears Click the Edit button next to the message to process the message is loaded into the New SMS message page for editing and sending To delete a draft message click the checkbox next to the message to delete and then click the D...

Page 62: ...e is loaded into the New SMS message page for editing Enter the Mobile Phone Number s or click the Contacts button the Contacts page appears Multiple phone numbers can be entered Use a comma or semicolon to separate the numbers Select a recipient by clicking the checkbox next to the contact s name multiple contacts may be selected then click the OK button to add the number s to the Recipients list...

Page 63: ...o restart the VoloAccess click Restart in the navigation panel of the Admin page If you still cannot access the VoloAccess switch the VoloAccess off then wait for 30 seconds before switching it on again To reset the settings to default factory configuration use a paper clip to press the Reset button Refer to Reset the VoloAccess to default factory configuration for further information The default ...

Page 64: ...is faulty you need to contact your service provider to obtain a replacement If the VoloAccess still does not work after performing the above steps please contact your Place of purchase The VoloAccess Signal Strength Indicator is On and the Network Indicator is Off The SIM you are using is not recognized by your service provider Please contact your service provider to register your service or have ...

Page 65: ...Refer to Call Barring in the User Manual for further information Check the SIM is not locked If the SIM PIN is required the dial tone is different an intermittent tone instead of the normal dial tone On a voice enabled VoloAccess unlock the SIM using the telephone keypad by lifting the handset and entering NNNN where NNNN is the SIM PIN then replace the handset SIM SIM Insertion See Network Indica...

Page 66: ...ccess to default factory configuration see above This will reset the login details to default values The default User Name is admin and the Password is password If the computer is connected to the VoloAccess via an Ethernet cable check that the corresponding LAN connector indicator is illuminated If not make sure that the cable is properly connected or try using another Ethernet cable Connectivity...

Page 67: ...et Protocol TCP IP and click the Properties button The adjacent dialog appears Ensure that Obtain an IP address and Obtain DNS Server address are both set to automatic In Windows Vista Load Windows Control Panel and double click Network and Sharing Center Next to Local Area Connection click View status The Local Area Connection Status window is displayed Click the Properties button The Local Area ...

Page 68: ... If the above steps do not resolve the problem check the Ethernet cable connection and the status of the LAN Indicators No Internet Access I cannot access any Web pages If you cannot access the Internet from any of your local devices perform the following actions to identify and solve the problem First check the Network Indicator it should be solid On If this is not the case refer to the instructi...

Page 69: ...ntify and solve the problem Check that at least one of the LAN connector indicators is On If not check that the Ethernet cable is properly connected or try using another Ethernet cable Also the yellow Activity light on the computer s Network Interface Card NIC should flash if network traffic is present Check that the computer is configured to obtain an IP address automatically using DHCP If not ch...

Page 70: ...panel From the drop down list next to Default Dial select Disabled Click the Apply button I cannot enable Call Divert Check that the phone number is specified including the International Dialing Prefix and Country Code From Admin it is NN where NN is the International Dialing Prefix and From the keypad it is NN where NN is the International Dialing Prefix Note The is entered as when using the keyp...

Page 71: ...er administrator and obtain the Server s host and network details and the authentication key to be configured in Admin Each time you turn your VoloAccess off and on your service provider allocates a new WAN IP Address unless your account has a static address A static IP address can be arranged with your 3G service provider If your WAN IP Address is dynamic changes each time you will need to notify...

Page 72: ...ork Authentication is the same in the computer s WiFi setup as was configured on the VoloAccess Check that the Encryption Key or Pre Shared Key is the same in the computer s WiFi setup as was configured on the VoloAccess Remove the Ethernet cable Restart the VoloAccess and the computer then attempt to reconnect If the above does not correct the problem try the following Windows XP From the Windows...

Page 73: ...olink com into IP addresses e g 208 77 188 166 which networking equipment needs to deliver information DDNS Dynamic Domain Name System A method protocol or network service that provides the capability for a networked device using the Internet Protocol Suite such as an IP router or computer system to notify a domain name server to change in real time the active DNS configuration of its configured h...

Page 74: ... Identity The IMSI number is a unique 15 digit code that is attached to every SIM and makes it possible for mobile networks to identify the home country and network of a subscriber ISP Internet Service Provider An Internet service provider is a business or organization that provides consumers or businesses access to the Internet and related services K Kbps kilobits per second A kilobit per second ...

Page 75: ...the same IP address to a specific computer on your LAN T TCP IP Transmission Control Protocol Internet Protocol The basic communication language or protocol of the Internet U UPnP Universal Plug and Play A set of computer network protocols that allow devices to connect seamlessly and to simplify the implementation of networks data sharing communications and entertainment in the home and corporate ...

Page 76: ...nology used in computers mobile phones PDAs gaming consoles and more It covers the various 802 11 technologies WPA WiFi Protected Access WPA is a security protocol used to secure wireless computer networks This protocol implements most of the IEEE 802 11i standard WPA2 WiFi Protected Access version 2 An advanced more secure form of the WPA protocol that implements all of the mandatory elements of ...

Page 77: ...lexible design Voice and Data or Data only Optional rechargeable Li ion battery pack for continuous operation during power failures Vololink Pty Ltd Melbourne Australia sales vololink com www vololink com 3G Wireless Network Air Interface WCDMA GSM GPRS EDGE frequencies 850 900 1800 1900MHz WLAN 802 11b g n WiFi access point 2 4000 2 4835GHz ISM Band 2 x 2 MIMO WiFi Protected Setup Internet Protoc...

Page 78: ...t and receiver Connect the equipment into an outlet on a circuit different from that to which the receiver is connected Consult the dealer or an experienced radio TV technician for help FCC Caution Any changes or modifications not expressly approved by the party responsible for compliance could void the user s authority to operate this equipment This device complies with Part 15 of the FCC Rules O...

Reviews: