background image

12

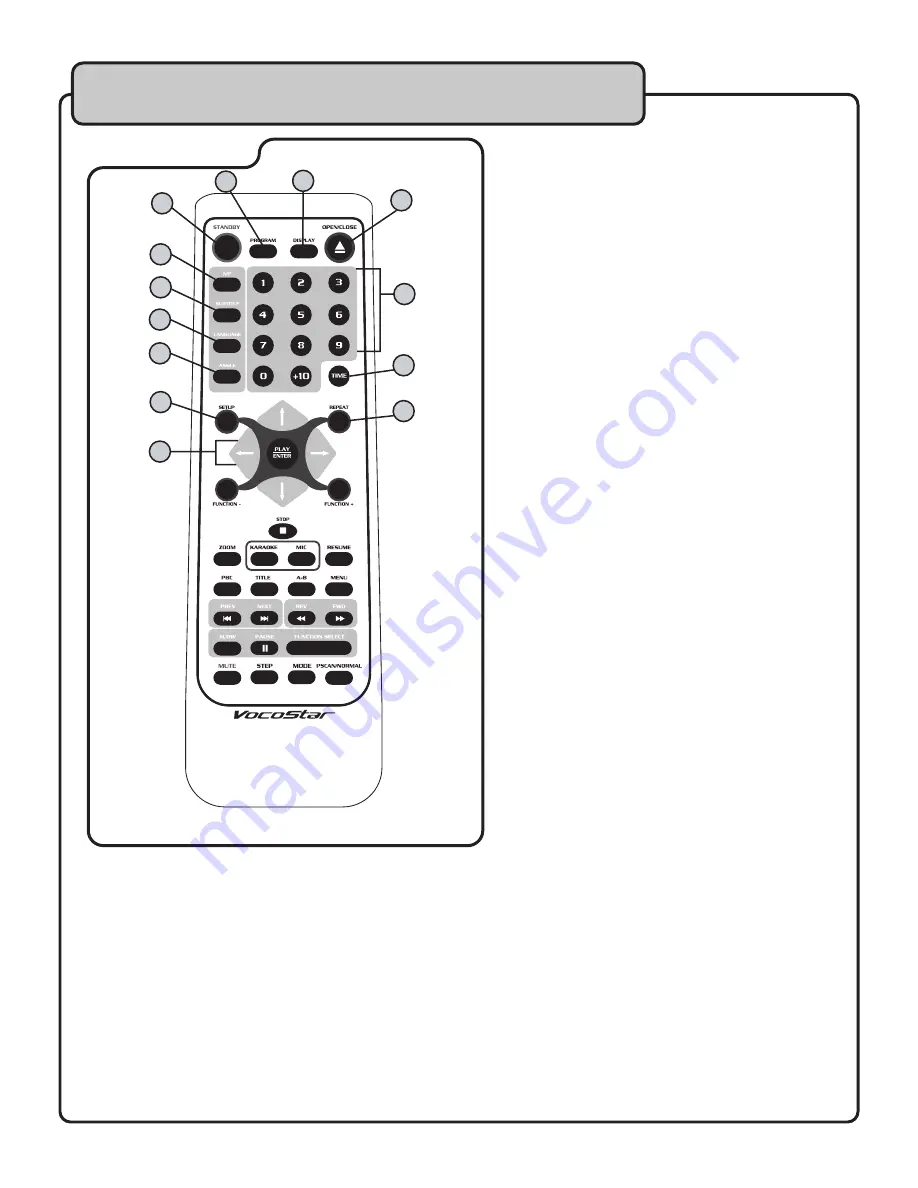
4. OPEN/CLOSE button

 - Use this button to open  

    the DISC TRAY compartment for inserting and  

    removing discs.

5. N/P (NTSC/PAL) button

 - Use this button to  

    select between NTSC/PAL video modes. For  

    U.S., Mexico, and Canada, select NTSC. For 

    European countries, select PAL.

6. SUBTITLE button

 - This button accesses the 

    subtitle options for the DVD player. Will only work 

    with DVDs that have subtitle options.

7. LANGUAGE button

 - This button switches  

    between the different LANGUAGES in a DVD that 

    contains multiple LANGUAGES.

8. ANGLE button

 - This button allows you to switch 

    between different video ANGLES on DVDs that 

    employ multi-angel video.

9. NUMBER pad

 - Use these buttons for direct 

    track selection, selecting tracks in program 

    mode or any other occasion where numeric entry 

    is needed.

10. TIME button

 - Press this button to display the 

      current disc’s information including type of disc,  

      current track or chapter (DVDs only), disc 

      format, and disc time.   You can use the 

      directional buttons and the number pad to skip 

      directly to a track or a chapter (DVDs only) 

      when this display is showing.

11. SETUP button

 - Use this button to access the 

      on-screen preference pages. See the SETTING 

      UP PREFERENCES section for more detailed  

      instructions on changing preferences.

12. REPEAT button

 - Press this button once to 

      have the currently selected track repeat 

      (REPEAT 1) after it completes. Press REPEAT 

      a second time and the entire disc will be 

      replayed once (REPEAT ALL).  Press REPEAT 

      a third time to turn REPEAT mode off. This 

      button also toggles between Mp3 Playback 

      Modes. See the Mp3 Playback Modes section 

      for instructions.

13. DIRECTIONAL buttons (< ^ > v)

 - These 

      buttons allow you to navigate through the DVD 

      menu screens, Setup Pages, and MP3 menus. 

      When viewing a photo from a PHOTO-CD, you 

      can rotate the picture using these directional 

      buttons.

Remote control descriptions

1

2

3

4

5

6

7

8

9

10

12

13

11

1. POWER/STANDBY

 - Use this button to turn the 

    DVG-399K ON or place it in STANDBY mode.

    NOTE:

 When the power is turned on, the unit will 

    automatically begin loading the first disc

.

2. PROGRAM button

 - This button accesses the program   

    selection menu.  In the program selection menu you can  

    customize the playback order of songs on a disc.

3. DISPLAY button

 - Use this button to toggle between the  

    different time display options or to turn off the time 

    display.  The options are Track Elapsed, Track Remaining,  

    Disc Elapsed, Disc Remaining and OFF.

Summary of Contents for DVG-399K

Page 1: ...o w n e r s m a n u a l DVG 399K Karaoke Player with Digital Key Control DVD CD G VCD Mp3 CD PHOTO CD...

Page 2: ...ONNECTED Audio connections 7 8 Video connections 8 9 Microphone connections 9 CONTROLS AND FUNCTIONS Front panel 10 Rear panel 11 Remote control 12 14 OPERATIONS Basic operations 15 Advanced operation...

Page 3: ...ther appliances including amplifiers that produce heat 10 Power Sources The appliance should be connected to a power supply only of the type described in the operating instructions or as marked on the...

Page 4: ...eep it in a safe place for future reference 2 Install your unit in a cool dry clean place away from windows heat sources and too much vibration dust moisture or cold Avoid sources of hum transformers...

Page 5: ...urtiss Court La Verne CA 91750 Toll Free 800 678 5348 TEL 909 593 8893 FAX 909 593 8890 VocoPro Company Email Directory Customer Service General Information info vocopro com Tech Support techsupport v...

Page 6: ...attention to the different levels in various recordings Taking a minute to do this now will help to prevent hearing damage or loss in the future After all we want you listening for a lifetime Used wi...

Page 7: ...atible with DVD CD G VCD Mp3 HDCD CD R CD RW WMA and PHOTO CD formats Progressive Scan Player 5 1 Channel Dolby Digital Component Video Output with VFD Display Coaxial S Video and Optical outputs L R...

Page 8: ...NOTE Make sure that your input device is set to the correct input i e If you are connected to input 1 be sure that input 1 is the active input on your device Many amps mixers receivers and TVs have a...

Page 9: ...jack on your television Getting connected cont Connecting both Analog and Digital Audio POWER STAND BY ON MIC MASTER VOLUME MALE ECHO DELAY FEEDBACK EFFECT MODE MODE CHANNEL LANGUAGE INPUT BASS TREBL...

Page 10: ...e DVG 399K s VGA output jack and connect the other end to the VGA IN jack on your HDTV VIDEO monitor NOTE When using the VGA output the DVG 399K s video mode must be set to PC VGA in the SYSTEM SETUP...

Page 11: ...counter clockwise to DECREASE the mic volume 4 DISC TRAY compartment This is used for inserting and removing discs The DISC TRAY is operated using the OPEN CLOSE button on the DVG 399K or remote 5 DI...

Page 12: ...or monitor i e Pr Pb Y or Cr Cb Y or R Y B Y Y etc Component video cables only transmit the video signal separate cables are needed for audio signals Please refer to the operating instructions of the...

Page 13: ...utton to access the on screen preference pages See the SETTING UP PREFERENCES section for more detailed instructions on changing preferences 12 REPEAT button Press this button once to have the current...

Page 14: ...he TITLE MENU of a DVD VCD or media disc Press again to return back to disc play back If the TITLE MENU button is pressed during disc play back playback is paused Upon exiting the TITLE MENU play back...

Page 15: ...ch time STEP is pressed To exit STEP mode hit the ENTER PLAY button 32 MODE button This button switches through 4 PSM Picture Status Memory modes Standard Dynamic Mild and Memory The PSM function adju...

Page 16: ...side facing up 4 Press OPEN CLOSE to close the disc tray After the disc tray closes the disc will automatically start playing If it does not auto start press PLAY When the menu screen is displayed The...

Page 17: ...ious chapter or track NOTE When using these features with a VCD1 1 disc with PBC on you may be returned to the main menu To skip to the desired track directly using the number buttons During playback...

Page 18: ...rogram Press PLAY To cancel a program You can cancel a program by pressing the STOP button twice removing the disc is removed or turning off the unit Changing Angles When playing a DVD with multi angl...

Page 19: ...a TV using an S Video connection 4 TV TYPE TV Display Modes You can select one of the following TV display modes for the video output 4 3 PS When the player is connected to a normal 4 3 TV and a wide...

Page 20: ...er to play Dolby digital discs select this mode 2 MIC SETUP There are two MIC settings in the MIC SETUP option AUTO and OFF When selecting AUTO the player will auto detect and deal with the input voi...

Page 21: ...output VSS When using a disc that has been formatted with Virtual Surround Sound 5 1CH Choose this setting to output the 5 1 channel sound 2 SUBWOOFER Select ON if you are using a subwoofer Select OF...

Page 22: ...o NOTE This can only be used when LINE OUT is chosen in the OP MODE options FULL The audio signal peak value will be the minimum OFF The audio signal peak value will be the maximum 3 DUAL MONO Here yo...

Page 23: ...mber of recorded tracks and the complexity of the album tree If you play a non MP3 track that has the mp3 le extension the unit will skip to the next valid track automatically Digital recordings with...

Page 24: ...utton on the DVG 399K s remote control REPEAT 1 Repeats the same song REPEAT DIR Repeats the entire directory folder once it has played through REPEAT ALL Repeats the whole disc once it has played thr...

Page 25: ...wer cord is plugged rmly into an outlet and the AC IN con nection on the back of the DVG 399K Make sure that it is in working condi tion and switched ON Use a lens cleaner to clean the disc player Cle...

Page 26: ...399K Is there something in the way The batteries may be low Solution Consult the Getting Connected sec tion of this manual and try reconnecting the video connections Make sure any speakers amps mixer...

Page 27: ...C VocoStar 2005 V 1 0 WWW VOCOSTAR COM...

Reviews: