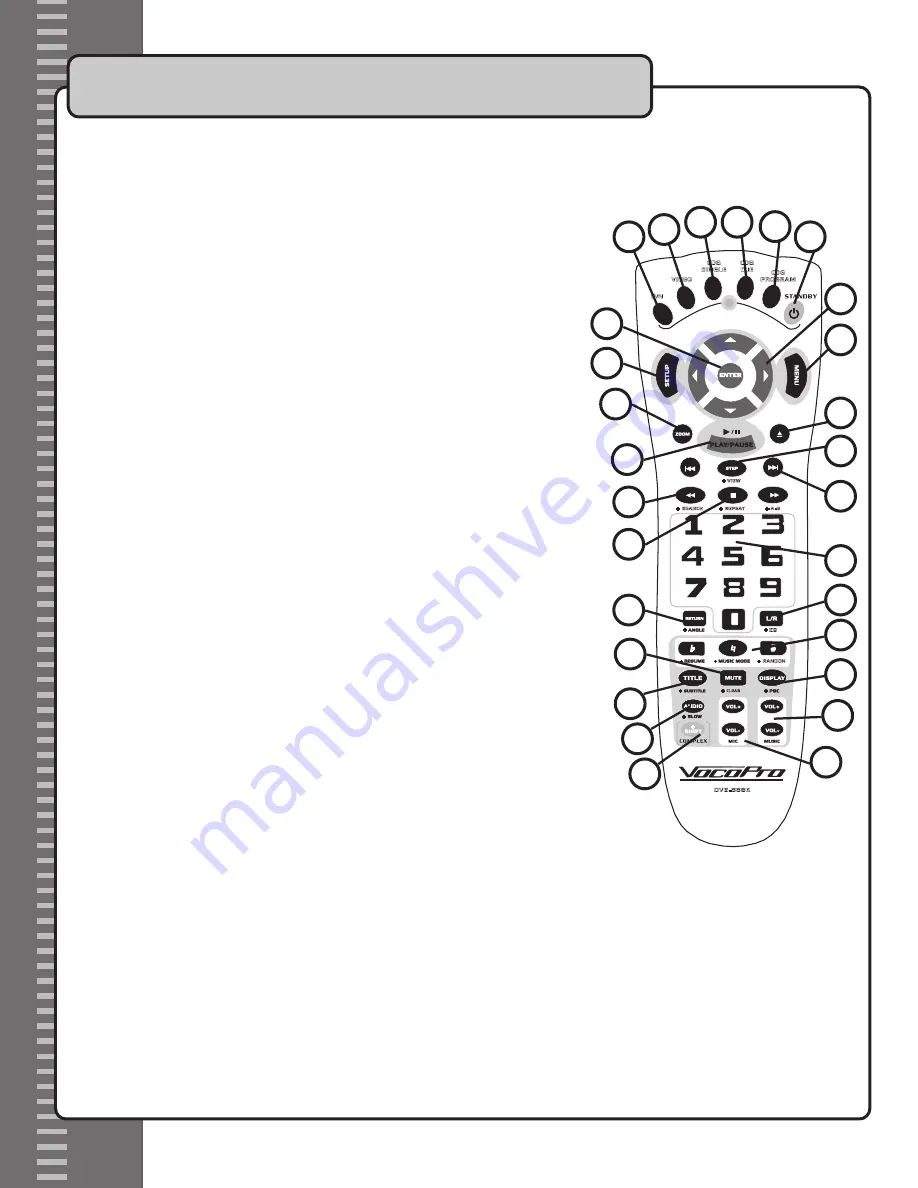
VocoPro DVG-888K II Owner'S Manual Download Page 26

Remote Control

1. P/N 

(PAL / NTSC) 

button

 - Cycles through the TV modes: P (PAL), N (NTSC), MULTI-SYSTEM and 720P (HDTV).  


 See the Operations section in this manual for detailed instructions.

2. Video button

 - Cycles through the different Video modes:  Y/PB/PR, VGA, S-VIDEO, Y/Cb/Cr, SCART.   


See the Operations section in this manual for detailed instructions.

3. CDG Single

 - Turns on CDG Single mode.  When in CDG Single, the player will 

      stop playback after a single track has finished playing.

4. CDG CUE button

 - CDG Cue allows you pause tracks at the 5-second point to display the

      song title before selecting playback.  
      

Note:

 This feature is intended to freeze the song-title screen on 

CD+G

 discs however due 

      to the varying formats of certain 

CD+G

 discs,  not every disc will display a song-title 

      screen at the 5-second point. Results will vary from disc to disc.

5. CDG-Program button

 - Opens up the Program Menu which lets you program 

      the order of up to 55 tracks on a disc. 

 See the Operations section in this manual for 

      detailed instructions on programming tracks.  

6. Standby button

 - When the POWER button on the front panel is turned on, 

      the STANDBY button allows you to turn on Standby mode and save power.

7. Arrow buttons

 - Use the buttons for navigating through DVD, VCD and Mp3 menus.

8. Menu buttons

 - Accesses the main menu on DVD and VCD discs.

9. Eject button

 - Opens and closes the disc tray.  Press once to open the disc tray 

      and press again to close the disc tray.

10. Step button

 - Allows you to view a movie or CD+G song one frame at a time.  


See the Operations section in this manual for detailed instructions.

11. |<< 

and

 >>|

 buttons - Allow you to jump directly to back to the previous track ( |<< )

         or forward to the next track ( >>| ).  See the Operations section in this manual for 
         detailed instructions.

12. Direct Track Access

 (number) 

buttons

 - For use whenever number input is 

         necessary.  I.e. jumping directly to tracks/chapters, programming tracks in program 
         mode, parental password, etc.  

See the Operations section in this manual for detailed 

         instructions.

13. L/R button

 - Cycles between three audio playback modes: STEREO, MONO-LEFT 

         and MONO-RIGHT.  Use this to cancel vocals on Multiplex formatted CD+G discs.  
         

See the Operations section in this manual for detailed instructions on canceling vocals 

        on Multiplex formatted CD+G discs.

14. Digital Key Control 

- Changes the key of disc music to fit the singer’s vocal range.  


 See the Operations section in this manual for detailed instructions on using 

        Digital Key Control.

15. Display button

 - Cycles through available disc time info and displays it on the 

         TV/video monitor.

16. Music Master Volume control

 - For adjusting the master music (disc music) 

         volume output.  Press the VOL+ button to increase the master music volume and 
         VOL - to decrease the master music volume.

17. Mic Master Volume buttons

 - For adjusting the master microphone volume output.  

         Press the VOL+ button to increase the master microphone volume and VOL - to decrease the microphone volume.

18. + Shift button

 - Use this button to access the advanced features on the remote labeled with a +.

19. Audio button

 - Choose either 5.1 CH. output or AC 2 channel output.

20. Title button

 - Press to access the TITLE MENU of a DVD, VCD or media disc. Press again to return back to disc playback. 

         If the TITLE MENU button is pressed during disc playback, playback is paused. Upon exiting the TITLE MENU, playback is resumed.

21. Mute button

 - Mutes the disc music.

22. Return button

 - Returns to the Main Menu page on VCD discs

23. Stop button

 - Stops a disc that is playing.

24. << 

and 

>>

 buttons - Allows you to scan backwards (<<) and forwards (>>) through a track or chapter.

25. Play/Pause

 - Begins playing a disc that is stopped or paused and will pause a disc that is playing

26. Zoom button

 - For zooming in on the picture on DVDs with the zoom feature available.

27. Setup button

 - Accesses the On-Screen Setup Menu.  

       Note:

 The DVG-888K must be connected to a TV/video monitor to see the Setup Menu.

28. Enter button

 - Use this to make selections in a menu.

Descriptions and functions cont.

20

BASS

ECHO

MIC 2

MIC 1

PBC

MIC 2 VOL

MIC 1 VOL

POWER

DIRECT ACCESS

KEY CONTROL

PLAY/PAUSE

MIC EFFECT

CDG

1

2

3

4

5

6

7

8

9

0

L

/

R

REPEAT

TIME

MENU

PCB

CDG

SINGLE

CDG
CUE

CDG

PROGRAM

DVG-888K  


MULTI-FORMAT DIGITAL KARAOKE PLAYER 


    PROGRESSIVE SCAN

TREBLE

MIC MASTER VOL.            MUSIC MASTER VOL.

MULTI-FORMAT

V I D E O

MIXER BALANCED OUTPUT

MIXER

OUTPUT

MIC

OUTPUT

L

R

TO


REDUCE


THE


RISK


OF


FIRE


OR


ELECTRIC


SHOCK

,

RAIN


OR


EXPOSURE

DO


NOT


EXPOSE


THIS


EQUIPMENT

TO


MOISTURE

.

/

/

P/N

VIDEO

CDG

SINGLE

CDG
CUE

CDG

PROGRAM

DVG-888K

CLEAR

RANDON

A-B

REPEAT

SEARCH

EQ

VIEW

1

2

3

4

5

6

7

8

 9

10

11

12

13

14

15

16

17

18

19

20

21

22

24

26

27

23

28

25

Summary of Contents for DVG-888K II

Page 1: ...ED OUTPUT MIXER OUTPUT MIC OUTPUT L R TO REDUCE THE RISK OF FIRE OR ELECTRIC SHOCK RAIN OR EXPOSURE DO NOT EXPOSE THIS EQUIPMENT TO MOISTURE P N VIDEO CDG SINGLE CDG CUE CDG PROGRAM DVG 888K CLEAR RANDON A B REPEAT SEARCH EQ VIEW BASS ECHO MIC 2 MIC 1 MIC 2 VOL MIC 1 VOL PLAY PAUSE MIC EFFECT CDG CDG SINGLE CDG CUE CDG PROGRAM KE PLAYER PROGRESSIVE SCAN TREBLE MIC MASTER VOL MUSIC MASTER VOL MULTI...

Page 2: ...MIC 1 PBC MIC 2 VOL MIC 1 VOL POWER DIRECT ACCESS KEY CONTROL PLAY PAUSE MIC EFFECT CDG 1 2 3 4 5 6 7 8 9 0 L R REPEAT TIME MENU PCB CDG SINGLE CDG CUE CDG PROGRAM DVG 888K MULTI FORMAT DIGITAL KARAOKE PLAYER PROGRESSIVE SCAN TREBLE MIC MASTER VOL MUSIC MASTER VOL MULTI FORMAT V I D E O MIC OUTPUT L R TO REDUCE THE RISK OF FIRE OR ELECTRIC SHOCK RAIN OR EXPOSURE DO NOT EXPOSE THIS EQUIPMENT TO MOI...

Page 3: ... other appliances including amplifiers that produce heat 10 Power Sources The appliance should be connected to a power supply only of the type described in the operating instructions or as marked on the appliance 11 Grounding or Polarization Precautions should be taken so that the grounding or polarization means of an appliance is not defeated 12 Power Cord Protection Power supply cords should be ...

Page 4: ...y Keep it in a safe place for future reference 2 Install your unit in a cool dry clean place away from windows heat sources and too much vibration dust moisture or cold Avoid sources of hum transformers v motors To prevent fire or electrical shock do not expose to rain and water 3 Do not operate the unit upside down 4 Never open the cabinet If a foreign object drops into the set contact your deale...

Page 5: ...Court La Verne CA 91750 Toll Free 800 678 5348 TEL 909 593 8893 FAX 909 593 8890 VocoPro Company Email Directory Customer Service General Information info vocopro com Tech Support techsupport vocopro com Remember Our Website Be sure to visit the VocoPro website www vocopro com for the latest information on new products packages and promos And while you re there don t forget to check out our Club V...

Page 6: ...dial and leave it there Pay attention to the different levels in various recordings Taking a minute to do this now will help to prevent hearing damage or loss in the future After all we want you listening for a lifetime Used wisely your new sound equipment will provide a lifetime of fun and enjoyment Since hearing damage from loud noise is often undetectable until it is too late this manufacturer ...

Page 7: ...phones Audio output Stereo RCA mixed 5 1 channel Optical Coaxial digital L R Balanced XLR Mic only RCA Video output RCA Video S VIDEO VGA SCART and RGB NTSC PAL and 110V 230V compatible for worldwide use Rack mountable with removable rack ears rack ears included Full function remote control Specifications Power Requirements 110V 240V AC 50 60Hz Power Consumption 25W Compatible Disc Formats DVD MPEG...

Page 8: ...onnecting the Power The DVG 888K can be connected directly to a wall plug or to a surge protector recommended for added protection Note The DVG 888K automatically switches between 110V and 240V 1 Connect the power cord securely to the AC IN on the rear panel of the DVG 888K 2 Connect the other end to the power plug or surge protector 2 1 2 1 2 3 4 3 4 BASS ECHO MIC 2 MIC 1 PBC MIC 2 VOL MIC 1 VOL ...

Page 9: ...TPUT L R TO REDUCE THE RISK OF FIRE OR ELECTRIC SHOCK RAIN OR EXPOSURE DO NOT EXPOSE THIS EQUIPMENT TO MOISTURE P N VIDEO CDG SINGLE CDG CUE CDG PROGRAM DVG 888K CLEAR RANDON A B REPEAT SEARCH EQ VIEW KJM 8000 BASS ECHO MIC 2 MIC 1 PBC MIC 2 VOL MIC 1 VOL POWER DIRECT ACCESS KEY CONTROL PLAY PAUSE MIC EFFECT CDG 1 2 3 4 5 6 7 8 9 0 L R REPEAT TIME MENU PCB CDG SINGLE CDG CUE CDG PROGRAM DVG 888K M...

Page 10: ...mended that you use Digital RCA audio cables for optimum digital signal quality Getting Connected cont 4 BASS ECHO MIC 2 MIC 1 PBC MIC 2 VOL MIC 1 VOL POWER DIRECT ACCESS KEY CONTROL PLAY PAUSE MIC EFFECT CDG 1 2 3 4 5 6 7 8 9 0 L R REPEAT TIME MENU PCB CDG SINGLE CDG CUE CDG PROGRAM DVG 888K MULTI FORMAT DIGITAL KARAOKE PLAYER PROGRESSIVE SCAN TREBLE MIC MASTER VOL MUSIC MASTER VOL MULTI FORMAT V...

Page 11: ...ECT CDG 1 2 3 4 5 6 7 8 9 0 L R REPEAT TIME MENU PCB CDG SINGLE CDG CUE CDG PROGRAM DVG 888K MULTI FORMAT DIGITAL KARAOKE PLAYER PROGRESSIVE SCAN TREBLE MIC MASTER VOL MUSIC MASTER VOL MULTI FORMAT V I D E O MIXER BALANCED OUTPUT MIXER OUTPUT MIC OUTPUT L R TO REDUCE THE RISK OF FIRE OR ELECTRIC SHOCK RAIN OR EXPOSURE DO NOT EXPOSE THIS EQUIPMENT TO MOISTURE P N VIDEO CDG SINGLE CDG CUE CDG PROGRA...

Page 12: ...BALANCED OUTPUT MIXER OUTPUT MIC OUTPUT L R TO REDUCE THE RISK OF FIRE OR ELECTRIC SHOCK RAIN OR EXPOSURE DO NOT EXPOSE THIS EQUIPMENT TO MOISTURE P N VIDEO CDG SINGLE CDG CUE CDG PROGRAM DVG 888K CLEAR RANDON A B REPEAT SEARCH EQ VIEW DVG 888K TV monitor BALANCE MIC 1 MIC 1 MIC 2 Gain 5 0 10 Treble 0 15 15 Bass 0 15 15 Echo 10 8 CUE KEY 6 4 2 0 0 10 BALANCE MIC 2 Gain 5 0 10 Treble 0 15 15 Bass 0...

Page 13: ...put on a TV or video monitor 7 REMOTE SENSOR BASS ECHO MIC 2 MIC 1 PBC MIC 2 VOL MIC 1 VOL POWER DIRECT ACCESS KEY CONTROL PLAY PAUSE MIC EFFECT CDG 1 2 3 4 5 6 7 8 9 0 L R REPEAT TIME MENU PCB CDG SINGLE CDG CUE CDG PROGRAM DVG 888K MULTI FORMAT DIGITAL KARAOKE PLAYER PROGRESSIVE SCAN TREBLE MIC MASTER VOL MUSIC MASTER VOL MULTI FORMAT V I D E O MIXER BALANCED OUTPUT MIXER OUTPUT MIC OUTPUT L R T...

Page 14: ...G 1 2 3 4 5 6 7 8 9 0 L R REPEAT TIME MENU PCB CDG SINGLE CDG CUE CDG PROGRAM DVG 888K MULTI FORMAT DIGITAL KARAOKE PLAYER PROGRESSIVE SCAN TREBLE MIC MASTER VOL MUSIC MASTER VOL MULTI FORMAT V I D E O MIXER BALANCED OUTPUT MIXER OUTPUT MIC OUTPUT L R TO REDUCE THE RISK OF FIRE OR ELECTRIC SHOCK RAIN OR EXPOSURE DO NOT EXPOSE THIS EQUIPMENT TO MOISTURE P N VIDEO CDG SINGLE CDG CUE CDG PROGRAM DVG ...

Page 15: ...t the same spot Skipping Tracks or Chapters Use the and buttons on the front panel or on the remote control to skip forwards and backwards to a new track or chapter 1 Press the button to skip to the next track or chapter 2 Press the button ONCE to skip to the beginning of the current track or chapter 3 Press the button TWICE quickly to skip to the previous track or chapter Scanning through a Track...

Page 16: ...after it has played through REP OFF Plays a disc all the way through and stops when the disc is finished Viewing Playback Time Use the DISPLAY button on the remote control to cycle through the 5 available playback time display options Note The Playback time display can only be viewed when connected to a TV or video monitor SINGLE ELAPSED Displays how much time has elapsed within the current track o...

Page 17: ...rol and press the EQ button a fifth time to turn EQ off Setting your own EQ 1 Hold down the SHIFT button on the remote control and press the EQ button to turn on the EQ The display on your TV video monitor will say EQ ON and the graphic EQ will appear 2 Press the ENTER button until you reach the EQ titled PERSONAL 3 Use the Left and Right arrow buttons on the remote to choose which slider to adjust...

Page 18: ...he ENTER button on the remote to cycle through the 5 available Video Output modes Y Pb Pr When using the RGB outputs on an analog video system VGA When using the VGA video output S VIDEO When using the S VIDEO video output Y Cb Cr When using the RGB outputs on a digital video system SCART When using the SCART video output Programming Track Playback The DVG 888K allows you to program the order of u...

Page 19: ...ho level and counter clockwise to decrease the Echo level 2 Turn Echo off by turning the Echo control fully clock wise Adjusting the Tone of the Microphone Vocals The BASS and TREBLE controls on the front panel control the amount of Bass and Treble present in the microphone channels BASS Use this control to increase or decrease the amount of low end or Bass present in the vocals Too much bass may ...

Page 20: ...point into a track Note This feature is intended to freeze the song title screen on CD G discs however due to the varying formats of certain CD G discs not every disc will display a song title screen at the 5 second point Results will vary from disc to disc 1 Press the CDG CUE button to turn on CDG CUE mode CDG CUE ON will appear on the TV screen 2 Press the track song number that you would like t...

Page 21: ...ress the ANGLE button to cycle through the alternate angles Note Not all DVDs have multiple angles available Jump directly to a Chapter using the Search Feature 1 Hold down the SHIFT button and press the SEARCH button once to access the Chapter Search display 2 Enter the desired chapter number using the number buttons on the remote control 3 Press ENTER on the remote control to select the chapter ...

Page 22: ...n to open files and select Mp3s for playback Choosing an Mp3 Play Mode SINGLE Plays a single song and then stops playback REP ONE Repeats the same song continuously FOLDER Plays all the tracks in the selected folder in the correct order and stops playback once it has played through FOLDER REP Repeats an entire folder after it has played through DISC SCAN Plays the first 10 seconds of each song on th...

Page 23: ...o 55 tracks on a disc See the Operations section in this manual for detailed instructions on programming tracks 8 Mic Master Volume control For adjusting the master microphone volume output 9 Music Master Volume control For adjusting the master music disc music volume output 10 and buttons Allow you to jump directly to back to the previous track or forward to the next track See the Operations sect...

Page 24: ...ent disc 22 Mic 1 2 input jacks Connect microphones here using a microphone cable with a microphone cable 23 Mic 1 2 volume controls Control the individual volume for each microphone channel with these controls 24 Echo control Controls the amount of Echo that is present in the microphone signal Turn clockwise to increase the Echo level and counter clockwise to decrease the Echo level and fully cou...

Page 25: ...l audio input using a digital audio cable 11 Coaxial Output jack audio Connect to a sound system with digital Coaxial audio input using a digital audio cable Note Although it is alright to use standard RCA cables it is recommended that you use Digital RCA audio cables for optimum digital signal 12 Master Unbalanced Left and Right output Music only For unbalanced Left and Right disc music output us...

Page 26: ...lex formatted CD G discs See the Operations section in this manual for detailed instructions on canceling vocals on Multiplex formatted CD G discs 14 Digital Key Control Changes the key of disc music to fit the singer s vocal range See the Operations section in this manual for detailed instructions on using Digital Key Control 15 Display button Cycles through available disc time info and displays i...

Page 27: ...a track scene will cause the playback to stop and restart 7 Clear button Erases numbers entered into a menu without exiting the menu 8 Complex SHIFT button Hold this button down while pressing the COMPLEX remote functions 9 Slow button Cycles between the different slow motion Forward and Reverse speeds See the Operations section in this manual for detailed instructions 10 Subtitle button Cycles th...

Page 28: ...o mark on the screen when using the ANGLE feature 3 OSD LANGUAGE Select the language of the text for this System Setup On Screen Display menu 4 CAPTIONS For use with discs that have captions available ON Turns captions on displaying them on the screen OFF Turns captions off 5 SCREEN SAVER Screen saver is used to protect your TV video monitor when the player is idle for a significant period of time ...

Page 29: ...ut from the SUB speaker output jack OFF The SUB output is off 5 CENTER DELAY Use this to synchronize the center CEN speaker with the rest of the speakers in your Surround Sound speaker system 6 REAR DELAY Use this to synchronize the SL and SR speakers with the rest of the speakers in your Surround Sound speaker system 7 TEST TONE Use this after you have connected all of the speakers for the Surrou...

Page 30: ...sion for quieter late night use 4 8 Medium compression for general use 6 8 Low compression FULL Full volume cinematic sound 4 PRO LOGIC When using a Surround Sound speaker system PRO LOGIC must be set to ON or AUTO ON Surround Sound decoder is on OFF Surround Sound is off AUTO Automatically detects when Surround Sound format is present on a disc 5 LPCM OUTPUT LPCM 48K For digital audio devices wit...

Page 31: ...PUT Select the right video output based on which Video Output connection you are using on the rear panel of the DVG 888K To view the standard 4 3 picture or the cut standard 4 3 picture 4 3 subtitle block to view the full width of the widescreen mode 16 9 To view widescreen picture with a widescreen TV set Widescreen TV set Standard TV set System Setup On Screen Display 25 SPDIF DUAL MONO COMPRESS...

Page 32: ...time you change the password you will need to enter the original factory password which is 3308 You can also enter 3308 if you forget your new password in order to create a new one 6 DEFAULTS Restores all the original factory settings 7 SMART NAVI NO MENU There will not be a navigation menu on the TV screen when an Mp3 disc is inserted WITH MENU The SMART NAVI menu will be visible on the TV screen...

Page 33: ...re the DVG 888K is set to the correct video output mode using the VIDEO button on the remote control The disc does not play Make sure the disc is inserted correctly label side up Make sure the disc is clean and not scratched If using a CD DVD R RW try using a different brand as some brands might not be compatible Clean the CD lens using a CD lens cleaner Remote control does not work Make sure the ...

Page 34: ...C THE SINGER S ULTIMATE CHOICE TM R ...

Reviews: