background image

1

1

Installing the TV

Inspecting the Package Contents

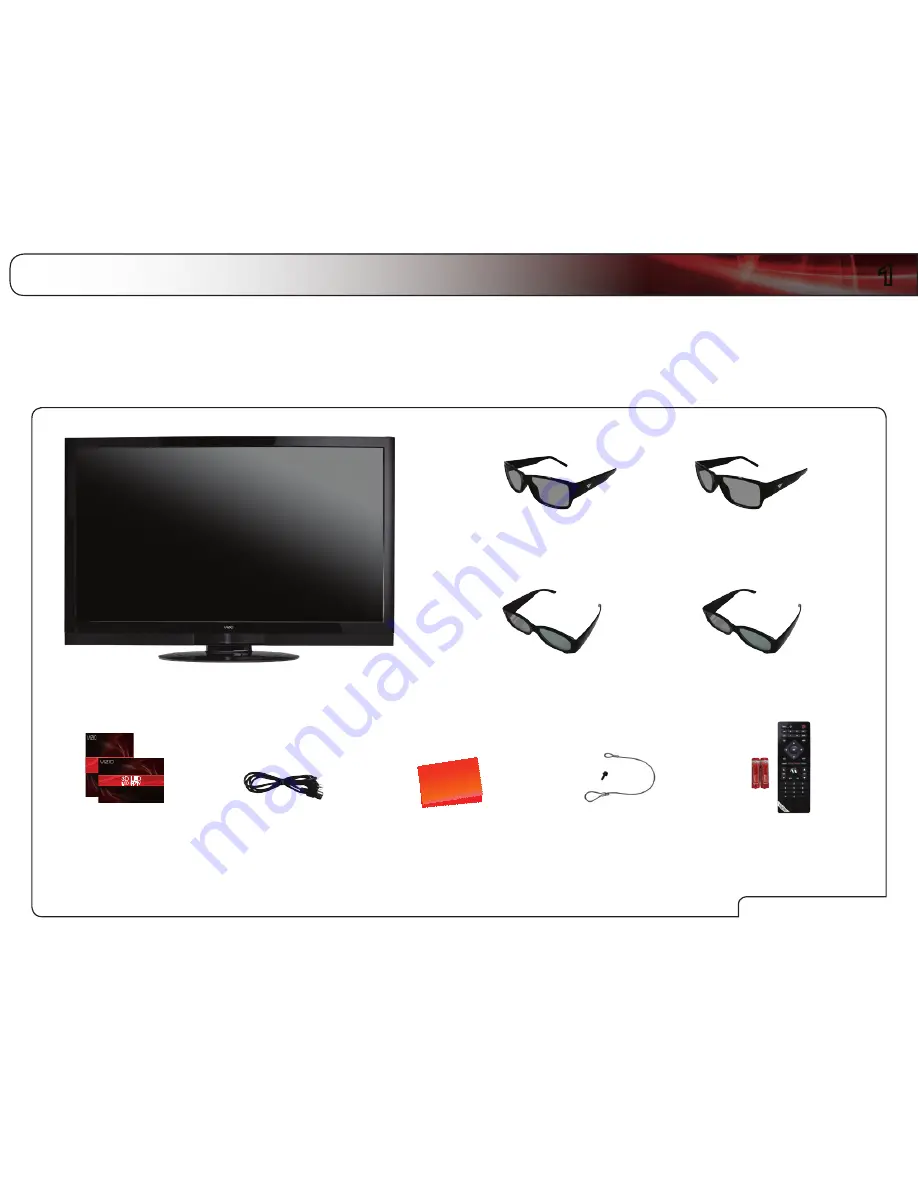
Before installing your new TV, take a moment to inspect the package contents. 
Use the images below to ensure nothing is missing or damaged.
When you have completed your inspection, install the TV.

VIZIO 65” Theater 3D HDTV with Stand

Bluetooth

®

 Remote Control 

with Batteries

Power Cord

Cleaning Cloth

User Guide and 

Quick Start Guide

Safety Cable

XVT3D424SV / XVT3D474SV / XVT3D554SV


QUICK START GUIDE

XVT3D424SV / XVT3D474SV / XVT3D554SV


QUICK START GUIDE

Basic Theater 3D Glasses (2)

Premium Theater 3D Glasses (2)

Package Contents

Summary of Contents for XVT3D650SV

Page 1: ...XVT3D650SV USER MANUAL 65 THEATER 3D LED LCD HDTV ...

Page 2: ...anging the factory default picture settings or enabling other features will increase power consumption that could exceed the limits necessary to qualify for ENERGY STAR rating SRS TruSurround HD and SRS TruVolume are trademarks of SRS Labs Inc TruSurround HD and TruVolume technologies are incorporated under license from SRS Labs Inc HDMI the HDMI logo and High Definition Multimedia Interface are t...

Page 3: ...closed registration card and mail it to VIZIO 39 Tesla Irvine CA 92618 Extended Warranties For peace of mind and to protect your investment beyond the standard warranty VIZIO offers on site extended warranty service plans These plans provide additional coverage during the standard warranty period To purchase an extended warranty service plan visit www VIZIO com When Reading this Manual When you se...

Page 4: ...lace for future reference To reduce the risk of electric shock or component damage switch off the power before connecting other components to your HDTV Unplug the power cord before cleaning your HDTV A damp cloth is sufficient for cleaning your HDTV Do not use a liquid or a spray cleaner for cleaning your HDTV Do not use abrasive cleaners Always use the accessories recommended by the manufacturer ...

Page 5: ...ur HDTV from damage due to power surges Do not attempt to repair or service your HDTV yourself Opening or removing the back cover may expose you to high voltages electric shock and other hazards If repair is required contact your dealer and refer all servicing to qualified service personnel Keep your HDTV away from moisture Do not expose your HDTV to rain or moisture If water penetrates into your ...

Page 6: ...al cable is intended to be connected to earth in the building installation DTV Transition Advisory The nationwide switch to digital television broadcasting was complete on June 12 2009 Analog only television sets that receive TV programming through an antenna now need a converter box to continue to receive over the air TV Watch your local stations to find out when they will turn off their analog s...

Page 7: ...the TV Settings 15 Changing the Input Source 15 Adjusting the Picture Settings 15 Adjusting the Advanced Picture Settings 16 Adjusting the Color Temperature 17 Adjusting the Picture Size and Position 17 Resetting the Picture Settings 17 Adjusting the Audio Settings 18 Adjusting the Advanced Audio Settings 18 Resetting the Audio Settings 19 Adjusting the Tuner Settings 19 Setting the Tuner Mode 19 ...

Page 8: ...s 34 Creating an Owner PIN 34 Creating a New User Profile 35 Removing a User Profile 35 Restoring the VIA Dock to the Factory Default Settings 36 Viewing Theater 3D 37 How Theater 3D Works 37 What You Need to View 3D Content 37 Watching Blu ray 3D Content 37 Watching SBS TB or Sensio 3D Content 38 Troubleshooting Technical Support 39 The TV displays No Signal 39 There is no power 39 There is no so...

Page 9: ...damaged When you have completed your inspection install the TV VIZIO 65 Theater 3D HDTV with Stand Bluetooth Remote Control with Batteries Power Cord Cleaning Cloth User Guide and Quick Start Guide Safety Cable XVT3D424SV XVT3D474SV XVT3D554SV QUICK START GUIDE XVT3D424SV XVT3D474SV XVT3D554SV QUICK START GUIDE Basic Theater 3D Glasses 2 Premium Theater 3D Glasses 2 Package Contents ...

Page 10: ...tach the base To install the TV stand 1 Place the TV screen down on a clean flat surface To prevent scratches or damage to the screen place the TV on a soft surface such as carpet rug or blanket 2 Slide the base plate into the slot on the stand making sure the arrow on the stand base plate points toward the front of the TV If your stand has a wing screw on the bottom tighten it securely 3 Using a ...

Page 11: ...x 600 H mm VESA standard Installing a TV on a wall requires lifting To prevent injury or damage to the TV ask someone to help you Be sure the mount you choose is capable of supporting the weight of the TV After you have determined that you have the correct mount for your TV you can begin the installation To install your TV on a wall 1 Disconnect any cables connected to your TV 2 Place the TV face ...

Page 12: ...od 3D effect In addition the child on the floor is not seeing the best possible picture because his her eyes are not inside the viewing angle The viewers in the example below are not seeing the best 3D picture Too Close Losing 3D Effects 10 Eye Line Correct 3D Viewing Distance and Angle In the examples below all of the viewers are experiencing the best possible 3D picture quality Best 3D TV on Sta...

Page 13: ...erforms functions you might see as buttons on other TVs Functions including volume up down power input source and channel up down have been combined into a single Quick Menu controlled by the Jag Wheel Jag Wheel To power the TV on or off Press the Jag Wheel once to turn the TV on Press and hold the Jag Wheel for three seconds to turn the TV off To increase or decrease the volume turn the Jag Wheel...

Page 14: ...s a network or the Internet Audio Connect 1 8 mini stereo connector from com puter RGB PC Connect RGB cable from computer Component Connect component video audio devices Cable Antenna Connect coaxial cable for external antenna or cable TV DC IN Connect the included Power Cable here Connect the other end to an electrical outlet USB 5 4 3 2 1 3 2 1 BEST HDMI CABLE ANTENNA DTV TV Y RGB PC COMPONENT B...

Page 15: ...creen menu options Guide Display the episode guide digital channels only See Using the Digital Episode Guide on page 32 Mute Turn the sound off or on When mute is activated the TV s audio is turned off Last Return to the channel last viewed Volume Up Down Increase or decrease the loudness of the TV s audio Channel Up Down Change the channel With each press of the but ton the channel will increase ...

Page 16: ... already activated the remote in the first time setup using the Setup App then you do not have to activate the remote again To activate the Bluetooth remote control 1 Press the MENU button on the remote 2 Select Bluetooth and press OK 3 Select Pair Device and press OK 4 Press and hold the Record and Green VIA Shortcut buttons for 5 seconds 5 Select Start searching for devices and press OK The TV b...

Page 17: ...te by pressing Record and the Green VIA Shortcut button for 5 seconds then highlight Begin Activation and press OK Wait for the remote to be found 4 When the remote is found use the Arrow Up Down buttons on the remote to highlight Connect to the Internet and press OK 5 Use the OK and Arrow Up Down buttons on the remote to read and accept the Terms of Service and Privacy Policy for Yahoo TV Widgets...

Page 18: ...V connection using the Arrow and OK buttons on the remote 9 Choose the device you would like to connect Answer the on screen questions about your TV connection using the Arrow and OK buttons on the remote 10 When you have finished adding devices highlight Exit to Live TV and press OK The First Time Setup is complete ...

Page 19: ...nt 2 Ensure the TV has a matching available port 3 Ensure you have a cable that matches the available port For example if you are connecting a Blu ray player with an HDMI port be sure you have an HDMI cable Choosing the Correct Connection Use the table below to choose the connection with the highest possible picture quality Use a digital connection when possible Picture Quality Connector Image Con...

Page 20: ...y pressing the Power Standby button on the remote 4 Turn your device on 5 When you are ready to use your newly connected device press the INPUT button on the remote and select the connection type HDMI RGB etc from the on screen menu Press OK 6 Check the list of devices connection types below for special instructions Cable TV without cable box directly from wall Perform a channel scan See Scanning ...

Page 21: ...red network 1 Ensure you have An ethernet cable long enough to reach your TV A router or modem with an available ethernet port A high speed internet connection 2 Connect your ethernet cable to the router and to the ethernet port on the back of the TV 3 Use the Guided Network Setup to configure the TV See Using Guided Setup on page 31 Connecting to a Wireless Network To connect to a wireless networ...

Page 22: ...14 4 XVT3D650SV ...

Page 23: ...can be adjusted to suit your preferences and viewing conditions To adjust the picture settings 1 Press the MENU button on the remote The on screen menu is displayed 2 Use the Arrow buttons on the remote to highlight the TV Settings icon and press OK The TV Settings menu is displayed 3 Use the Up Down Arrow buttons on the remote to highlight Picture and press OK The Picture Settings menu is display...

Page 24: ... Picture then press OK The Advanced Picture menu is displayed 3 Use the Arrow buttons to highlight the setting you wish to adjust then press Left Right Arrow to change the setting Smooth Motion Effect Activates Smooth Motion motion estimation motion compensation which suppresses motion judder or stuttering of the image when the camera moves across a scene horizontally Select Off Low Middle or High...

Page 25: ... the HDMI or RGB input the size and position of the display image can be adjusted To adjust the picture size and position 1 Ensure the input is set to HDMI or RGB 2 From the Picture Settings menu use the Arrow buttons on the remote to highlight More then press OK 3 Use the Arrow buttons on the remote to highlight Size Position then press OK The Size Position menu is displayed 4 Use the Arrow butto...

Page 26: ...justing the Advanced Audio Settings To adjust the advanced audio settings 1 From the Audio Settings Menu use the Arrow buttons to highlight Advanced Audio then press OK The Advanced Audio menu is displayed 2 Use the Arrow buttons to highlight the setting you wish to adjust then press Left Right Arrow to change the setting SRS TruSurround HD TruSurround HD is a robust multichannel virtualization te...

Page 27: ...t Tuner Mode and press OK The Tuner Mode menu is displayed 5 Highlight Antenna or Cable and press OK 6 Press the EXIT button on the remote Scanning for Channels Before the TV can detect and display channels and their associated information you must scan for channels A channel scan may also be necessary when the TV has been moved to an area where different free to air broadcast television channels ...

Page 28: ...e channels you do not want to view You can remove these channels from the TV s memory with the Skip Channel feature Channels that have been removed with the Skip Channel feature can still be viewed if the channel is entered using the Number Pad If you wish to completely block a channel from being viewed use the parental controls See Using the Parental Controls on page 22 To remove a channel 1 From...

Page 29: ...easier to recognize the different devices attached to the inputs on your TV you can rename the inputs For example if you have a DVD player connected to the Component input you can rename that input to display DVD Player To change the name of an input 1 Press the MENU button on the remote The on screen menu is displayed 2 Use the Arrow buttons on the remote to highlight the TV Settings icon and pre...

Page 30: ... content according to its rating you must enable the Program Rating feature To enable or disable the Program Rating feature 1 From the Parental Controls menu highlight Rating Enable and press OK The Rating Enable menu is displayed 2 Select On or Off and press OK Locking and Unlocking Channels When a channel is locked it will be inaccessible Locking a channel is a good way to prevent children from ...

Page 31: ...ress OK The Change PIN menu is displayed 2 In the New Pin field use the Number Pad on the remote to enter your new 4 digit parental control passcode 3 In the Confirm Pin field use the Number Pad on the remote to re enter your new 4 digit parental control passcode 4 Write down your new parental control passcode and save it in a secure location 5 Press the EXIT button on the remote Resetting the Con...

Page 32: ...the TV Settings icon and press OK The TV Settings menu is displayed 3 Use the Arrow buttons on the remote to highlight Time Local Settings and press OK The Time Local Settings menu is displayed 4 Highlight Time Zone and press OK The Time Zone menu is displayed 5 Highlight your time zone and press OK 6 Highlight Daylight Savings and press OK The Daylight Savings menu is displayed 7 Highlight Off or...

Page 33: ... Displays Sensio 3D 5 The TV displays 3D viewing mode enabled Please wear 3D glasses Put on your 3D glasses You can also quickly change the 3D display mode by pressing the 3D button on the remote Changing the Screen Aspect Ratio The TV can display images in four different modes Wide Zoom Normal and Stretch Each mode displays the picture differently To change the screen aspect ratio 1 Press the MEN...

Page 34: ... display different languages For example CC1 may display English captions and CC2 may display Spanish captions Changing the Appearance of Digital Closed Captions Digital closed captions can be displayed according to your preference To change the appearance of digital closed captions 1 From the Closed Caption menu use the Arrow buttons to highlight Digital CC Style 2 Use the Left Right Arrow button...

Page 35: ...lable when the Rating Enable option in the Parental Controls menu is set to Off See Enabling or Disabling Program Ratings on page 22 To enable or disable PIP POP 1 Press the MENU button on the remote The on screen menu is displayed 2 Use the Arrow buttons on the remote to highlight the PIP icon and press OK The PIP Controls menu is displayed 3 Highlight PIP Mode and press OK The PIP Controls menu ...

Page 36: ...word then highlight Connect and press OK If you would like to use the on screen keyboard instead highlight Show Keyboard and press OK 6 Press the EXIT button on the remote To connect to a wireless network whose network name SSID is not being broadcast 1 Press the MENU button on the remote The on screen menu is displayed 2 Use the Arrow buttons on the remote to highlight the Network icon and press ...

Page 37: ...he EXIT button on the remote Testing Your Network Connection To test your network connection 1 From the Network Connection menu highlight Test Connection and press OK 2 The Test Connection screen displays the connection method network name signal strength and download speed of your network connection 3 Press the EXIT button on the remote Setting Up a Bluetooth Device To pair a Bluetooth device wit...

Page 38: ... is displayed 3 Highlight Reset TV Settings and press OK The TV displays Are you sure you would like to Restore Defaults This will erase any custom settings 4 Highlight Yes and press OK 5 Press the EXIT button on the remote Restoring the TV to Factory Default Settings All of the on screen menu settings can be reset to the factory defaults If you restore the TV to the factory default settings all c...

Page 39: ...s displayed 2 Use the Arrow buttons on the remote to highlight the Help icon and press OK The Help menu is displayed 3 Highlight Guided Setup and press OK 4 Highlight the guided setup you want to access and press OK Remote Setup Set up the Bluetooth remote Tuner Setup Set up the TV tuner Device Setup Set up your external devices Network Setup Connect the TV to your network 5 Follow the on screen i...

Page 40: ...el Using the Info Window The Info Window can be displayed by pressing the INFO button on the remote Press the INFO button one time to display channel and input information Press the INFO button two times to display the program title and closed captioning information Press the INFO button three times to display the program description Digital Episode Guide Info Window Program Description Upcoming P...

Page 41: ... Red Exit from an open App or to close the App Dock Green View settings for an open App Using the VIA Dock The VIA Dock is where all of your VIA Apps are accessed To use the VIA Dock and launch an App 1 Press the VIA button on the remote 2 Highlight a VIA App by scrolling left and right using the Left Right Arrow buttons on the remote The highlighted App is in the lower left corner of the screen 3...

Page 42: ...t of Apps in the VIA Dock For each profile you create a different set of Apps and App settings are saved Creating an Owner PIN Creating an owner PIN allows you to restrict access to the Administrative Controls menu in the Profile App You can also restrict other profiles from installing new Apps To create an owner PIN 1 Press the VIA button on the remote 2 Highlight the Profile App by scrolling lef...

Page 43: ...ocation 12 Highlight OK and press OK The PIN Confirmation menu is displayed 13 Re enter your 4 digit passcode Highlight OK and press OK The Security Question dialog is displayed Press OK 14 Highlight a security question and press OK The Security Answer menu is displayed 15 Enter your security answer using the QUERTY Keyboard and press OK The Create Profile menu is displayed 16 If you would like to...

Page 44: ...ighlight the Profile App by scrolling left and right using the Left Right Arrow buttons on the remote The highlighted App is in the lower left corner of the screen 3 Select the App by pressing the OK button The Profile App is displayed 4 Highlight System Settings and press OK The System Settings menu is displayed 5 Highlight Restore Factory Settings and press OK The TV displays Are you sure you wa...

Page 45: ...tely VIZIO Theater 3D Glasses 3D compliant HDMI cable sold separately VIZIO 3D HDTV 3D Blu ray Player High Speed HDMI Cable Blu ray 3D Disc VIZIO Theater 3D Glasses What You Need Watching Blu ray 3D Content To view Blu ray 3D content 1 Ensure you have the following equipment 3D Blu ray player VIZIO Theater 3D Glasses Blu ray 3D disc High speed HDMI cable 2 Ensure the 3D Blu ray player and your TV ...

Page 46: ...r Sensio 3D content 1 Ensure the program you are watching is broadcast in SBS TB or Sensio 2 Press the 3D button on the remote The Output Mode menu is displayed 3 Highlight 3D and press OK 4 Select the 3D mode to match the content you are watching SBS TB or Sensio 5 The TV displays 3D viewing mode enabled Please wear 3D glasses Put on your Theater 3D glasses ...

Page 47: ...oom or close to a window for the best signal The power is on but there is no image on the screen Ensure all cables are securely attached to the TV Ensure all devices are connected correctly Devices differ see your device s user manual for details Adjust Brightness Contrast or Backlight See Adjusting the Picture Settings on page 18 Press the INPUT button on the remote to select a different input so...

Page 48: ...ved to match your TV s display capabilities This up converting can sometimes cause irregularities in the image If you are using an antenna the signal strength of the channel may be low Ensure your antenna is connected securely to the TV and move the antenna around the room or close to a window for the best signal When I change input source the volume changes The TV remembers the volume level on ea...

Page 49: ...ideo Inputs 1 Composite Inputs 1 Shared with Component Y Pb R RF Antenna Input 1 Viewing Angle 178 178 USB 2 0 Ports 3 RGB Inputs 1 Ethernet 10 100 Base TX OSD Language English Spanish French HD Gameport Yes Outputs Optical Digital Audio Out SPDIF 5 1 Picture In Picture PIP Yes Ambient Light Sensor Yes Bluetooth HID Remote A2DP AVRCP Headset Wireless WiFi 802 11n Dual Band Theater 3D Yes Mercury F...

Page 50: ...42 B ...

Page 51: ...modifications or adjustments as well as installation and set up issues or any repairs attempted by anyone other than by a VIZIO authorized service center Products with unreadable or removed serial numbers or requiring routine maintenance are not covered This one year limited warranty does not cover Products sold AS IS FACTORY RECERTIFIED or by a non authorized reseller THERE ARE NO EXPRESS WARRANT...

Page 52: ...44 C ...

Page 53: ...lways use an AC DC power adapter that is properly grounded Use the AC cords listed below for each area USA UL Canada CSA Germany VDE UK BASE BS Japan Electric Appliance Control Act Open Source Software Notice Your VIA device may contain GPL executables and LGPL libraries that are subject to the PL2 0 LGPL2 1 License Agreements VIZIO offers to provide source code to you on CD ROM for a processing f...

Page 54: ...46 D XVT3D650SV ...

Page 55: ......

Page 56: ...SED ARE FOR ILLUSTRATION PURPOSES ONLY VIZIO THE V LOGO WHERE VISION MEETS VALUE AND OTHER VIZIO TRADEMARKS ARE THE INTELLECTUAL PROPERTY OF VIZIO INC PRODUCT FEATURES AND SPECIFICATIONS ARE SUBJECT TO CHANGE WITHOUT NOTICE 2010 VIZIO INC ALL RIGHTS RESERVED 101019ST NC ...

Reviews: