background image

1

7

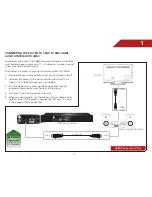
For the most reliable network performance, a wired 

connection is recommended.

Ethernet cables are available from many retailers in 

lengths of up to 50 feet.

Connecting to a Wireless Network

To connect to a wireless network:

1.  Ensure you have:

•  A router broadcasting a high-speed wireless signal 

(802.11n recommended)

•  A high-speed Internet connection

2.  Press the 

Power

 button on the remote to turn the player on. 

Turn your TV on and select the input to which the Blu-ray 

player is connected.

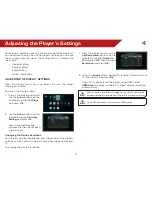
3.  Use the 

Left/Right Arrow

 buttons on the remote to highlight 

Settings

, then press 

OK

.

4.  Use the 

Up/Down Arrow

 buttons on the remote to highlight 

Network

, then press 

OK

.

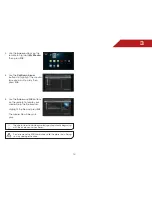
5.  Use the 

Up/Down Arrow

 buttons on the remote to highlight 

Connection Type

, then press OK.

6.  Use the 

Up/Down Arrow

 buttons on the remote to highlight 

Wireless

, then press OK. A confirmation window is displayed, 

highlight 

Yes

 to continue.

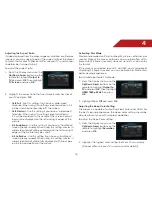
7.  Use the 

Up/Down Arrow

 buttons to select 

Scan

 to have your 

player search for available wireless networks.

8.  If your network is password-protected, enter your password 

using the buttons on the remote. When you are finished 

select 

Enter

, and then 

Next

 to continue.

9.  When your player has connected, a success message is 

displayed. Select OK to complete the wireless setup.

Connecting to a Wireless Network with WiFi Protected Setup 

(WPS)

Wi-Fi Protected Setup is an easy way to connect the Player to your 

home wireless network.

To connect using WPS:

1.  Ensure you have:

•  A router with a WPS button, broadcasting a high-speed 

wireless signal (802.11n recommended)

•  A high-speed Internet connection

2.  Press the 

Power

 button on the remote to turn the player on. 

Turn the TV on and and select the input to which the Blu-ray 

player is connected.

3.  Use the

 Left/Right Arrow 

buttons on the remote to highlight 

Settings

, then press 

OK

.

4.  Use the 

Up/Down Arrow

 buttons on the remote to highlight 

Network

, then press 

OK

.

5.  Use the 

Up/Down Arrow

 buttons on the remote to highlight 

Connection Type

, then press OK.

6.  Use the 

Up/Down Arrow

 buttons on the remote to highlight 

Wireless

, then press OK. A confirmation window is displayed, 

highlight 

Yes

 to continue.

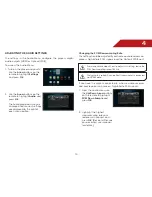
7.  Use the 

Up/Down Arrow

 buttons to select 

Auto WPS

.

8.  Follow the on screen instructions to complete the WiFi 

Protected Setup.

Summary of Contents for VBR140

Page 1: ...R GUIDE INSTALLING the Blu ray player CONTROLS CONNECTIONS basic operation adjusting the player s settings TROUBLESHOOTING SUPPORT Help SPECs warranty LEGAL MODELS E3D320VX E3D420VX E3D470VX MODEL VBR...

Page 2: ...fault setting and this is the setting in which power savings will be achieved Changing the factory default picture settings or enabling other features will increase power consumption that could exceed...

Page 3: ...Activating Film Mode 18 Adjusting the Deep Color Setting 18 Adjusting the Audio Settings 19 Changing the PCM Downsampling Rate 19 Adjusting the Digital Audio Output 20 Activating or Deactivating Dynam...

Page 4: ...a Netflix Account 31 Using the VUDU App 31 Opening a VUDU Account 31 Using the Pandora App 32 Opening a Pandora Account 32 Using the HULU Plus App 32 Opening a HULU Plus Account 32 Troubleshooting Te...

Page 5: ...cting the player to an electrical outlet Your player must be connected to a power source in order to work Connect the power cord to an electrical outlet as shown below Connecting Power Cord HDMI HDMI...

Page 6: ...tton on the front of the player 4 Turn your home audio system on Remember You still need to connect the player to your television to view video See Connecting the Player to Your TV on page 5 5 When yo...

Page 7: ...ff 2 Connect the player to the home audio system and TV as shown in the HDMI Connection Chart below 3 Turn the power on by pressing the Power button on the remote or Power button on the front of the p...

Page 8: ...etailers in lengths of up to 50 feet To connect to a wired network 1 Ensure you have An ethernet cable long enough to connect the player to your router or modem A router or modem with an available eth...

Page 9: ...ssword protected enter your password using the buttons on the remote When you are finished select Enter and then Next to continue 9 When your player has connected a success message is displayed Select...

Page 10: ...t Insert USB thumb drive to play photos and music Supported files include jpg and mp3 Eject Button Press to eject the disc tray Power Button Press to turn Player on or off Disc Tray To insert a disc p...

Page 11: ...udio Out Connect an optical cable to an external audio device Ethernet Connect an Ethernet cable to your router or modem HDMI Out Connect an HDMI cable to your TV RCA Stereo Audio Out Connect an RCA c...

Page 12: ...vious Next Go to the next track or chapter on disc Power Turn Player on or off rewind FAST FORWARD Press repeatedly to increase speed app LAUNCHER Quickly launch app on button title menu Open disc tit...

Page 13: ...atteries match the and symbols inside the battery compartment 3 Replace the battery cover Use only good quality batteries Inserting the batteries incorrectly may result in cracking or leakage that may...

Page 14: ...highlighted icon or menu setting will glow light blue To select an icon or menu setting highlight the icon or menu setting and press OK button on the remote On Screen Menu To go back to a previous scr...

Page 15: ...tons on the remote to manipulate the playback in several ways Play Pause Stop Previous Rewind Next Fast Forward Basic Playback Buttons Previous Skip to last chapter or track Next Skip to next chapter...

Page 16: ...age on page 22 Supported discs only Audio Open audio menu Press again to close See Adjusting the Audio Settings on page 19 Supported discs only A B Loop a segment of audio or video Press at the beginn...

Page 17: ...ack Controls When listening to USB audio you can control the playback using buttons on the remote Previous Play the file listed before the currently playing file Audio only Next Play the file listed a...

Page 18: ...y then press OK 5 Use the Arrow and OK buttons on the remote to locate your media file in the file browser Highlight the file and press OK The media file will begin to play The photo slide show will b...

Page 19: ...ess OK Your current settings are displayed to the right of each menu option Changing the Display Resolution For the best viewing experience you should adjust the player s settings so that it outputs v...

Page 20: ...picture may be cut off 4 3 Letterbox Use this setting if you have a traditional screen nearly square When using this setting movies in widescreen format will be fully displayed with black bars on the...

Page 21: ...ng Rate This setting should be adjusted if your home audio receiver can process high bitrate PCM signals over the Optical SPDIF port If you are unsure about how to adjust this setting leave the PCM Do...

Page 22: ...ting normalizes the volume of a disc s audio track The loudest parts of the soundtrack will be quieter and the quietest parts will be louder This effect can be useful when viewing movies late at night...

Page 23: ...ayer currently only offers English for the On Screen menus Additional languages may become available with future updates Changing the Disc s Menu Language Using this setting you can change the languag...

Page 24: ...and press OK 2 Use the Arrow buttons on the remote to highlight a language of your choice and press OK bd live storage When a USB storage device is connected to the USB port the player can use its mem...

Page 25: ...the code enter 0000 Setting the Parental Country Because countries have their own rating systems if you are going to use the Parental Controls you should set the parental country to match the country...

Page 26: ...n press OK For example if you only want the player to display content rated PG or below select PG Content ratings will vary according to your country Changing the Parental Code If you use the parental...

Page 27: ...ings menu is displayed 2 Use the Arrow buttons on the remote to highlight System and press OK Your current settings are displayed to the right of each menu option Activating or Deactivating the Screen...

Page 28: ...nic Control allows you to control your Blu ray player using your TV remote For CEC to work your player must be connected to your TV with an HDMI cable and your TV must support CEC Not all manufacturer...

Page 29: ...ress OK Then select either Disc USB Storage or Network 2 Confirm that you want to update the player Highlight OK and press OK You must have the proper firmware file on your CD DVD or USB storage devic...

Page 30: ...the player will automatically detect the connection You can manually adjust the settings but VIZIO recommends this for advanced users only To adjust the wired settings 1 From the Network Menu use the...

Page 31: ...rd protected you are prompted to enter a password Enter your password using the remote When finished highlight Next and press OK Setting Up a Wireless Connection Using WPS Many newer routers feature W...

Page 32: ...rface MAC Address IP Address To access the info screen 1 Turn on the player and your TV Use the Arrow buttons on the remote to highlight Settings and press OK The Settings menu is displayed 2 Use the...

Page 33: ...r Netflix support go to www netflix com help or call 1 866 579 7113 Using the VUDU App Your player has the VUDU App built in With it you can stream high definition movies and TV programs from the inte...

Page 34: ...e mail Click the Complete Account Setup button in the body of the e mail Complete the account setup by following the instructions on the VUDU website For VUDU support go to www VUDU com support or ca...

Page 35: ...LL FREE techsupport VIZIO com www VIZIO com support Hours of operation Monday Friday 5 am to 8 pm PST Saturday Sunday 8 am to 4 pm PST The VIZIO support team is highly trained and is based in the Unit...

Page 36: ...ith Apps please contact www netflix com help or 1 866 579 7113 www pandora com support www VUDU com support or 1 888 554 8838 Select the Contact Us button in the right hand column of the Help page in...

Page 37: ...olutions of 1080p HDMI 1080i 720p 480i 480p HDMI Audio CD CD R CD RW MP3 WMA Support 5 1 7 1 PCM Digital Audio via HDMI 24 bit 192KHz Audio DAC Dolby Dolby Digital Dolby Digital Plus Dolby Digital Tru...

Page 38: ...ty does not cover for example cosmetic damage normal wear and tear improper operation improper voltage supply or power surges signal issues damages from shipping acts of God any type of customer misus...

Page 39: ...Commission of the U S Government This device complies with FCC radiation exposure limits set forth for an uncontrolled environment DHHS and FDA safety certification This product is made and tested to...

Page 40: ...to limit the use of unauthorized copies of some commercially produced film and videos and their soundtracks When a prohibited use of an unauthorized copy is detected a message will be displayed and p...

Page 41: ...VIA Services reserve the right to delete data from their servers or prevent access to their servers or to change data categories product offerings or service levels for any reason that VIZIO or said...

Page 42: ...ite In the event of a conflict between the VIZIO Internet Applications VIA Policy and the VIA Software License Agreement the VIA Software License Agreement shall control BY YOUR USE OF THE VIA SERVICE...

Page 43: ...MODELS E3D320VX E3D420VX E3D470VX 2012 VIZIO INC All rights reserved 120605OC A...

Reviews: