background image

2.3 Operation menu

When turning on the device, your system will start

with the operation menu.

Logo on/off

To turn the logo on/off, press the logo on the touch

screen.

Date & time on/off

To turn date & time on/off, press the logo on the

touch screen.

2.3.1 Flashback recording

Many areas of interest are passed by while inspec-

ting. By the time deficiency is realized, revisits are

needed for analysis and documentation. Save time

and money with VUCAM

®

constantly buffer capturing.

By pressing

the last 15 seconds are already saved with the

ongoing recording. By stopping the video recording.

To just save the last 15 seconds without adding

ongoing data, press

twice

2  OPERATION - USER INTERFACE - DOCUMENTATION

18

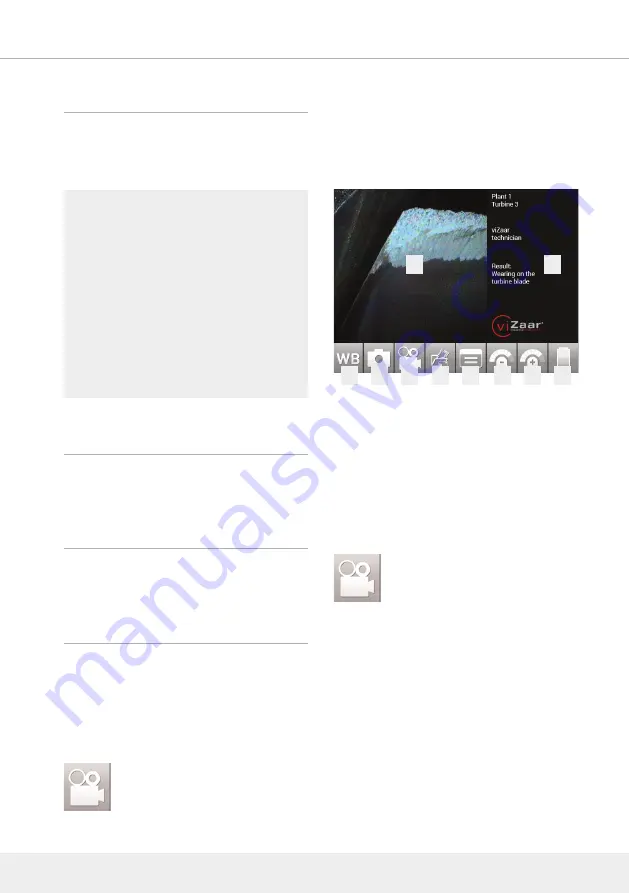
1

White balance

2

Digital image capture

3

Digital video capture

4

File management / last captured file

5

Setup

6

Illumination -

7

Illumi

8

Battery indicator

9

Inspection area

10

Text area

1

2

3

4

5

6

7

9

10

8

Summary of Contents for VUCAM XO

Page 1: ...OPERATING INSTRUCTIONS Revision 1 2 VUCAM XO www vizaar com DXX 80 000162 BA01 018_1 2...

Page 2: ...warnings carefully The observance of these instructions serve the purpose of your own safety as well as the safety of those in the work field of the device Alltips codeofbehaviour suggestionsformeasur...

Page 3: ...49 3273 www vizaar na com info vizaar na com viZaar South East Asia Sdn Bhd 2A Lrg Desa Utama Jln Masjid Kayu Ara PJU 6 47400 Petaling Jaya Selangor Malaysia Fon 603 772 217 10 Fax 603 772 217 10 www...

Page 4: ...er be connected to electric mains if you have not understood this instruction including safety warnings or even if you have not understood individual sections or if you cannot or do not wish to use th...

Page 5: ...spark over Never operate the device under conditions whichdonotcomplywiththeoperatingconditions or storage conditions described in the in structions manual The device must never be operated in operati...

Page 6: ...witch off the machine during pauses Using the videoprobe nearby radioactive energy sources or in areas which may cause radioactive contamination demands strict compliance with the corresponding health...

Page 7: ...time voltage differences of the earth potential as compared to the dis placed reference point of electric output bridged by a too long extension cord could cause dangerous electric currents on contact...

Page 8: ...tions contained in the instructions When operating the device outside the per missible operating conditions or with de struction caused by usage which deviates from the instructions non compliance wit...

Page 9: ...ce must never be operated with damaged video probe There is a risk of damage to hand due to the metallic protective mesh suggestion always wear work gloves for protection At the same time there is a d...

Page 10: ...like eddy current or radiography tests are being undertaken on the same plant part Never insert the probe in plant parts which are not fully switched off e g danger fromrotatingplantcomponents orcoole...

Page 11: ...o transport the system use the handle on the control unit Do not insert the insert tube into any flammable gas or liquid such as a fuel tank to avoid dangers Do not send the device without return mate...

Page 12: ...l car charger 24 3 3 Optional battery pack 24 3 4 Optional neck strap 25 5 WARRANTY TECHNICAL DATA CONFIRMITY 27 5 1 Warranty 27 5 2 General device specifications 27 5 3 Disposal of the device after e...

Page 13: ...Removal from the transport case 03 1 1 Scopy of delivery 01 1 3 Specifications 08 1 4 Initial operation 10 1 5 Mounting the protection ring 11 1 6 Flashback recording 12 1 8 Changing the batteries 12...

Page 14: ...START UP 01 1 VUCAM XO with standard straight view 45 2 Protection ring 3 Two field replacable batteries 4 Power supply 4 1 Power supply to VUCAM adapter 5 SD card 8 GB FAT32 formated 6 Hard copy VUC...

Page 15: ...sed additionally Therefore please contact your local sales representative 1 STRUCTURE AND START UP 02 9 Tip adapter straight view DOV 0 FOV 100 10 Tip adapter side view close focus DOV 90 FOV 100 11 T...

Page 16: ...Dimensions H 515 x W 395 x D 190 mm PE Weight empty 3 3 kg 1 STRUCTURE AND START UP 03 1 Carry handle 2 Pull here to open the transport case 1 1a 1 1b 1 2 2 NOTE Open the transport case in the correc...

Page 17: ...obe and the probe head 1 VUCAM XO 2 Optionaltip adapters 3 Two field replacable batteries 4 Optionalbattery charger 5 Power supply 6 SD card 8 GB FAT32 formated 7 Hard copy VUCAM XO manual 1 2 3 7 6 5...

Page 18: ...tion 8 Illumination 9 Battery indicator 10 Illumination see chapter 2 3 2 Buttons page 19 11 ON OFF switch see chapter 2 3 2 Buttons page 19 12 Illumination see chapter 2 3 2 Buttons page 19 1 2 3 4 5...

Page 19: ...nection to the wrist loop Horizontal position The special construction of the VUCAM XO system allows operation in horizontal position Vertical position The special construction of the VUCAM XO system...

Page 20: ...ounted to tripod Use the tripod connection for operation with a standard tripod Mounted to a magic arm Use the mounting to operate the VUCAM XO system mounted to a magic arm 1 STRUCTURE AND START UP 0...

Page 21: ...High efficiency LED illumination 6 Watt Daylight quality 6 500 K Image representation Screen type high resolution 5 7 LED back illuminated TFT display 640 x 480 Pixel anti glare Image recording Digit...

Page 22: ...ousing IP 54 splash water and dust proof Shock and vibration Vibration 3 grms random at 20Hz to 2 KHz 10 min per axis Shock 50 grms 11 ms half sine three axis Weight 1 5 kg 3 3 lbs 1 7 kg 3 7 lbs with...

Page 23: ...rform a white balance by pressing and confirming with OK Confirm the white balance The white balance symbol flashes while performing 3 After successfully performing white balance start your inspection...

Page 24: ...ay damage the SD card NOTE Do not store the device in low temperature environment If stored in low temperature environment warm up the device before starting or operate with usual power supply NOTE Th...

Page 25: ...em 2 Put the tip adapter onto the probe head and turn it clockwise by holding the ribbed end to mount the tip adapter To remove the tip adapter of the probe head please proceed in reverse order and tu...

Page 26: ...rt the batteries again proceed in reverse order considering this instructions 5 Make sure the pins of the battery mounting fit the insertion of the VUCAM XO system To remove the batteries from the mou...

Page 27: ...3 Operation menu 18 2 2 1 File manager 14 2 2 3 Date time configuration 15 2 2 2 Video in 14 2 2 5 GUI configuration 16 2 3 1 Flashback Buffer Recording 18 2 2 6 Release SD card 17 2 3 2 Buttons 19 2...

Page 28: ...u chapters by using or To enter leave a menu or to return to the operation menu press 2 2 1 File manager All your inspection data images videos are showed in the file manager For further instructions...

Page 29: ...finished with configurating the settings exit the menu with 2 2 4 Device Enter the menu for following settings A Format SD card B System status C Language D Set date time chapter 2 2 2 Date time confi...

Page 30: ...ange the complete design of the setup menu Change text color background color as well as marked text and marked background colors Optimize your menu design for every envi ronment with different backgr...

Page 31: ...asing the SD card press or confirm Return without releasing card After successfully releasing the SD card please press 2 OPERATION USER INTERFACE DOCUMENTATION 17 NOTE Always release the SD card perfo...

Page 32: ...ealized revisits are needed for analysis and documentation Save time andmoneywithVUCAM constantlybuffercapturing By pressing the last 15 seconds are already saved with the ongoing recording By stoppin...

Page 33: ...Stop to pause the video Press Up Down to select images videos Setup Press Setup to change the settings of your system Change GUI configurations system configurations eject the sd card or enter the fil...

Page 34: ...button for min 2 seconds Flashback recording Eliminate revisits with Flashback Buffer Recording Many areas of interest are passed by while inspecting By the time deficiency is realized revisits are ne...

Page 35: ...ection results To enter the text generation menu press the text area 10 Shift ALT 2 OPERATION USER INTERFACE DOCUMENTATION 21 1 Shift 2 Space 3 ALT 4 Delete previous character 5 Confirm 6 Up 7 Down 8...

Page 36: ...th special characters Delete previous character Press Delete Previous Character to delete the last character typed on the keyboard Confirm Confirm your text or text change with Confirm and enter the o...

Page 37: ...mages and videos Press or to select the file Then press to open the file If you want to delete an inspec tion file press To exit the File Manager press By choosing a image video the File Manager opens...

Page 38: ...3 OPTIONAL ACCESSORY EQUIPMENT 24 3 1 Optional side tip adapter 24 3 2 Optional car charger 24 3 3 Optional battery pack 24 3 4 Optional neck strap 25...

Page 39: ...r 3 3 Optional battery pack Toremovethebatteriesfromthesystem pleaserefer to chapter 1 8 Changing the batteries page 12 To charge the batteries refer to pictures 3 3a to 3 3b Charging time approx 1 5...

Page 40: ...loop 3 OPTIONAL ACCESSORY EQUIPMENT 25 Li FeP NOTE Chargingthebatterieswithotheroptions than Li FeP can damage the batteries NOTE IATA classification of the batteries UN 3481 Lithium ion batteries pac...

Page 41: ...4 MAINTENANCE CARE REPAIR 26 4 1 Maintenance by the manufacturer 26 4 2 Cleaning of the system 26 4 4 Customer service 26 4 3 Transport 26...

Page 42: ...ing of the system A dirty probe as far as watertight can be cleaned with soap water A tip adapter can be cleaned with a very softcottonclothandsome70 isopropanoloralcohol 4 3 Transport The system can...

Page 43: ...e device after end of life expectancy 28 5 4 Confirmation of CE confirmity 28 5 1 1 Exluded from the warranty regulation 27 5 1 2 Special fabrications are subject to a special warranty agreement 27 5...

Page 44: ...transport damage misuse and typical wear and tear and tear components as steering cable outer insertion tube 5 1 1 Excluded from the warranty regulation Wear and tear parts like steering cables braid...

Page 45: ...s The device must never be left next to household or bulky waste but must be disintegrated in component types and must be introduced in the commercial recycling system The device contains electro chem...

Page 46: ...AFFIX...

Page 47: ...ts in all aspects of our business This is an ongoing process involving all staff and processes guided and certified by experts Furthermore our personal commitment to quality is attached to your VUCAM...

Reviews: