background image

6

Introduction

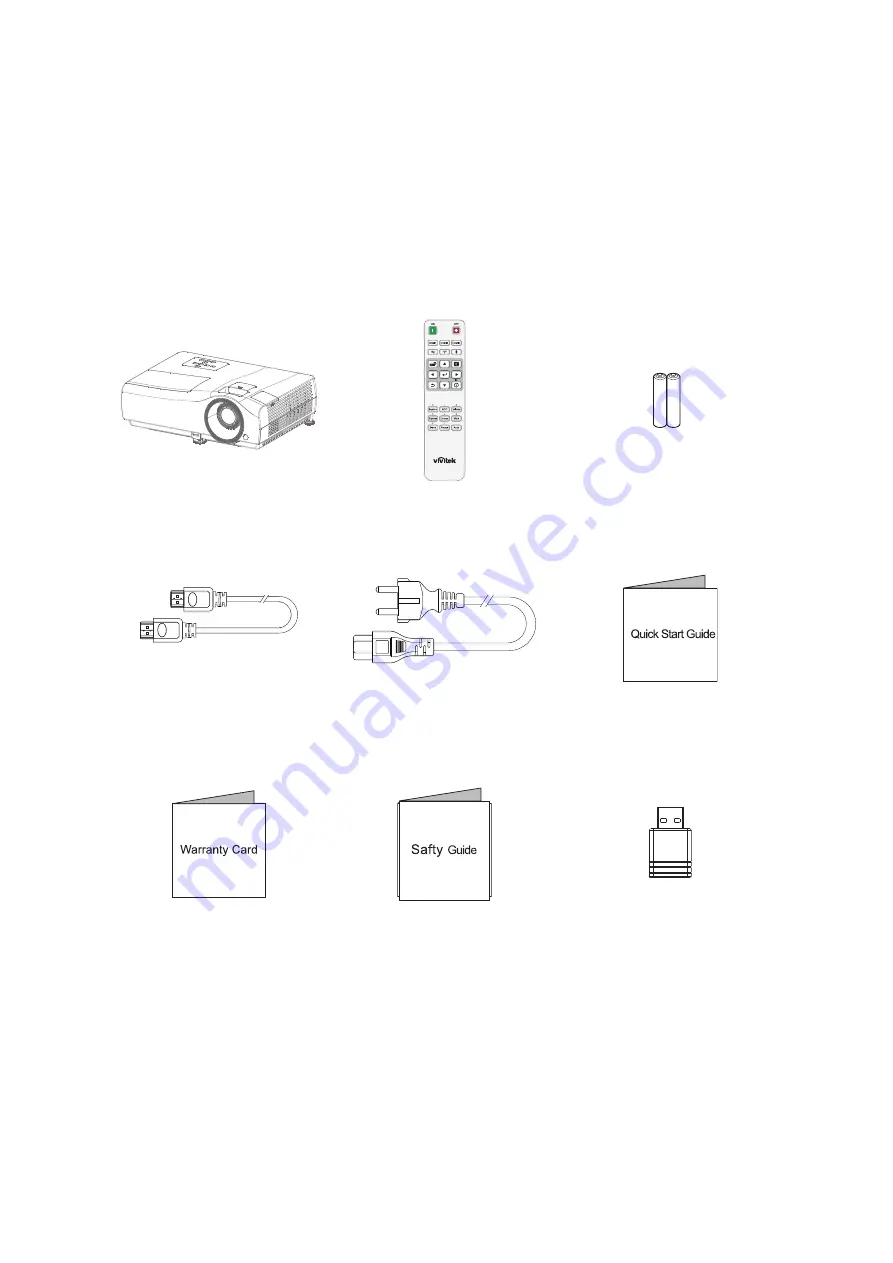
Shipping contents

Carefully unpack and verify that you have all of the items shown below. If any of these 
items are missing, please contact your place of purchase.

Standard accessories

Projector

Remote control

AAA batteries*2

HDMI cable

Power cord

Quick start guide

Warranty card

Safety guide

USB Wireless dongle

Summary of Contents for HK1288 Series

Page 1: ...User Manual HK2200 HK1288 UHK328 UHK268 VW268 MH3000K Series ...

Page 2: ...If this equipment does cause harmful interference to radio or television reception detectable by turning the equipment in question off and on the user is encouraged to try to correct the interference by one or more of the following measures Reorient or relocate the receiving antenna Increase the distance between the equipment and the receiver Connect the equipment to an outlet on a different circu...

Page 3: ...he projector is equipped with ventilation holes intake and ventilation holes exhaust Do not block or place anything near these slots or internal heat build up may occur causing picture degradation or damage to the projector 6 Power sources Check that the operating voltage of your unit is identical with the voltage of your local power supply 7 Servicing Do not attempt to service this projector your...

Page 4: ... please contact your sales dealer This projector is equipped with a grounding type AC line plug Please ensure that your outlet fits the plug Do not defeat the safety pur pose of this grounding type plug We highly recommend using a video source device also equipped with a grounding type AC line plug to prevent signal interference due to voltage fluctuations For Australia and Mainland China For the ...

Page 5: ...nd Zoom 15 Operation 16 Installing the USB wireless dongle 16 Powering On the Projector 16 Powering Off the Projector 16 Home Screen 17 Connection 18 Connecting to a Wi Fi Network 19 Screencasting with a Smartphone Tablet or PC 20 Screencasting by Mirror Cast 25 Presenting from a Media Player 26 Using the menus 27 Securing the projector 28 Upgrading firmware 30 Menu operation 31 Maintenance 41 Cle...

Page 6: ...that you have all of the items shown below If any of these items are missing please contact your place of purchase Standard accessories Projector Remote control AAA batteries 2 HDMI cable Power cord Quick start guide Warranty card Safety guide USB Wireless dongle ...

Page 7: ... USB wireless dongle port 15 Ceiling mount holes 16 12V DC output terminal Triggers external devices such as an electric screen or light control etc 17 RS 232 control port 18 USB Mini B port for firmware upgrades 19 HDMI input ports 20 SPDIF output port 21 Audio output jack 22 Kensington anti theft lock slot 23 USB Type A port USB 2 0 24 USB Type A port USB 3 0 25 AC power socket 1 6 1 2 2 3 3 14 ...

Page 8: ... the previous layer Goes back to previous OSD menu exits and saves menu settings 6 Menu Turns on the On Screen Display OSD menu 7 Power indicator light See LED Indicator Messages on page 46 8 Temperature warning light See LED Indicator Messages on page 46 9 Lamp indicator light See LED Indicator Messages on page 46 10 HDMI 1 HDMI 2 Selects HDMI 1 or HDMI 2 input source 11 Number keys 12 Keystone D...

Page 9: ...reless linking Bluetooth No function 18 Media Player Accesses projector Home Screen page 19 ID No function 20 ECO Displays the lamp mode selection bar Normal ECO Dynamic ECO 21 Volume Displays the volume adjustment bar 22 Mute Toggles projector audio between on and off 23 Contrast Displays the setting bars for adjustments of the appropriate contrast values 24 Auto No function ...

Page 10: ...g a battery Note Keep the batteries out of the reach of children There is a danger of death by accidentally swallowing the batteries Remove batteries from remote control when not using for extended periods Do not dispose of the used batteries along with household waste Dispose of used batteries according to local regulations Danger of explosion may happen if batteries are incorrectly replaced Repl...

Page 11: ...es The remote control may not operate when there is sunlight or other strong light such as a fluorescent lamp shining on the remote sensor Operate the remote control from a position where the remote sensor is visible Do not drop the remote control or jolt it Keep the remote control out of locations with excessively high temperature or humidity Do not get water on the remote control or place wet ob...

Page 12: ... placed on the table in front of the screen This is the most common way to position the projector for quick setup and portability 2 Rear Select this location with the projector placed on the table behind the screen Note that a special rear projection screen is required 3 Front Ceiling Select this location with the projector suspended upside down in front of the screen Purchase the Projector Ceilin...

Page 13: ...0 2286 1121 1992 2251 2590 2929 100 2540 1245 2214 2502 2878 3254 110 2794 1370 2435 2752 3166 3580 120 3048 1494 2657 3002 3454 3905 130 3302 1619 2878 3252 3741 4231 140 3556 1743 3099 3502 4029 4556 150 3810 1868 3321 3752 4317 4881 160 4064 1992 3542 4003 4605 5207 170 4318 2117 3763 4253 4893 5532 180 4572 2241 3985 4503 5180 5858 190 4826 2366 4206 4753 5468 6183 200 5080 2491 4428 5003 5756...

Page 14: ...stance using the actual projector in situ before you permanently install it so as to make allowance for this projector s optical characteristics This will help you determine the exact mounting position so that it best suits your installation location To optimize your projection quality we suggest doing the projection by following the values in the non gray cells The values in the gray cells are fo...

Page 15: ... front adjuster foot to change the image height 2 Use the rear adjuster foot to fine tune the horizontal angle To retract the foot screw the adjuster foot in a reverse direction Note To avoid damaging the projector make sure that the adjuster feet are fully retracted before placing the projector in its carrying case Adjusting the Projector Focus and Zoom 1 Focus the image by rotating the focus rin...

Page 16: ...l will continue to be displayed Warning Never look into the lens when the lamp is on This can damage your eyes This focal point concentrates high temperature Do not place any object near it to avoid possible fire hazard Powering Off the Projector 1 Press on the projector or OFF on the remote control to turn off the projector lamp You will see a message Power off Please press power again appear on ...

Page 17: ...by default If the projector is projecting from a source you can return to Home Screen page by pressing or The Home Screen page offers the following features Source List Selects input source for Media Player HDMI1 or HDMI2 AirReceiver Allows you to wirelessly cast content from smartphones tablets or PCs Network Connects the projector to a wireless network Mirror Cast Allow you to cast content direc...

Page 18: ...r They are commercially available from electronics stores The connection illustrations above are for reference only The rear connecting jacks available on the projector vary with each projector model Please check your computer s baud rate at 9600 so that you can connect the projector by using a suitable RS 232 cable 1 12V Trigger for screen control 2 HDMI cable 3 USB cable Mini B to A type 4 Audio...

Page 19: ...rk 1 Install the USB wireless dongle before using See 16 page 2 Power on the projector See Powering On the Projector on page 16 3 On the Home Screen page interface select Network and press OK to access the wireless settings 4 Turn on the Wi Fi to see available networks 5 Select the SSID for the wireless AP you want to connect to and press OK ...

Page 20: ...apps have been tested to wirelessly cast or stream content smoothly to the projector sometimes there are regional restrictions or compatibility issues for video streaming from a mobile device to the projector It is recommended to contact your mobile device manufacturer telecom provider or application developer for compatibility and limitations Some live streaming applications such as Netflix Amazo...

Page 21: ...o a Wi Fi Network on page 19 3 Connect your device to the same Wi Fi network as the projector 4 Swipe up from the bottom of the device s screen to access the iOS control console 5 Tap the Screen Mirroring button on the iOS control console 6 In the Screen Mirroring menu select the device name Vivitek 7 Your iOS device s screen will be displayed on the projector ...

Page 22: ...Fi network See Connecting to a Wi Fi Network on page 19 3 Connect your device to the same Wi Fi network as the projector 4 Open the status menu at the top of the screen and then click the Screen Mirroring button 5 In the Screen Mirroring menu select the device name Vivitek 6 Your MacOS device s screen will be displayed on the projector ...

Page 23: ...e Check your device s user manual or call the device s support line to find out the name of your device s casting feature 5 In the wireless casting menu select the device name Vivitek 6 Your Android device s screen will be displayed on the projector Screencasting with a Windows PC 1 Power on the projector See Powering On the Projector on page 16 2 Connect the projector to a Wi Fi network See Conne...

Page 24: ... menu 7 In the Cast tab menu select the device name Vivitek 8 Select either Cast tab cast the browser tab you are viewing or Cast desktop to cast your PCs entire desktop 9 Your Windows PC s screen will be displayed on the projector ...

Page 25: ... discovery setting and check again Check AirReceiver Advanced Setting Device Discovery Tweeks Turn Off On Problem Casting is successful but the display screen is black 4 Go to AirReceiver Advanced Settings Use Hardware HW Codec turn off this feature and check again Problem Unable to find the casting function in your Android smartphone tablet 5 The casting function might be located in the device s ...

Page 26: ...2 Press on the projector and select Media Player or press on the remote control The projector displays the built in media reader main page 3 Press to select and press OK to enter the sub folder or display a file 4 After a file is displayed press OK to call out the function bar You can press to select the function and press OK to enact the selected item Video format Audio format Photo format MPEG1 ...

Page 27: ...e OSD menu 2 When OSD is displayed use to select any feature in the main menu 3 After selecting the desired main menu item press to enter sub menu for feature setting 4 Use to select the desired item and adjust the settings with 5 To enter the next level of OSD menu press OK 6 Press Menu twice to leave and save the settings The first press leads you back to the main menu and the second press close...

Page 28: ...Input the password again Note The digits being input will display as asterisks on screen Make a note of your selected password and keep it in a safe place in advance or right after the password is entered so that it is available to you should you ever forget it Once a password has been set and the power on lock is activated the projector cannot be used unless the correct password is entered every ...

Page 29: ...rd appears for your retry You can press BACK to cancel the change or try another password 4 Enter a new password 5 Confirm the new password by re entering the new password Disabling the password function To disable password protection go to MANAGEMENT Menu Password Power On Lock and press to select Off The message Input Current Password appears Enter the current password If the password is correct...

Page 30: ...rive Suggest to use the USB flash drive with FAT32 format 3 Insert USB flash drive into USB port in the rear of the projector 4 Go to MANAGEMENT Menu Firmware Upgrade menu and press OK 5 Select Yes to upgrade the firmware version In the process of upgrading please keep power on until updating finished 6 When you see this message Upgrade Sucessfully firmware upgrade is done ...

Page 31: ... light like in living room User Recalls the settings customized based on the current available display modes See User Mode on page 31 ISF Night Only available when ISF is enabled ISF Day Only available when ISF is enabled Smooth Picture Hidden as default Shows only when Smooth Picture is switched on in the ALIGNMENT menu 3D Is appropriate for playing 3D images and 3D video clips This mode is only ...

Page 32: ... input source You can also manually select a brightness level to display better picture quality When the value is higher the image becomes brighter when the value is lower the image becomes darker Color Temperature There are several preset color temperature settings available The available settings may vary according to the signal type selected Preset Selects a color temperature from among Normal ...

Page 33: ...will include red close to yellow and red close to magenta Saturation Adjusts the values to your preference Every adjustment made will reflect to the image immediately For example if you select Red and set its value at 0 only the saturation of pure red will be affected Note Saturation is the amount of that color in a video picture Lower settings produce less saturated colors a setting of 0 removes ...

Page 34: ...t pop off the screen Users can adjust levels of sharpness and detail enhancement for optimal viewing ViviMotion You can use this feature to smooth fast moving videos by comparing consecutive image frames ans inserting an intermediate image frame between them Noise Reduction Reduces electrical image noise caused by different media players ViviBlack Changes the black level of the projected pictures ...

Page 35: ... your preference 3D Sync Invert When your 3D image is distorted enable this function to switch between the image for the left eye and the right eye for more comfortable 3D viewing experience HDR The projector supports HDR imaging sources It can automatically detect the dynamic range of the source for SDR or HDR10 or HLG and optimize settings to reproduce contents under wider dynamic range Meanwhil...

Page 36: ... width Fill Projects an image as its original resolution and resizes it to fit within the display area 4 3 Scales an image so that it is displayed in the center of the screen with a 4 3 aspect ratio 16 9 Scales an image so that it is displayed in the center of the screen with a 16 9 aspect ratio Keystone Corrects vertical keystoning of the image manually 16 9 picture 4 3 picture 16 9 picture 4 3 p...

Page 37: ...Source Allows the projector to automatically search for a signal Audio Settings Effect Mode This function utilizes MaxxAudio sound enhancement technology which incorporates Waves s algorithms to deliver great effects of the bass and treble and provide you with immersive cinematic audio experience The following preset sound modes are provided Normal Cinema Music Dynamic and User The User mode allow...

Page 38: ...ly by children for example When the Key Lock is on no control keys on the projector will operate except POWER To release panel key lock press and hold the right key on the projector or remote control for 3 seconds Note If you turn off the projector without disabling panel key lock the projector will still be in locked status the next time it is turned on LED Indicator You can turn off the LED warn...

Page 39: ...een 0 C 30 C Operation under High Altitude may cause a higher decibel operating noise level because of increased fan speed necessary to improve overall system cooling and performance If you use this projector under other extreme conditions excluding the above it may display auto shut down symptoms which is designed to protect your projector from over heating In cases like this you should switch to...

Page 40: ...urrent signal source Resolution Shows the native resolution of the input signal Light Usage Time Shows the number of hours the lamp has been used 3D Format Shows the current 3D mode Firmware Version Shows the system DLP versions of your projector Serial No Shows the serial number of your projector ...

Page 41: ...this product yourself Refer all servicing to qualified service personnel Cleaning the Lens Gently wipe the lens with lens cleaning paper Do not touch the lens with your hands Cleaning the Projector Housing Gently wipe with a soft cloth If dirt and stains are not easily removed use a soft cloth damped with water or water and neutral detergent and wipe dry with a soft dry cloth Note Turn off the pro...

Page 42: ...f vibration shock or degradation as a result of hours of use as its lifetime draws to an end Risk of explosion may differ according to the environment or conditions in which the projector and lamp are being used Wear protective gloves and eyeglasses when fixing or detaching the lamp Faster on off cycles will damage the lamp and reduce lamp life Wait at least for 5 minutes to turn off the projector...

Page 43: ... screw 8 Turn on the projector If the lamp does not turn on after the warm up period try reinstalling the lamp 9 Reset the lamp hour Refer to the MANAGEMENT Light Settings Reset Light Timer menu Note Dispose the used lamp according to local regulations Ensure that screws are tightened properly Screws not tightened fully may result in injury or accidents Since the lamp is made of glass do not drop ...

Page 44: ...Audio signal output PC audio jack x 1 SPDIF to optical x 1 Control USB Type A USB 3 0 x 1 Type A USB 2 0 x 1 Mini B x 1 Type A USB 2 0 for wireless dongle x 1 Trigger for screen control 12V DC x 1 RS 232 serial control 9 pin x 1 IR receiver x 1 Input terminals Video signal input HDMI 2 0b HDCP 2 2 x 2 Environmental Requirements Operating temperature 0 C 40 C at sea level Operating relative humidit...

Page 45: ...45 Dimensions 367 3 mm W x 254 0 mm D x 129 7 mm H Ceiling mount installation Ceiling mount screws M4 x 8 Max L 8mm Unit mm ...

Page 46: ...rn In events Burn in on Burn in off Lamp events Lamp error in normal operation Lamp is not lit up Thermal events Fan 1 error the actual fan speed is outside the desired speed Fan 2 error the actual fan speed is outside the desired speed Fan 3 error the actual fan speed is outside the desired speed Fan 4 error the actual fan speed is outside the desired speed Temperature 1 error over limited temper...

Page 47: ...4 995 41 467 51 419 1280 x 720 1280 x 720_60 60 45 000 74 250 V V 1280 x 768 1280 x 768_60 59 870 47 776 79 5 V V 1280 x 800 WXGA_60 59 810 49 702 83 500 V V WXGA_75 74 934 62 795 106 500 WXGA_85 84 880 71 554 122 500 WXGA_120 Reduce Blanking 119 909 101 563 146 25 1280 x 1024 SXGA_60 60 020 63 981 108 000 V V SXGA_75 75 025 79 976 135 000 SXGA_85 85 024 91 146 157 500 1280 x 960 1280 x 960_60 60 ...

Page 48: ...920 x 1080 33 75 30 74 25 1080 50i 1920 x 1080 28 13 50 74 25 V 1080 60i 1920 x 1080 33 75 60 74 25 V 1080 50P 1920 x 1080 56 25 50 148 5 V V 1080 60P 1920 x 1080 67 5 60 148 5 V V 2160 24P 3840 x 2160 Only HDMI 2 0 support 54 24 297 2160 25P 3840 x 2160 Only HDMI 2 0 support 56 25 25 297 2160 30P 3840 x 2160 Only HDMI 2 0 support 67 5 30 297 2160 50P 3840 x 2160 Only HDMI 2 0 support 112 5 50 594...

Page 49: ... an active input source Be sure the external source is turned on and connected For a computer connection ensure your notebook computer s external video port is turned on Refer to the computer manual If the image is out of focus While displaying the on screen menu adjust the focus ring The image size should not change if it does you are adjusting the zoom not the focus Check the projection lens to ...

Page 50: ...turn message Execute command reset all CR RESET ALL Query current brightness op bright CR OP BRIGHT 50 Set up brightness op bright 100 CR OP BRIGHT 100 Brightness value 1 op bright CR OP BRIGHT new value Brightness value 1 op bright CR OP BRIGHT new value Out of range or not support op bright 200 CR OP BRIGHT NA Illegal command op abright 100 CR Illegal format ...

Page 51: ...olor temp 1 CR Write Color Temperature Cool Y op color temp 2 CR Write Color Temperature Lamp Native Y op color temp 3 CR Read Color Temperature Status Y op color temp CR Write Color Temperature Red Gain Y op red gain 100 CR Read Color Temperaturet Red Gain value Y op red gain CR Write Color Temperaturet Green Gain Y op green gain 100 CR Read Color Temperature Green Gain value Y op green gain CR W...

Page 52: ...ront Y op projection 0 CR Write Projector Position Front Ceiling Y op projection 1 CR Write Projector Position Rear Y op projection 2 CR Write Projector Position Rear Ceiling Y op projection 3 CR Read Projector Position Status Y op projection CR Write Language Y op lang 0 CR Write splash screen Y op splash screen 0 CR Write Auto Off Timer Y op sleep timer 0 CR Write Direct Power On Y op direct pow...

Page 53: ...e Remove psaaword Power on lock off Y op security unlock CR Write Key lock Y op keypad lock 0 CR Write LED Indicator Y op led 0 CR Write Test Pattern Y op test pattern 0 CR Write 12V Trigger Y op trigger 0 CR Write High Altitude mode off Y op fanspeed 0 CR Write Firmware Upgrade Y op fwupgrade CR Write Reset all settings Y op reset all CR Read Model Name Y op model CR Read Eco Blank Status Y op ec...

Reviews: