background image


24 

Audio Menu 


The Audio 

menu allows you to control the camcorder‟s ability to record audio in the video clips 

recorded with your camcorder in addition to the video record.   

1)  Press the 

OK

 button to open the menus for the current mode. 

2)  Press the 

LEFT

 or 

RIGHT

 button to select the Audio menu.   

3)  Press the 

UP

 or 

DOWN

 button to highlight the desired menu selection. 

4)  Press the 

OK

 button to confirm and select the highlighted menu option. 

5)  A 

  selected option icon will appear on the selected item. 

6)  Press the 

DV

 button to exit the menu and return to your previous mode. 

7)  An icon reflecting your selection will display on the LCD screen. 

8)  Remember that this setting will be remembered by your camcorder until you manually change the 

setting or restore the camcorder

‟s default factory settings. 


Auto Power Off Menu 


You can use the Auto Power Off feature in order to conserve you camcorder

‟s battery life. The 

designated time represents when your camcorder will automatically power off.   

When the camcorder sits idle for the designated period of time, the camcorder will shut off completely 

and will need to be turned on again with the power button before the next use. 

1)  Press the 

OK

 button to open the menus for the current mode. 

2)  Press the 

LEFT

 or 

RIGHT

 button to select the Auto Power Off menu.   

3)  Press 

UP

 or 

DOWN

 button to highlight the desired menu selection. 

4)  Press the 

OK

 button to confirm and select the highlighted menu option. 

5)  A 

  selected option icon will appear on the selected item. 

6)  Press the 

LEFT

 or 

RIGHT

 button to select the next menu item. 

7)  Press the 

DV

 button to exit the menu and return to your previous mode. 

8)  Remember that this setting will be remembered by your camcorder until you manually change the 

setting or restore the camcorder

‟s default factory settings. 


Summary of Contents for DVR 950WHD

Page 1: ...al Camcorder User Manual 2009 2011 Sakar International Inc All rights reserved Windows and the Windows logo are registered trademarks of Microsoft Corporation All other trademarks are the property of...

Page 2: ...e Menus 15 Video Capture Mode 16 Video Playback Mode 27 Photo Capture Mode 29 Photo Playback Mode 42 Connecting the Digital Video Camera to a TV or HDTV 46 Installing the Software 47 Connecting the Ca...

Page 3: ...ard up to 32GB for normal use SD Memory cards are not included and need to be purchased separately It is recommended to use an SDHC Class 4 SD card or higher Please read this manual carefully first in...

Page 4: ...xposure 3 0EV 3 0EV White Balance Auto Daylight Cloudy Incandescent Fluorescent Scene Auto Scenery Portrait Night Scenery Night Portrait High Sensitivity Sport Beach Party Language English French Span...

Page 5: ...8 recommended screen resolution CD ROM Drive QuickTime 6 or higher Microsoft Internet Explorer 7 or higher Windows Media Player 10 or higher DirectX 9 or higher Internet connection required Computer S...

Page 6: ...arging Indicator 7 DC Photo Mode Button 8 DV Video Mode Button 9 Up Zoom In Button 10 Right LED Flash Button 11 OK Menu Button 12 Down Zoom Out Button 13 Battery SD Card Compartment USB Slot 14 Power...

Page 7: ...t the camcorder with the USB cable to the AC Adapter and then to an electric socket or to the computer 4 Allow the battery to charge for at least 3 hours before using the first time 5 The charge light...

Page 8: ...rce before you hear a click for the battery door to release B Gently pull the battery door outwards and open it slowly with your finger C A B C Note 1 When opening the battery door do not hold the LCD...

Page 9: ...ure that the rubber seal on the battery door is clean and smooth 4 Once powering on your camcorder the battery icon will appear on the top left of the LCD screen Charging the Lithium Battery In order...

Page 10: ...e photos and videos are being saved to the camcorder Doing so may cause the photo and video to be lost or damaged We strongly recommend downloading your photos and videos regularly to your computer Im...

Page 11: ...to transfer to the card Formatting will delete all data on the SD Memory Card Download all the media to your computer before you format the card Do not remove the SD Memory Card during formatting as t...

Page 12: ...r is closed properly before going in the water After using the camcorder in sea salt water first rinse the camcorder with clean water as soon as you can and put in a dry place so that the water inside...

Page 13: ...p to 32GB has been properly inserted into your camcorder SD card not included To properly insert the SD Card Press the SD card into the slot Press the SD card until you hear a slight clicking sound Th...

Page 14: ...it the Setup mode function Setting the Date and Time To set the time and date that will appear on the photos you capture 1 Press the OK button 2 Press the Left Right button on the OK dial until you se...

Page 15: ...cally power off when the LCD Panel is returned to the side of the camcorder While the camcorder is on you can press the Power button again at any point to turn your camcorder OFF You will see a Goodby...

Page 16: ...e LCD display Navigating the Menus Each camcorder mode has a set of menus specific to that mode 1 Press the OK MENU button to open the menus for the current mode 2 Press the LEFT or RIGHT direction co...

Page 17: ...digital video recorder at the scene you would like to capture 2 Press the UP Zoom In and DOWN Zoom Out buttons to better set the camcorder display if desired 3 Press the DV button to start the video c...

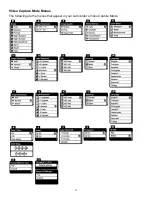
Page 18: ...17 Video Capture Mode Menus The following are the menus that appear in your camcorder s Video Capture Mode...

Page 19: ...or restore the camcorder s default factory settings Image Resolution Menu The Image Size menu allows you to choose the desired size of the images taken by your camcorder Keep in mind that images with...

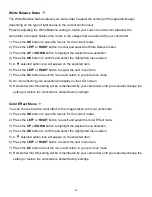
Page 20: ...camcorder s default factory settings White Balance Menu The White Balance feature allows your camcorder to adjust the coloring of the captured images depending on the type of light source in the curr...

Page 21: ...or less distinct 1 Press the OK button to open the menus for the current mode 2 Press the LEFT or RIGHT button to select the Image Sharpness menu 3 Press the UP or DOWN button to highlight the desired...

Page 22: ...your camcorder has to light in the surrounding environment When the ISO level is increased the image sensor in your camcorder will be more sensitive to light and allow you to capture images in lower...

Page 23: ...ton to highlight the desired menu selection 4 Press the OK button to confirm and select the highlighted menu option 5 A selected option icon will appear on the selected item 6 Press the LEFT or RIGHT...

Page 24: ...select the Date Time menu 3 Press the UP or DOWN button to highlight the desired menu selection 4 Press the OK button to confirm and select the highlighted menu option 5 A selected option icon will ap...

Page 25: ...Auto Power Off Menu You can use the Auto Power Off feature in order to conserve you camcorder s battery life The designated time represents when your camcorder will automatically power off When the c...

Page 26: ...r camcorder until you manually change the setting or restore the camcorder s default factory settings TV Out Menu TV Out allows you to select the TV option appropriate for you to view your captured im...

Page 27: ...ct No and press the OK button to exit without formatting Select Yes and press the OK button to begin the format The memory card will be completely formatted A message will appear confirming that your...

Page 28: ...video Press the DV button to PAUSE the video and to continue playing and pausing as needed Press the LEFT button to Fast Rewind the video while it is playing Press the RIGHT button to Fast Forward th...

Page 29: ...the playback mode Videos that are not locked will not display the lock symbol 6 Remember that you cannot delete locked videos Delete Menu While in the Playback mode you can delete images both videos...

Page 30: ...display on the back of the camcorder to direct the camcorder at the scene you would like to capture 2 Press the UP Zoom In and DOWN Zoom Out buttons to better set the camcorder display if desired 3 Pr...

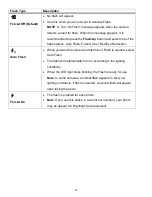
Page 31: ...Reduction A Auto Flash When you want the camera to determine if Flash is needed select Auto Flash The flash will automatically turn on according to the lighting conditions When the LED light stops bli...

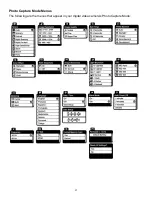
Page 32: ...31 Photo Capture Mode Menus The following are the menus that appear in your digital video camera s Photo Capture Mode...

Page 33: ...g or restore the camcorder s default factory settings Image Resolution Menu The Image Size menu allows you to choose the desired size of the images taken by your camcorder Keep in mind that images wit...

Page 34: ...ry settings Self Timer Menu The Self Timer menu allows you to set a delay between the time that the camcorder s Shutter button is pressed and the actual capture of the picture This is an optimal featu...

Page 35: ...xit the menu and return to your previous mode 8 An icon reflecting your selection will display on the LCD screen 9 Remember that this setting will be remembered by your camcorder until you manually ch...

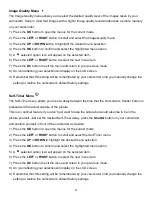
Page 36: ...er that this setting will be remembered by your camcorder until you manually change the setting or restore the camcorder s default factory settings Image Sharpness Menu You can set the level of sharpn...

Page 37: ...e menu and return to your previous mode 8 An icon reflecting your selection will display on the LCD screen 9 Remember that this setting will be remembered by your camcorder until you manually change t...

Page 38: ...d scenes Spot Meters the area within the spot point frame at the center of the LCD to set the exposure on the subject in the center of the monitor 1 Press the OK button to open the menus for the curre...

Page 39: ...ar on photos taken To Enable Disable the Timestamp 1 Press the OK button to open the menus for the current mode 2 Press the LEFT or RIGHT button to scroll and select the Date Time menu 3 Press the UP...

Page 40: ...the selected item 6 Press the LEFT or RIGHT button to select the next menu item 7 Press the DC button to exit the menu and return to your previous mode 8 Remember that this setting will be remembered...

Page 41: ...menu option 5 A selected option icon will appear on the selected item 6 Press the LEFT or RIGHT button to select the next menu item 7 Press the DC button to exit the menu and return to your previous...

Page 42: ...and select the Format Memory Card menu 3 Press the UP or DOWN button to highlight the desired menu selection 4 To exit without formatting the card select No and press the OK button 5 To proceed with t...

Page 43: ...e are no images stored a message No File appears Viewing Photos on Your Camcorder 1 Select your Photo Once in Playback Mode Press the LEFT or RIGHT to scroll through the images on your camcorder s mem...

Page 44: ...RIGHT to scroll and select the image you wish to view 4 Press the OK button to enlarge the selected image full size 5 Once the selected photo is full size you can Zoom In or Zoom Out of the selected p...

Page 45: ...de 2 Press the LEFT or RIGHT button to scroll and select the Protect Lock menu 3 Press the UP or DOWN button to scroll through the menu options 4 Press the OK button to select and save the desired opt...

Page 46: ...ss the OK button when highlighting the Print Photo option to print the selected photo 6 You will be asked to connect the camcorder to the Pictbridge printer 7 Connect the USB cable provided in the pac...

Page 47: ...at the camcorder is now not portable The camcorder will continue to consume battery power 1 Connect the camcorder to a TV via the TV out cable supplied or to a HDTV 2 Turn on the TV and the camcorder...

Page 48: ...on s CD DVD drive and click on Setup exe to launch the installer 3 On Macintosh Click the icon that appears on the desktop to install the Vivitar Experience Image Manager 4 If you do not have internet...

Page 49: ...l be installed and then click Install 11 Please wait while the application continues the installation process on your computer 12 On PC Click the Close button when the installation is complete The app...

Page 50: ...then it will be selected automatically 5 Select a location on the computer where to place the new photo and video files 6 Add the new photo and video files to albums if desired 7 Select to remove the...

Page 51: ...cation s Home page Transfer media from my camcorder to my computer manually Using Windows 1 Use the USB cable that came with your camcorder to connect your camcorder to your computer 2 A Mass Storage...

Page 52: ...Optionally select the files and choose Copy from the Finder s Edit menu Then select a folder and choose Paste from the Edit menu 6 We recommend that you copy the images into the Pictures folder and th...

Page 53: ...t not limited to repair by unauthorized parties tampering modification or accident What To Do When Service Is Required When returning your defective product postage pre paid for service your package s...

Page 54: ...Shutter button to take some sample photos and then try downloading them again With test photos if the camera powers off before you upload them to the computer the photos are not stored in the camera s...

Page 55: ...emory card The Memory card is not formatted correctly Format the memory card again or use a new card Image is blurry or out of focus The video camcorder was moving when the image was captured Hold the...

Reviews: