background image

EN-19

Loading


an SD Memory


Card (Optional Accessory)

The DVR-530 comes with 32MB of internal memory (24MB available for image storage), allowing you to
record video clips, captured still images, MP3 and audio files in the DVR-530. However, you can also
expand the memory capacity by using an SD memory card so that you can store more files.

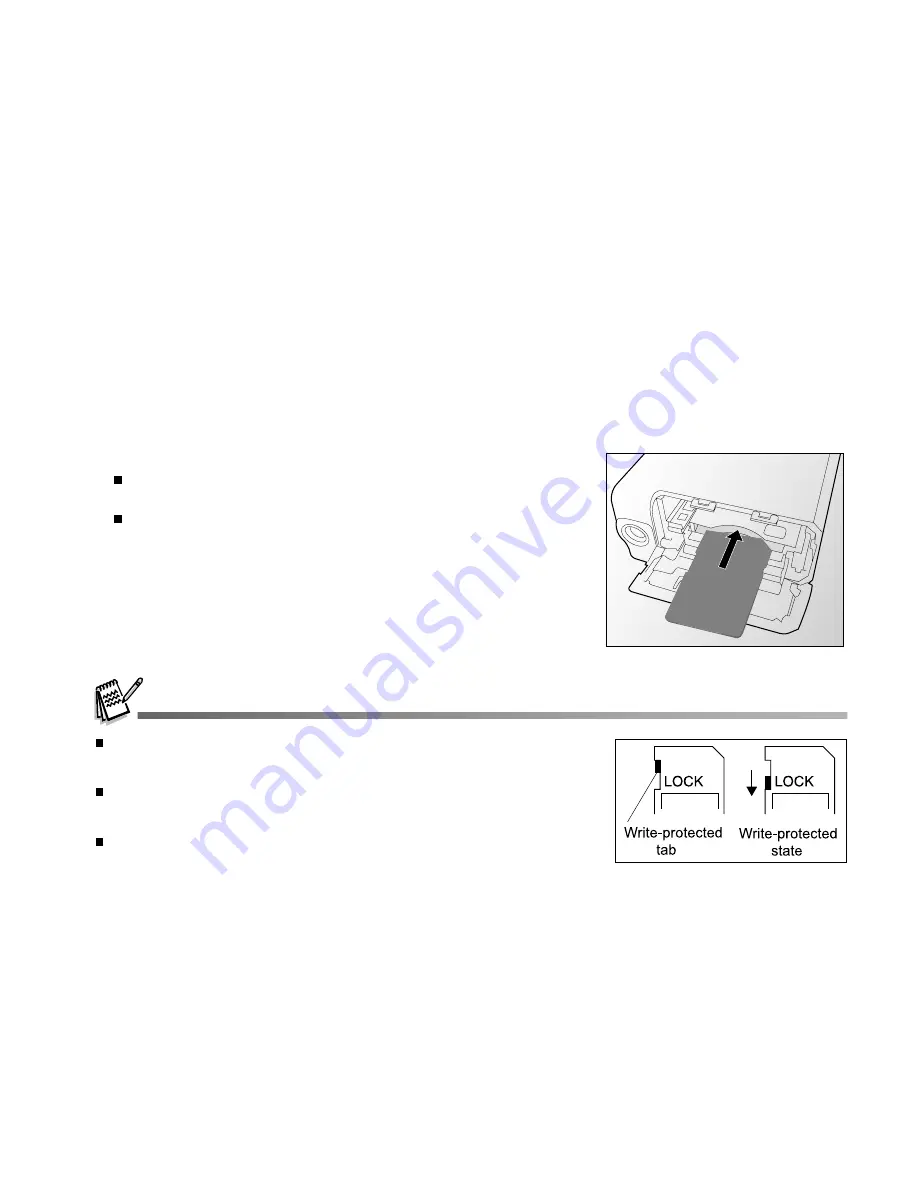
1. Open the battery/SD memory card cover.
2. Insert the SD memory card.

If the card cannot be inserted, check the orientation.

3. Close the battery/SD memory card firmly.

To remove the SD memory card, make sure the DVR-530 is
turned off. Open the battery/SD memory card cover, then press
lightly on the edge of the memory card and it will eject.

Be sure to format an SD memory card with this DVR-530 before using it.
Refer to section in the manual titled “Formatting an SD memory card” for
further details.
To prevent valuable data from being accidentally erased from an SD
memory card, you can slide the write protect tab (on the side of the SD
memory card) to “LOCK”.
To save, edit, or erase data on an SD memory card, you must unlock the
card.

Summary of Contents for DVR-530

Page 1: ...cations However there is no guarantee that interference will not occur in a particular installation If this equipment does cause harmful interference to radio or television reception which can be dete...

Page 2: ...nual This is due to the fact that different retailers often specify slightly different product inclusions and accessories to suit their market requirements customer demographics and geographical prefe...

Page 3: ...spection ask the store of purchase Do not use the DVR 530 in areas near water This might cause fire or electric shock Take special care during rain snow on the beach or near the shore Do not place the...

Page 4: ...precision instrument Do not drop it strike it or use excessive force when handling the DVR 530 This might cause damage to the DVR 530 Do not use the DVR 530 in humid steamy smoky or dusty places This...

Page 5: ...recommend that you fully charge the battery and discharge it for at least one complete cycle before use The battery may feel warm after long period of continuous use of the DVR 530 or the flash This i...

Page 6: ...guage 21 Setting the Date and Time 21 Formatting an SD Memory Card 22 Setting Image Resolution and Quality 23 PHOTOGRAPHY MODES 26 Capturing Still Images 26 Recording Video Clips 26 Normal Mode 27 Mac...

Page 7: ...D FILES TO YOUR COMPUTER 54 Step 1 Install the USB driver Windows 98 users only 54 Step 2 Connect the DVR 530 to your computer 55 Step 3 Download still images video clips and audio files 56 INSTALLING...

Page 8: ...n capturing images It also displays the images you have captured Recording media 32 MB internal memory 24 MB available for image storage External memory supports SD memory cards up to 1 GB Digital Rec...

Page 9: ...u find any mismatch or damage promptly contact your dealer Common product components DVR 530 User s Manual USB Cable Software CD ROM A V IN cable Rechargeable Lithium ion battery Battery charger Commo...

Page 10: ...N 10 GETTING TO KNOW YOUR DVR 530 Front View 1 Lens 2 Flash 3 Self timer LED 4 Focus switch Normal mode Macro mode 5 Speaker 6 Microphone 7 Battery SD memory card cover 8 Tripod socket 1 2 4 6 5 3 7 8...

Page 11: ...ton 5 Image button 6 X Right button Self timer button 7 W Left button Flash button 8 MENU Menu button 9 Status LED indicator 10 USB connector 11 A V IN terminal 12 A V OUT terminal 13 Earphone connect...

Page 12: ...mory card indicator An SD memory card is loaded No SD memory card is loaded SD memory card is full 8 Video quality SUPER FINE FINE NORMAL 9 Video resolution 640 x 480 pixels 320 x 240 pixels 10 Availa...

Page 13: ...ash Auto flash with red eye reduction 7 Macro mode 8 ISO sensitivity AUTO ISO 100 ISO 200 ISO 400 9 EV compensation 10 AWB White balance 11 Image quality SUPER FINE FINE NORMAL 12 Image resolution 326...

Page 14: ...Recording indicator 5 Available recording time Before recording Elapsed time While recording TV Recording Mode 1 TV recording mode 2 Zoom status 3 Remaining battery status 4 SD memory card indicator i...

Page 15: ...time During playback 3 Video playback mode icon 4 Battery power indicator 5 SD memory card indicator 6 Playback indicator 7 Video status bar 8 Sound level speaker volume Low volume Mild volume Medium...

Page 16: ...s bar 6 Sound level speaker volume 7 Playback indicator 8 Play mode indicator Play one file Play all files Play the selected files 9 Repeat indicator 10 Elapsed time Still Image Playback 1 Still image...

Page 17: ...ore using the DVR 530 Make sure that the power of the DVR 530 is off before inserting or removing the battery 1 Slide the battery SD memory card cover 2 Insert the battery in the correct orientation a...

Page 18: ...iption Activity LED indicator Solid green 1 The DVR 530 is powering up 2 The DVR 530 is ready to record images or video clips LED indicator Blinking green USB communication transfer is in progress LED...

Page 19: ...ted check the orientation 3 Close the battery SD memory card firmly To remove the SD memory card make sure the DVR 530 is turned off Open the battery SD memory card cover then press lightly on the edg...

Page 20: ...on and rotation with the wrong direction may damage the hinge that connects the LCD monitor to the DVR 530 Avoid contact with the LCD monitor when moving the LCD panel Do not hold the DVR 530 by the L...

Page 21: ...SETUP setting screen is displayed 5 Select the item s field with the W X buttons and adjust the vale for the date and time with the zoom lever 6 After confirming all settings are correct press the bu...

Page 22: ...Select FORMAT with the zoom lever and press the button 5 Select YES with the zoom lever and press the button You should format an SD memory card before using it for the first time Formatting an SD me...

Page 23: ...Lower resolution quality images take up less memory space and may be quite suitable for sharing images via e mail in a report or on a web page To change image resolution or image quality perform these...

Page 24: ...SD memory card SUPER FINE FINE NORMAL SUPER FINE FINE NORMAL SUPER FINE FINE NORMAL SUPER FINE FINE NORMAL SUPER FINE FINE NORMAL Quality Resolution Internal memory 128 MB SD memory card 3264 x 2448...

Page 25: ...INE FINE NORMAL Quality Resolution 128 MB SD memory card Internal memory 640 x 480 320 x 240 The data shows the standard testing results The actual capacity varies according to the shooting conditions...

Page 26: ...one on LCD preview after image captured Recording Video Clips In this mode you may record video clips 1 Turn on your DVR 530 2 The default mode is Video Mode If not press the MODE button continuously...

Page 27: ...utton to end the recording After a macro shot is taken DO NOT FORGET to reset the lens to the normal position Flash mode is automatically set to off once you switch to Macro mode Normal Mode This mode...

Page 28: ...ing the zoom lever to the T side The subject appears farther away by sliding the zoom lever to the W side 3 Press the button to capture a zoomed image To record video clips press the button to start r...

Page 29: ...istance to the subject is beyond the effective range of the flash A Auto flash The flash fires automatically according to the ambient lighting conditions Select this mode for general flash photography...

Page 30: ...the self timer during operation press again the button Once the self timer has been activated and the button has been pressed you can not slide the zoom lever The table below will help you choose the...

Page 31: ...V output socket of the TV set 3 Turn the TV and device on 4 Toggle the MODE button to select the TV mode 5 Press the button to start recording To stop recording press the button The AV cable must be c...

Page 32: ...er to the W side To start playing back the video clips follow the steps 1 4 above then press the button A press of the W X buttons during playback allows fast forward play fast reverse play To pause v...

Page 33: ...the video equipment you are going to connect to the DVR 530 then turn all connected devices off 1 Connect one end of the A V OUT cable to the A V OUT terminal of the DVR 530 2 Connect the other end to...

Page 34: ...x 4 5x 5 0x 5 5x 6 0x 6 5x 7 0x 7 5x 8 0x and thumbnail display During zoom playback the outer frame indicates the entire image while the inner frame indicates the location of the currently enlarged a...

Page 35: ...d 6 Select PROTECT with the zoom lever and press the button 7 Select ONE FILE or ALL FILE with the zoom lever and press the button 8 Select LOCK by pressing the W X buttons and press the button Protec...

Page 36: ...he button 4 Press the MENU button 5 Select SLIDE SHOW with the zoom lever and press the button 6 Set the playback interval with the zoom lever and press the button The slide show starts The video clip...

Page 37: ...tton 6 Select DELETE FILE or DELETE ALL with the zoom lever and press the button DELETE FILE Delete the current still image video clip DELETE ALL Delete all still images video clips 7 Select YES with...

Page 38: ...E 3 Select MP3 with the zoom lever and press the button The MP3 LIST appears on the screen Button operations Playlist During playback Power off press hold Power off press hold T Scroll up Volume W Scr...

Page 39: ...e Recording Audio Files 1 Turn on your DVR 530 2 Toggle the MODE button to select audio recording mode as the illustration 3 Press the button Voice starts recording To pause recording press the button...

Page 40: ...MENU Enter AUDIO menu Stop playing audio file Start to play voice file Pause playing audio file State Audio Playing Back Audio Files 1 Turn on your DVR 530 2 Toggle the MODE button to go to SELECT MO...

Page 41: ...MENU or AUDIO MENU appears on the screen 5 Select DELETE with the zoom lever and press the button SELECT Delete the selected audio or MP3 file ALL Delete all audio or MP3 files in a single operation 6...

Page 42: ...layed on the screen 3 Select the desired option item with the zoom lever and press the button 4 Select the desired setting with the zoom lever and press the button 5 To exit from the menu press the ME...

Page 43: ...rding under lamp light FLUORESCENT 1 Cool white fluorescent W3900 4500K FLUORESCENT 2 Day white fluorescent W4600 5400K SHADE For recording outdoors on a cloudy day EV Your DVR 530 adjusts the exposur...

Page 44: ...the desired option item with the zoom lever and press the button 4 Select the desired setting with the zoom lever and press the button 5 To exit from the menu press the MENU button SIZE Sets the desir...

Page 45: ...ography will become possible even in dark locations but the more pixelated grainier the image will appear AUTO Auto adjustment 100 Equivalent to ISO 100 200 Equivalent to ISO 200 400 Equivalent to ISO...

Page 46: ...3 Select the desired option item with the zoom lever and press the button 4 Select the desired setting with the zoom lever and press the button 5 To exit from the menu press the MENU button SIZE Sets...

Page 47: ...ting with the zoom lever and press the button 7 To exit from the menu press the MENU button DELETEFILE Refer to section in this manual titled Deleting Still Images Video Clips for further details DELE...

Page 48: ...ct the desired setting with the zoom lever and press the button 7 To exit from the menu press the MENU button PLAY MODE Sets the method of the files playback mode SINGLE Play only one audio or MP3 fil...

Page 49: ...ed setting with the zoom lever and press the button 6 To exit from the menu press the MENU button FORMAT Please refer to the section in this manual titled Formatting Internal Memory or an SD Memory Ca...

Page 50: ...displayed type of date and time on the screen Y M D Year Month Day D M Y Day Month Year M D Y Month Day Year DATE SETUP Refer to section in this manual titled Setting the Date and Time for further de...

Page 51: ...nect to the DVR 530 NTSC NTSC system PAL PAL system RESET Returns all basic settings to the DVR 530 s default settings YES Returns to the default settings NO Does not return to the default settings LI...

Page 52: ...ever and then press the button 4 Select SIZE or BORDERLESS with the zoom lever and select its print type with the W X buttons Then press the button to confirm the selection SIZE You may select the des...

Page 53: ...e with file name 7 Use the zoom lever to select PRINT Then press the button to confirm the print settings and start printing 8 The printing starts and the figure shown on the right hand side appears u...

Page 54: ...2000 XP 64MB RAM 128MB hard disk space CD ROM drive Available USB port Step 1 Install the USB driver Windows 98 only Windows 98 computers The USB driver on the CD ROM is exclusively for Windows 98 com...

Page 55: ...ok for a new Removable disk icon This Removable disk is actually the memory or memory card in your DVR 530 7 Double click on the removable disk and locate the DCIM MP3 and AUDIO folders 8 Double click...

Page 56: ...de these folder s Select the files that you want and then choose Copy from the Edit menu Open the destination location folder and choose Paste from the Edit menu You may also drag and drop image files...

Page 57: ...evices by supporting the latest formats To install VideoStudio 1 Insert the CD ROM that came with the DVR 530 into your CD ROM drive The welcome screen appears 2 Click Install Ulead VideoStudio Follow...

Page 58: ...lete the installation USER MANUAL A copy of the user manual is provided on the CD ROM in PDF format It is a backup copy of the printed manual If you misplace the printed guide you may print another co...

Page 59: ...ll the PC camera driver same as USB driver Step 2 Connect the DVR 530 to your computer Step 3 Run your application software i e Windows NetMeeting Video conferencing or video editing software is not i...

Page 60: ...to your CD ROM drive The welcome screen appears 2 Click Install USB PC Cam driver Follow the on screen instructions to complete the installation After the driver installation is completed restart your...

Page 61: ...ter Then select Programs MYDSC2 PC Cam You can then use your DVR 530 as a web cam allowing others to see you online Simply follow the instructions in Yahoo Messenger to start your camera The video res...

Page 62: ...Video IMA ADPCM Audio File format EXIF 2 1 DCF 1 0 JPEG ASF Video Lens Aperture range 3 3 Focal Length 6 95mm Focus range Normal 1m infinity Macro 0 6m 1m LCD monitor 2 5 full color LTPS LCD 230K pixe...

Page 63: ...ft unattended and unused so the auto power off cuts it off The battery is exhausted DVR 530 malfunction It is being used in extreme low temperature Many images are being captured in dark places inside...

Page 64: ...auto power off function is activated The power is not on The LCD monitor is dark The DVR 530 is set to mode The flash is set to flash off Measure Recharge the battery Turn the power on Slide the mode...

Page 65: ...a card that was formatted and stored on by this device Remove the write protection Load a new memory card Adjust the brightness of LCD monitor in the SYSTEM MENU Even though the flash fired the image...

Page 66: ...r off and remove the battery once and try again Set the correct date and time Set the date and time again Symptom Cannot download files Cause The free space on the hard disk drive of your computer may...

Reviews: