background image

Transcendent 6 MegaPixel Fisheye Camera

34


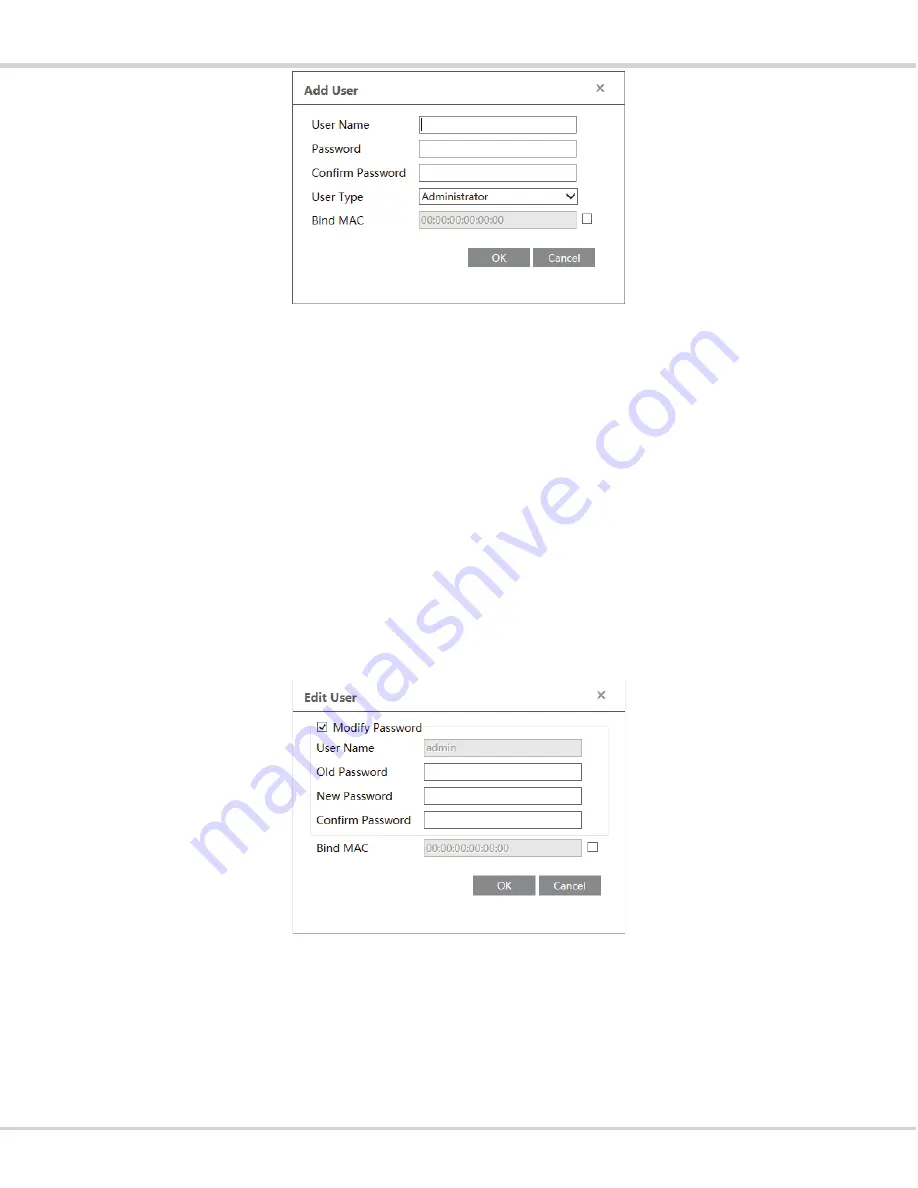
2. Input user name in “User Name” textbox. 
3. Input letters or numbers in “Password” and “Confirm Password” textbox. 
4. Choose the use type. Administrator has all permissions. Common user can only view the live 
image. Compared administrator, advanced user cannot set user, backup settings, restore the system 
to the default factory settings and upgrade the software. 
5. Input the MAC address of the PC in “Bind MAC” textbox. 
After binding physical address to the IP-CAM, you can access the device on this PC only. If the 
MAC address has “00:00:00:00:00:00” which means it can be connected to any computers. 
6. Click “OK” button and then the new added user will display in the user list. 


Modify user: 

1. Select the user you need to modify password and physical address in the user configuration list 
box. 
2. The “Edit user” dialog box pops up by clicking “Modify” button. 


3. Input old password of this user in the “Old Password” text box. 
4. Input new password in the “New password” and “Confirm Password” text box. 
5. Input computer’s MAC address as required. 
6. Click “OK” button to save the settings. 
 

Delete user: 

Summary of Contents for VTD-TND6FP

Page 1: ...ed 360 ceiling mounted 6 High Power Covert IR LEDs with 50 IR Range True Mechanical Day Night function by ICR XD DNR 2D DNR 3D DNR Noise Reduction ROI Encoding H 265 H 264 MJPEG Triple Streaming Secondary Video Output CVBS Remote Viewing via CMS Internet Explorer and iOS Android Apps ONVIF Compliant MicroSD memory card slot for Local recording supporting up to 128GB MicroSDXC cards IP66 Weather Re...

Page 2: ...ow the instructions to install the camera Do not reverse the camera or the reversing image will be received n Do not operate it in case temperature humidity and power supply are beyond the limited stipulations n Keep away from heat sources such as radiators heat registers stove etc n Do not expose the product to the direct airflow from an air conditioner n This manual is for using and managing the...

Page 3: ...n 16 3 2 2 Video Audio Configuration 17 3 2 3 OSD Configuration 19 3 2 4 Video Mask 19 3 2 5 ROI Configuration 20 3 3 PTZ Configuration 20 3 4 Alarm Configuration 21 3 4 1 Motion Detection 21 3 4 2 Alarm In 23 3 4 3 Alarm Out 24 3 4 4 Alarm Server 24 3 5 Network Configuration 25 3 5 1 TCP IP 25 3 5 2 Port 26 3 5 3 Server Configuration 26 3 5 4 DDNS 27 3 5 5 SNMP 28 3 5 6 RTSP 29 3 5 7 UPNP 30 3 5 ...

Page 4: ...ch 36 4 1 Photo Search 36 4 2 Video Search 37 4 2 1 Local Video Search 37 4 2 2 SD Card Video Search 38 Main Features l ICR auto switch true day night l 3D DNR digital WDR l ROI coding l Support BLC HLC Anti flicker l Support smart phones tablets remote monitoring Surveillance Application ...

Page 5: ...o the LAN and the IP Tool is installed in the PC from the CD Double click the IP Tool icon on the desktop to run this software as shown below Modify the IP address The default IP address of this camera is 192 168 226 201 Click the information of the camera listed in the above table to show the network information on the right side Modify the IP address and gateway of the camera and make sure its n...

Page 6: ...n the system will pop up the IE browser and connect to the IP CAM IE browser will download the Active X control After the Active X control is downloaded a login window will pop up as shown below Input the username and password to log in F 1 1 2 Directly Access through IE The default network settings are as shown below IP address 192 168 226 201 Subnet Mask 255 255 255 0 Gateway 192 168 226 1 HTTP ...

Page 7: ...hrough network cable Manually set the IP address of the PC and the network segment should be as the same as the default settings of the IP camera Open the network and share center Click Local Area Connection to pop up the following window Select Properties and then select internet protocol according to the actual situation for example IPv4 Next click Properties button to set the network of the PC ...

Page 8: ...ing Active X control you will see a login dialog box Input the default username and password and then enter to view 1 2 WAN Ø Access through the router or virtual server Make sure the camera is connected via LAN and then log into the camera via LAN and go to ConfigàNetworkàPort menu to set the port number Port Setup Go to Config àNetworkàTCP IP menu to modify the IP address ...

Page 9: ... Router Setup Open the IE browser and input its WAN IP and http port to access for example if you change your http port to 81 input 192 198 1 201 81 in the address bar of web browser to access Ø Access through PPPoE dial up Network connection You may access the camera through PPPoE auto dial up The setting steps are as follow Go to ConfigàNetworkàPort menu to set the port number ...

Page 10: ...ut the domain name and http port to access Ø Access through static IP Network connection The setting steps are as follow Go to ConfigàNetworkàPort menu to set the port number Go to Config àNetworkàTCP IP menu to set the IP address Check Use the following IP address and then input the static IP address and other parameters Open the IE browser and input its WAN IP and http port to access 2 Live View...

Page 11: ...interface Icon Description Icon Description Select live preview mode Snap Original size Start stop recording Appropriate size PTZ control Auto Sensor alarm indicator icon Full screen Motion alarm indicator icon Start stop live view Zoom in Start stop two way audio Zoom out Enable disable audio l In full screen mode double click to exit Click to select the live view mode Fisheye view mode See the p...

Page 12: ...Transcendent 6 MegaPixel Fisheye Camera 12 Fisheye 3PTZ view mode Panoramic 3PTZ view mode ...

Page 13: ...am mode in the fisheye parameter interface In panoramic 3PTZ view mode or fisheye 3PTZ view mode or 4PTZ view mode select a PTZ window and view the image from every direction by controlling PTZ panel Click to unfold the control panel The descriptions of the control panel are as follows ...

Page 14: ...he relevant information of the device Icon Description Icon Description Click it to rotate the dome diagonally up left Click it to rotate the dome diagonally up right Click it to rotate the dome upwards Click it to stop rotating the dome Click it to rotate the dome towards left Click it to rotate the dome towards right Click it to rotate the dome diagonally down left Click it to rotate the dome di...

Page 15: ...ase refer to the following interface You can select the time zone and DST as required Click Date and Time tab to set the time mode 3 1 3 Local Config Go to ConfigàSystemàLocal Config You can set the storage path of the captured pictures and video records You can also enable or disable the videos audio ...

Page 16: ...own below You can set the SD card recording stream Set the pre record time if you enable pre record Click Save button to save the settings Pre Record Time Set the time to record before the actual recording begins 3 1 5 Set Fisheye Parameters Before viewing the live image please go to ConfigàSystemàFisheye Parameters menu to set the stream mode and installation method Note Using of SD card function...

Page 17: ...below You may set and adjust the picture s brightness contrast hue and saturation etc Brightness Set the brightness level of the camera s image Contrast Set the color difference between the brightest and darkest parts Hue Set the total color degree of the image Saturation Set the degree of color purity The purer the color is the brighter the image is Sharpness Set the resolution level of the image...

Page 18: ...the anti flicker function l 50Hz PAL Make sure the horizontal stripes will not appear in the image while the device is adjusting the exposure automatically according to the brightness of the scene l 60Hz NTSC Make sure the horizontal stripes will not appear in the image while the device is adjusting the exposure automatically according to the brightness of the scene White Balance Adjust the color ...

Page 19: ...te Please choose according to the actual network situation Video Quality When VBR is selected you need to choose image quality The higher the image quality you choose the more bitrate will be required I Frame interval It is recommended to use the default value If the value is to high the read speed of the group of pictures will be slow resulting in the quality loss of the video Video Compression H...

Page 20: ...d entering the content drag them to change their position Then click Save button to save the settings 3 2 4 Video Mask Go to ImageàVideo Mask interface as shown below You can set 4 mask areas at most To set up video mask 1 Enable video mask 2 Click Draw Area button and then drag the mouse to draw the video mask area 3 Click Save button to save the settings 4 Return to the live to see the following...

Page 21: ...and then click Draw Area button 2 Drag the mouse to set the ROI area 3 Set the level 4 Click Save button to save the settings Now you will see the selected ROI area is clearer than other areas especially in low bitrate condition 3 3 PTZ Configuration The PTZ of this camera can be controlled by a keyboard Connect the keyboard and the camera through RS485 interface and then set the corresponding pro...

Page 22: ...ddress in the keyboard Address 2 you can control PTZ channel 2 by using this address in the keyboard 3 4 Alarm Configuration Alarm configuration includes four submenus Motion Detection Alarm In Alarm Out and Alarm Server 3 4 1 Motion Detection Go to AlarmàMotion Detection to set motion detection alarm 1 Check Enable Alarm check box to activate motion based alarm choose alarm holding time and set a...

Page 23: ...d pictures and triggered event will be sent to those addresses Trigger FTP If Trigger FTP and Attach Picture checkbox is checked the captured pictures will be sent to the FTP server address Please refer to FTP configuration chapter for more details 2 Set motion detection area and sensitivity Click Area and Sensitivity tab to go to the interface as shown below Move the Sensitivity scroll bar to set...

Page 24: ...dule Day schedule Set alarm time for alarm on a special day such as a holiday Set a date at the Date box click Add button to add that date to the list box on the right side and then drag the scroll bar to set the schedule of that day Select a date in the list box on the right side and click Delete to remove the schedule on that day Click Save button to save the settings Note Holiday schedule has p...

Page 25: ... motion detection Please refer to motion detection chapter for details 3 4 3 Alarm Out Go to ConfigàAlarmàAlarm Out interface as shown below Select alarm holding time at the Alarm Holding Time pull down list box Click On to trigger alarm out Click off to stop alarm out Click Save button to save the settings 3 4 4 Alarm Server Go to AlarmàAlarm Server interface as shown below You may input the alar...

Page 26: ... following IP address Please choose one of the options for your requirements Use PPPoE Click PPPoE Config tab to go to the interface as shown below Enable PPPoE and then enter the user name and password from your ISP You can choose either way of the network connection If you use PPPoE to connect to the internet you will get a dynamic WAN IP address This IP address will change frequently You may us...

Page 27: ...ault HTTP port is 80 It can be changed to any port which is not occupied Data Port The default data port is 9008 Please change it as required RTSP Port The default port is 554 Please change it as required 3 5 3 Server Configuration This function is mainly used for connecting network video management system 1 Check Enable 2 Check the IP address and port of the transfer media server in the VMS Then ...

Page 28: ...our camera is set to use PPPoE as its default network connection DDNS should be set for network access Before you set the DDNS please make sure you have registered a domain name on the DDNS server 1 Go to ConfigàNetworkà DDNS 2 Apply for a domain name Take www dvrdyndns com for example Input www dvrdydns com in the IE address bar to visit its website Then click Registration button Create domain na...

Page 29: ...re using the SNMP please download the SNMP software and set the parameters of the SNMP such as SNMP port trap address 1 Go to ConfigàNetworkàSNMP 2 Check the corresponding version checkbox Enable SNMPv1 Enable SNMPv2 Enable SNMPv3 according to the version of the SNMP software you download 3 Set the Read SNMP Community Write SNMP Community Trap Address Trap Port and so on Please make sure the setti...

Page 30: ...Transcendent 6 MegaPixel Fisheye Camera 30 3 5 6 RTSP Go to ConfigàNetworkàRTSP ...

Page 31: ...ss the camera via LAN and you don t need to configure the port mapping when the camera is connected to the WAN via the router Go to ConfigàNetworkàUPnP Enable UPNP and then input UPnP name After you enable it and set the UPnP name you will see the UPnP name by clicking Network on the desktop of your computer which is in the same local area network with your camera Then double click this name to ac...

Page 32: ...ion detection alarms are triggered within 60 seconds it will be considered as one alarm event and only one email will be sent If one motion alarm event is triggered and then another motion detection alarm event is triggered after 60 seconds there will be two emails sent When the motion detection alarm and other alarms are triggered at the same time the emails will be sent separately Click Test but...

Page 33: ...me of the FTP Upload Path The path of uploading the files Port The port of the FTP Use Name and Password The username and password used to log into the FTP 3 6 Security Configuration 3 6 1 User Configuration Go to ConfigàSecurityàUser interface as shown below Add user 1 Click Add button to pop up the following textbox ...

Page 34: ...r binding physical address to the IP CAM you can access the device on this PC only If the MAC address has 00 00 00 00 00 00 which means it can be connected to any computers 6 Click OK button and then the new added user will display in the user list Modify user 1 Select the user you need to modify password and physical address in the user configuration list box 2 The Edit user dialog box pops up by...

Page 35: ...sts interface as shown below Setting steps are as follows Check Enable IP address filtering check box Select Block the following IP address input IP address in the IP address list box and click Add button The operation step of Allow the following IP address and MAC address filter settings are the same with Block the following IP address After you set the IP address or MAC address the system will b...

Page 36: ... Click Reboot button to reboot the device Timed Reboot Setting Enable Time Settings set the date and time and then click Save button to save the settings 3 7 3 Upgrade Go to ConfigàMaintenanceàUpgrade In this interface you can upgrade the system 1 Click Browse button to select the save path of the upgrade file 2 Click Upgrade button to start upgrading the application program 3 The device will rest...

Page 37: ...w the operation log 4 Click Export to export the operation log 4 Search 4 1 Photo Search Click SearchàPhoto to go to the interface as shown below You can search the images saved in the SD card 1 Set time Select date and choose the start and end time in the top left corner 2 Check events 3 Click Search button to search the photos 4 Click a file name in the list to view captured photos as shown abov...

Page 38: ...button Actual size Click this button to display the actual size of the picture Zoom in Click this button to amplify the picture Zoom out Click this button to zoom out the picture Slide show play Click this button to play the picture in slide show mode Stop Click this button to stop slide show Play speed Play speed of the slide show 4 2 Video Search 4 2 1 Local Video Search Click SearchàVideoàLocal...

Page 39: ... Click to display full screen Double click to exit full screen 4 2 2 SD Card Video Search Click SearchàVideoàSD Card Recording to go to the interface as shown below You can search the recording saved in the SD card Before you search the SD recording you should trigger the SDrecording in motion detection alarm or alarm input alarm see Motion Detection Trigger or Alarm Input Trigger for detail infor...

Page 40: ...Transcendent 6 MegaPixel Fisheye Camera 40 1 19 1 54 5 12 ...

Page 41: ... F2 5 horizontal field of view 180 wall mounting 360 ceiling mounting 6 High Power Covert IR LEDs 50 IR Range True Day Night by ICR Digtal WDR D WDR Yes XD DNR 2D DNR 3D DNR Yes H 265 H 264 MJPEG VBR five levels adjustable CBR Support low bitrate low delay support ROI coding SVC technology support self adapative transmission bitrate as the network environment 64 Kbps 16MKbps G 711A G 711Mu 8Kbps 4...

Page 42: ... for many leading ONVIF compliant IP Camera models Internal PoE Switch VT TNR414P VT TNR818P and VT TNR3216P 1 Gigabit LAN Pentaplex Live Display Record Playback Backup Remote Access Supports SATA2 SATA3 HDD Applications for iOS Android Remote Viewing over the Internet via Web Browser or LAN Mac OS Client CMS Central Management Software Included Supports both Dynamic and Static IP Addresses Web ba...

Page 43: ...a 11 OPTIONAL MOUNTS AVAILABLE VT TJB F1 Junction Box for Transcendent VTD TND6FP Fisheye Dome Camera VT TWM F Wall Mount for Transcendent VTD TND6FP Fisheye Dome Camera VT TPDM F Pedestal Mount for Transcendent VTD TND6FP Fisheye Dome Camera ...

Page 44: ...replace ment for a defective product however all related costs including but not limited to shipping and or delivery charges will be the responsibility of the customer If upon return inspection a product is determined to be in good working order or shows evidence of misuse the customer will be re sponsible for full payment of the original product purchased as well as the replacement product Beyond...

Reviews: