


ENGLISH
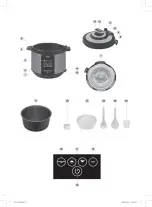
- Remove the lid (8) by turning the lid (8) so
that the mark ▲ located on the unit body
above the display is opposite the mark
on
the lid (8)
- Remove the bowl (6) and put the food into
the bowl following the recipe (see the Recipe
book).
- Install the bowl (6) in the process chamber.
Before installing the bowl (6), make sure that
the outer surface of the bowl is clean and dry,
and the bowl itself is placed evenly and is in
secure contact with the surface of the heat
ing element (14).
- If you steam products, pour water into the bowl
(6) so that boiling water doesn’t reach the b ot
tom of the basket (21). Put the food into the
basket (21) and place it on the bowl (6).
- If you are cooking in the «Roasting» program,
do not install the lid (8).
- Before installing the lid (8), check the valve
and the blocking system elements (9). They
should be clean and the blocking system valve
(9) should be lowered.
- Place the lid (8) on the unit so that the mark
▲ located on the unit body above the display
is opposite the mark ц ? on the lid (8)
- Turn the lid (8) in the direction o f the s
Q as far as it will go.
- Insert the power cord connector into the
nection socket on the multicooker body and
the power cord plug into the mains socket. You
will hear a sound signal, the «— » symbols will
be shown on the display (3) (sleep mode).
- To cancel the sleep mode, press the ON/OFF
button (19) (^). Symbols «88:88» will appear
on the display (3).
3. Setting an autom atic cooking program
Touch the «MENU» button (16) and then select
the cooking program with the buttons «-/+» (17).
The symbol of the selected program will flash,
the display (3) will show the program settings set
by default.
Setting the «Multicook» program:
Touch the
button (19), the flashing tem pera
ture indications as set by default will appear on
the display (3). Use the buttons (17) «-/+» to set
the necessary cooking temperature.
- Touch the button (19) (^) again, the display
(3) will show the flashing indications of coo k
ing time. Use the buttons (17) «-/+» to set the
necessary cooking time.
ymbol
e con-
4. Setting the delayed start
I f you want to s ta rt cooking im m ediately, skip
this step.
The delayed start function allows to set the cook
ing end time. See the list o f programs with avail
able delayed start function in the table «Cooking
programs».
Exam ple:
If you set the delayed start time for 2:00, and dura
tion o f the selected program is 50 minutes, the
unit will stay in standby mode fo r 1 hour 10 m in
utes and then the cooking process will start.
- Select a cooking program and make the settings.
- Touch the «DELAYED START» button (18), the
indicator ( 5 will appear on the display, the
delayed start tim e in hours will be flashing.
- Use the buttons (17) «-/+» to set the delayed
start tim e in hours.
- Touch the «DELAYED START» button (18), the
minutes digits will be flashing.
- Use the buttons (17) «-/+» to set the delayed
start tim e in minutes.
5. Starting the cooking program
To start the cooking program, touch the but
ton (19) O - If you have set the delayed start
function and switched the unit on, the unit will
be operating in standby mode, the symbol
« © » will be shown on the display (3). Once
the delay tim e is over, the unit will be switched
on in the cooking mode, the symbol @ will go
out as well.
- If after having selected and set the cooking
program, you do not switch the unit on with
the button (19) ( [) , then two minutes later you
will hear sound signals and the unit will auto
matically go into sleep mode, the display (3)
will show the symbols “ -------” .
- To switch the unit off while in the delayed start
mode or during cooking, touch the button (19)
(^) for two seconds.
6. End o f cooking and the keep warm func
tion switching on
- Sound signals will inform you that the cooking
program is finished.
- If the keep warm function is available
for the selected program, the unit will be auto
matically switched to the keep warm mode.
Symbol ©
will appear on the display (3).
- To switch the keep warm mode off, touch the
button (19) (^) for two seconds.
- After that unplug the unit.
7
V T -4 2 2 5 .in d d 7
2 6 .0 8 .2 0 1 4 1 4:22:12