6
ENGLISH
temperature•and•raise•it•gradually•until•you•get•
the•desired•result).
•
Corduroy•and•other•fabrics•that•become•glossy•
quickly•should•be•ironed•strictly•in•one•direction•
(in•the•direction•of•the•pile)•with•slight•pressure.
•
To• avoid• appearance• of• glossy• spots• on• syn-
thetic•and•silk•fabrics,•iron•them•backside.
SETTING THE IRONING TEMPERATURE
•
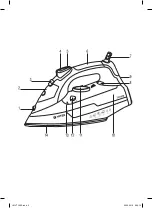
Place•the•iron•on•its•base•(9).
•
Insert•the•power•plug•into•the•mains•socket.
•
Turn• the• knob• (11)• to• set• the• required• iron-
ing• temperature:• «
•
»,• «
••
»,• «
•••
»• or• «MAX»•
(depending• on• the• type• of• fabric),• the• pilot•
lamp•(8)•will•light•up.
•
Once• the• temperature• of• the• soleplate• (14)•
reaches•the•set•point,•the•pilot•lamp•(8)•will•go•
out•and•you•can•start•ironing.
Note:
•
If you are ironing at high temperature but you
need to switch to low temperature, wait until
the soleplate temperature decreases and the
pilot lamp(8) lights up, and only then you may
start ironing. While steam ironing it is neces-
sary to set the ironing temperature «•••» or
«MAX».
WATER SPRAY
•
You• can• dampen• the• fabric• by• pressing• the•
water•spray•button•(5)•several•times.
•
Make• sure• that• there• is• enough• water• in• the•
water•tank•(10).
DRY IRONING
•
Place•the•iron•on•its•base•(9).
•
Insert•the•power•plug•into•the•mains•socket.
•
Set• the• continuous• steam• supply• knob• (3)• to•
the•lower•position•(steam•supply•is•off).
•
Turn• the• knob• (11)• to• set• the• required• iron-
ing• temperature:• «
•
»,• «
••
»,• «
•••
»• or• «MAX»•
(depending•on•the•type•of•fabric),•the•pilot•lamp•
(8)•will•light•up.
•
Once• the• soleplate• (14)• reaches• the• set• tem-
perature,•the•pilot•lamp•(8)•will•go•out•and•you•
can•start•ironing.
•
After• you• finish• ironing,• set• the• temperature•
control•knob•(11)•to•the•«OFF»•position.
•
Pull•the•power•plug•out•of•the•mains•socket•and•
let•the•iron•cool•down•completely.
STEAM IRONING
While• steam• ironing• it• is• necessary• to• set• the•
ironing• temperature• «
•••
»• or• «MAX».• The• iron• is•
provided• with• an• anti-drip• valve• that• stops• water•
supply•if•the•soleplate•temperature•is•too•low,•this•
prevents• dripping• from• the• soleplate• (14)• open-
ings.•During•heating•and•cooling•of•the•iron•sole-
plate,• you• will• hear• characteristic• clicks• of• the•
anti-drip• valve• opening/closing,• which• indicates•
its•normal•operation.
•
Place•the•iron•on•its•base•(9).
•
Set• the• continuous• steam• supply• knob• (3)• to•
the•lower•position•–•steam•supply•is•off.
•
Insert•the•power•plug•into•the•mains•socket.
•
Make• sure• that• there• is• enough• water• in• the•
water•tank•(10).
•
Turn• the• knob• (11)• to• set• the• required• iron-
ing• temperature:• «
•••
»• or• «MAX»,• the• pilot•
lamp•(8)•will•light•up.
•
Once• the• temperature• of• the• soleplate• (14)•
reaches•the•set•point,•the•pilot•lamp•(8)•will•go•
out•and•you•can•start•ironing.
•
Turn•the•continuous•steam•supply•knob•(3)•to•
set•the•required•steam•generation•rate,•steam•
will• start• going• out• from• the• soleplate• (14)•
openings.
•
The• continuous• steam• supply• knob• (3)• has•
three•positions:•the•lower•position•–•the•steam•
supply•is•off,•the•middle•and•higher•position•-•
with•various•intensity•of•steam•generation.•For•
maximum• continuous• steam• supply• set• the•
knob•(3)•to•the•higher•position.
•
After• you• finish• ironing,• set• the• temperature•
control•knob•(11)•to•the•position•«OFF»,•and•the•
continuous•steam•supply•knob•(3)•to•the•lower•
position•–•steam•supply•is•off.
•
Pull•the•power•plug•out•of•the•mains•socket•and•
let•the•iron•cool•down•completely.
ATTENTION!
If steam is not supplied constantly during the
operation, check whether the temperature control
knob (11) and the continuous steam supply knob
(3) are set properly and whether there is water in
the water tank (10).
BURST OF STEAM
The• burst• of• steam• function• is• useful• for• ironing•
folds• and• can• only• be• used• at• high• ironing• tem-
peratures•(when•the•iron•temperature•control•knob•
(11)•is•set•to•the•position•«
•••
»•or•«MAX»).
•
When• pressing• the• burst• of• steam• button• (4)•
steam• will• go• out• of• the• iron• soleplate• more•
intensively.
Note: To avoid water leakage from steam open-
ings, press the burst of steam button (4) with
a 4-5 sec. interval.
IM VT-1266.indd 6
20.05.2016 9:09:15
Summary of Contents for VT-1266 B
Page 1: ...1 VT 1266 B 3 8 14 20 26 Iron IM VT 1266 indd 1 20 05 2016 9 09 14...
Page 2: ...IM VT 1266 indd 2 20 05 2016 9 09 14...
Page 14: ...14 8 8 8 IM VT 1266 indd 14 20 05 2016 9 09 15...
Page 15: ...15 VT 1266 B 1 2 3 4 5 6 7 8 9 10 11 12 13 14 30 IM VT 1266 indd 15 20 05 2016 9 09 16...
Page 16: ...16 www vitek ru 14 10 10 11 OFF 3 2 10 2 MAX 13 2 14 10 IM VT 1266 indd 16 20 05 2016 9 09 16...
Page 20: ...20 8 8 8 IM VT 1266 indd 20 20 05 2016 9 09 16...
Page 21: ...21 VT 1266 B 1 2 3 4 5 6 7 8 9 10 11 12 13 14 30 IM VT 1266 indd 21 20 05 2016 9 09 16...
Page 22: ...22 www vitek ru 14 10 10 11 OFF 3 2 10 2 MAX 13 2 14 10 IM VT 1266 indd 22 20 05 2016 9 09 16...
Page 26: ...26 8 i 8 8 IM VT 1266 indd 26 20 05 2016 9 09 17...
Page 27: ...27 VT 1266 B 1 2 3 4 5 6 7 8 9 10 11 12 13 14 30 i IM VT 1266 indd 27 20 05 2016 9 09 17...

