VitalConnect VistaPoint 3.2 Instructions For Use Manual Download Page 34

34

IFU-26 Rev. J   |   December 2021

If “Low Quality Reading” is 

displayed, check finger is 

inserted correctly.

If “Finger is Removed” is 

displayed, check finger is 

inserted correctly or tap 

Disconnect

 to stop measuring 

oxygen saturation.

 %SPO2

Low Quality Reading

97


Finger is Removed

--

Error Messages

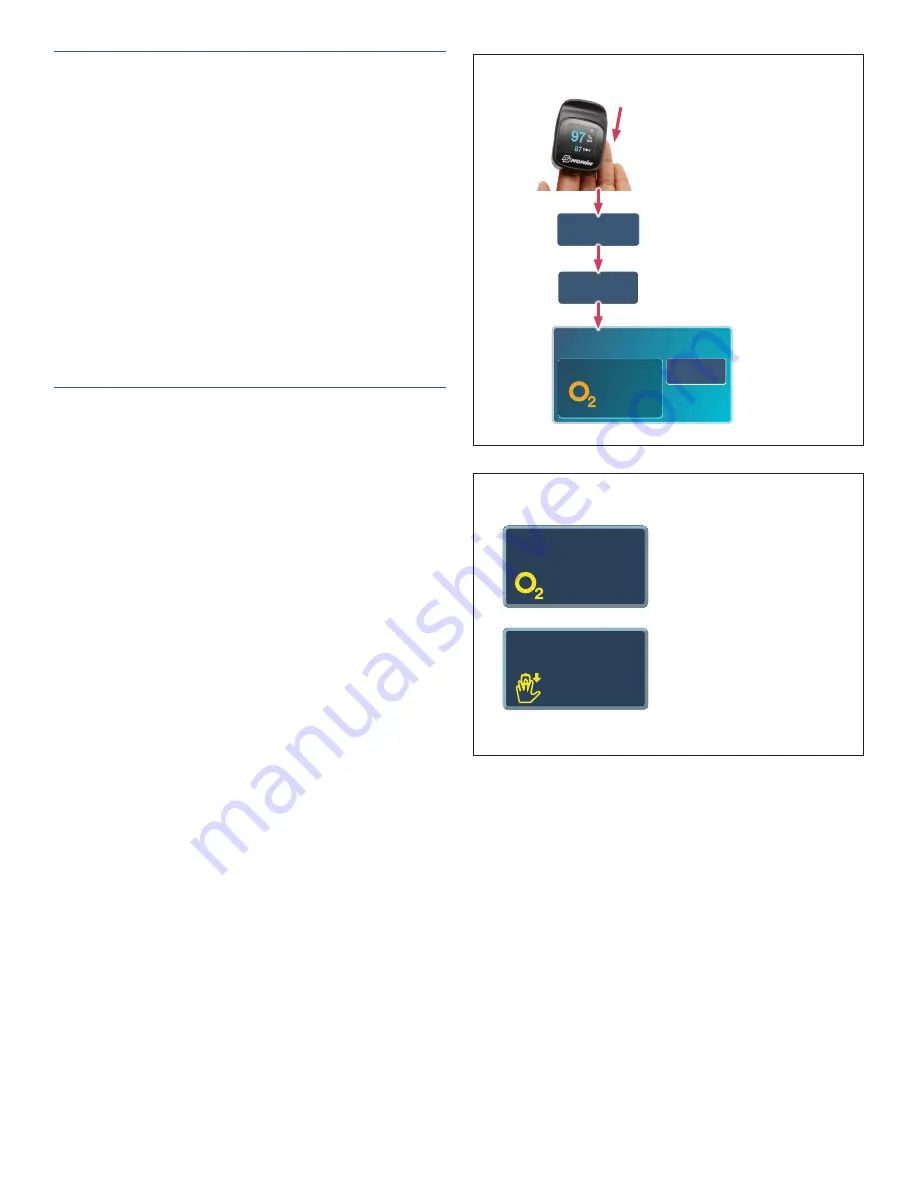
3.  Take a Reading (After Pairing)

a.  Apply the Model 3230 to the finger. The unit will 

automatically turn on and being measuring. 

b. 

Tap 

Take SpO2

 in the Oxygen Saturation tile.

c. 

Tap 

Use Bluetooth

 (if not already selected) and then 

tap 

Take Reading

.

d. 

VistaPoint displays “Please wait connecting…” while 

it retrieves the current reading. When the reading is 

complete, the oxygen saturation will be displayed on 

the dashboard with an indicator of when the reading 

was taken.
If the oxygen saturation value is not displayed, repeat 

the pairing process (

Step 2 on previous page

).

e.  Remove from finger when reading is complete.

Error Messages During Measurement

The following error messages may be displayed in 

VistaPoint when taking a measurement. See figure to the 

right.

• 

If the dashboard displays “Finger Removed”, check 

finger is inserted correctly, or tap Disconnect

 to stop 

monitoring.

• 

If the dashboard displays “Low Quality Reading”, 

check finger is inserted correctly.

%SPO2

Standby Mode (Spot)

97

Take SpO2

Oxygen Saturation

Nonin 3230 00:0B:57:AC:66:DA

Last Reading:

2 Minutes Ago

Take SPO2

Reading

Complete 

Take

Reading

Apply to

Finger

Take a Reading

Summary of Contents for VistaPoint 3.2

Page 1: ...vision History 2 Getting Started Setting Up VistaTablet or VistaPhone Device 3 Checking Device Battery Level and Patch Hours 5 Changing Patient Name and Device Name 6 Removing Previous VitalPatch 7 Ap...

Page 2: ...ate spot check behavior streaming mode no longer supported for Nonin 3230 Rev E Added support VistaPoint Release 3 2 Changes include controls for modifying and displaying patient name and device name...

Page 3: ...itoring session unpack the VistaTablet or VistaPhone device Keep the packaging that was provided Locate the following VistaTablet or VistaPhone USB charger and charging cable VitalPatch biosensors and...

Page 4: ...d hold the Power Key until the Options menu displays and then select Power Off Unlocking the Device If the VistaTablet or VistaPhone device is asleep black screen unlock and start the VistaPoint appli...

Page 5: ...ovider as soon as possible Failure to return may result in additional charges for monitoring services The monitoring equipment includes the following VistaTablet or VistaPhone USB charger and charging...

Page 6: ...permission to change the patient name 3 Enter the new patient name in the space provided Allowed characters are letters numbers hyphens spaces periods and underscores No other characters are allowed...

Page 7: ...r of the overlay and peel it off the skin b Continue pulling the overlay off Stretch the overlay horizontally to help release it from the skin Note The VitalPatch may begin pulling off with the overla...

Page 8: ...inimum of 2 minutes before powering on the VitalPatch You may prepare the chest next step while waiting 2 Prepare Chest a If there is body hair on the site shave the site before cleaning Prepare an ar...

Page 9: ...omfort or irritation occurs the VitalPatch and the optional adhesive overlay should be removed Contact your healthcare provider immediately If the VitalPatch begins to fall off or lift from the skin c...

Page 10: ...erlay over the VitalPatch with the blue liners against the chest The raised portions of the VitalPatch should be aligned with the cutouts of the overlay See figure to the right b Ensure the tab you cr...

Page 11: ...complete the help sequence Tap the Bluetooth ID of your VitalPatch ID when it appears on the screen If VistaPoint asks how you want to connect choose one of the following options Tap Search for VitalP...

Page 12: ...g you to confirm your selection Note If you have a pacemaker VistaPoint will not display ECG heart rate or respiration rate If pacemaker status has been incorrectly selected it may be changed later Se...

Page 13: ...ed after performing or skipping the temperature calibration See Section 9 on page 14 for more information 8 Recalibrate Body Temperature If your configuration supports automatic body temperature you m...

Page 14: ...ed for a simplified display that does not show vital signs For these devices your vital signs continue to be collected and will be monitored remotely by your care team VitalPatch Menu 92 5 45 PM Repor...

Page 15: ...a VitalPatch that does not support automatic body temperature selecting this option will display a unit setting screen See Section 13 on page 18 Flash Patch LED Use to check pairing between VistaPoin...

Page 16: ...oaded automatically using approved Bluetooth devices Blood Oxygen Saturation as SpO2 Blood Pressure mmHg systolic and diastolic Weight pounds and kilograms Fall Detection If the VitalPatch detects a f...

Page 17: ...l not be applied turn off the VistaTablet or VistaPhone by pressing and holding the Power Key on until the Options menu displays and then select Power Off CALL 911 if you are experiencing an emergency...

Page 18: ...Measure temperature with a clinical grade thermometer 2 Tap the Menu button and then tap Calibrate Temperature or tap the Body Temperature tile on the dashboard 3 Tap the units Celsius C or Fahrenheit...

Page 19: ...manual entry Section 15 Entering Body Temperature Manually Your care team may direct you to enter an oxygen saturation SpO2 reading manually on a regular schedule for example one or more times per day...

Page 20: ...nter value and then re enter the value Section 17 Entering Blood Pressure Manually Tap Take BP or Take a Measurement Take Weight Manual Entry Use Bluetooth Weight value 206 6 Clear Values Enter Pounds...

Page 21: ...ssage continues The VitalPatch cannot be reapplied by pressing down to re adhere The VitalPatch partially or completely falls off the skin If the VitalPatch must be replaced select Disconnect Patch fr...

Page 22: ...ashboard will display a VitalPatch Not Detected message See Section 10 on page 17 for more information Message Posture Calibration Required If posture becomes Unknown VistaPoint will direct you to per...

Page 23: ...t indicates that the VistaTablet or VistaPhone does not have a wireless connection or that the cloud service is down See messages above for more information Checking Your Wireless Connection Your Vist...

Page 24: ...ing procedure 1 Plug VistaTablet into the charger If the battery is completely discharged the it may need several minutes to recharge before you can restart next step 2 Restart the VistaTablet by hold...

Page 25: ...is ON Check the Bluetooth indicator in the display The indicator will be displayed when Bluetooth is ON If it is not ON use a long button press to turn it ON To power off the device press and hold th...

Page 26: ...tion tile This will remove the pairing between VistaPoint and the Berry device Error Messages During Measurement The following error messages may be displayed in VistaPoint when taking a measurement S...

Page 27: ...on again to move between options Long press the ON OFF button to select an option or to change its value Ensure Bluetooth is ON using the menu To power off the device press and hold the ON OFF button...

Page 28: ...tion tile This will remove the pairing between VistaPoint and the Berry device Error Messages During Measurement The following error messages may be displayed in VistaPoint when taking a measurement S...

Page 29: ...the device Release the device to close The display should face up b Check the display of the unit See figure to the right If the Bluetooth icon is displayed in the upper right of the display no additi...

Page 30: ...he number under mac 3 Take a Reading in VistaPoint a Apply Masimo MightySat device to the finger The device will turn on and begin measuring See figure to the right b Tap Take SpO2 in the Oxygen Satur...

Page 31: ...e team Note Monitor battery life and replace batteries as necessary 1 Find the Bluetooth ID Optional Note This step is optional and is only necessary when using the Model 3150 in an environment where...

Page 32: ...finger h If the monitoring session is complete tap Disconnect in the Oxygen Saturation tile This will remove the pairing between VistaPoint and the Nonin 3150 Error Messages During Measurement The fo...

Page 33: ...to the right The Bluetooth ID begins with BDA 2 Pair New in VistaPoint a Tap Take SpO2 in the Oxygen Saturation tile Tap Use Bluetooth and then tap Pair New Tap Nonin Model 3230 as the model b Apply t...

Page 34: ...ading When the reading is complete the oxygen saturation will be displayed on the dashboard with an indicator of when the reading was taken If the oxygen saturation value is not displayed repeat the p...

Page 35: ...y when using the UA 651 in an environment where multiple similar devices are being used such as a hospital To find the Bluetooth ID turn the base unit over and find the label above the battery compart...

Page 36: ...on on the base unit to take a reading VistaPoint displays Please wait connecting while it retrieves the current reading When the reading is complete the blood pressure will be displayed on the dashboa...

Page 37: ...o confirm the device pairing tap Confirm 3 Take a Reading a Tap Take Weight in the Weight tile b Tap Use Bluetooth if not already selected c Tap Take Reading or Take a Measurement on VistaPhone and th...

Page 38: ...4 Airport Parkway Suite 300 San Jose CA 95110 408 963 4600 www vitalconnect com support vitalconnect com 2021 VitalConnect A list of our trademarks can be found at www vitalconnect com All other marks...

Reviews: