background image

Enhanced Vision 

Amigo Advanced Features and Functions                                                                                 67


Update Using a USB Cable 

To update the device using a USB-C to USB-A cable: 

1.


Download the release software from 

enhancedvision.com/support/software.html

. The release file has a VHU 

(Vispero Hardware Update) extension and updates the Amigo software 

and firmware. 

2.


Insert the USB-A side of the cable into the computer where you 

downloaded the VHU file. 

3.


Insert the USB-C side of the cable into Amigo.  

4.


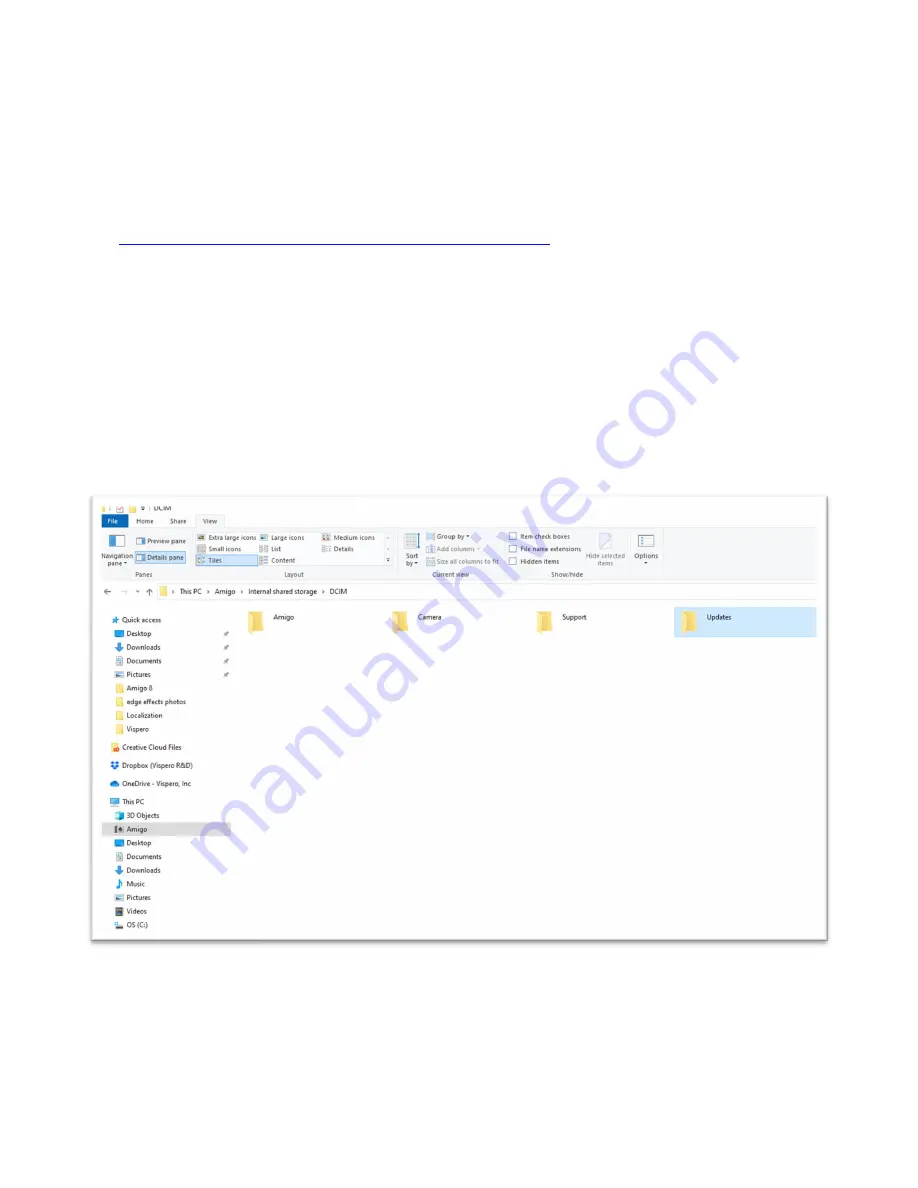
In Windows File Explorer, copy the VHU file from the computer into the 

DCIM/Updates 

folder on Amigo.  


5.


The 

Update Device

 screen automatically opens on Amigo when you begin 

copying, but do not proceed until the file has copied 100%. Check the file 

transfer progress bar to determine the status of the copy. 

6.


After the file has copied 100%, press the Color Mode button. 

Summary of Contents for enhanced vision amigo

Page 1: ...DOC 000837 Rev A AMHD8 June 2022 Advanced Features and Functions...

Page 2: ...pport enhancedvision com U K office 0800 145 6115 www enhancedvision co uk Ordersuk optelec co uk D E office 49 6078 9698270 www evoptron de rmaeurope evoptron de Canadian office 800 665 3005 ca optel...

Page 3: ...er On Off 10 First Run Setup Instructions 11 Using the Amigo 13 Open the Stand 13 Close the Stand 14 Reading 14 Writing 15 Distance Viewing 16 Enhancing an Image 18 Changing Views 20 Live View 21 Snap...

Page 4: ...ecking Available Storage 57 Deleting Files 57 Copying Files onto Another Device 59 System Settings 60 Set the Language 60 Set the Time and Date 60 Restore Default Settings 62 Change the Standby Time 6...

Page 5: ...splay of live images and image captures based on your personal preferences including magnification brightness and color filters color combinations lines and masks and edge effects You can pan live and...

Page 6: ...Enhanced Vision 2 Amigo Advanced Features and Functions...

Page 7: ...on standby off orange Front 2 Snapshot button orange 3 Color Mode button blue 4 Zoom In increase magnification button yellow 5 Zoom Out decrease magnification button yellow Back 6 Power button on stan...

Page 8: ...l ways depending on the function being explained Press and release the button to perform a task such as press the Zoom In button to magnify the image Press the button for a certain number of seconds t...

Page 9: ...ut to change the font size No bold italics or underline are available The default color combination is white on black True color is always available The default view is Live view showing the image cur...

Page 10: ...e status light is solid green 3 Power on the device 4 Complete first run setup instructions The remainder of the document provides step by step instructions for using product features Package Contents...

Page 11: ...er power supply 1 Connect the tip of the included AC adapter USB C cable to the USB C connector port 2 Plug in the other end of the AC adapter power supply to an available AC wall outlet Note A surge...

Page 12: ...Plug into an outlet to begin charging Charge the Battery Fully charge the battery before first use Wait until the battery charging status light is solid green to use the device Your Amigo battery lif...

Page 13: ...charger provided with your Amigo if so contact Enhanced Vision technical support for assistance See page ii Battery Symbol A battery symbol on the bottom right of any menu screen indicates the remaini...

Page 14: ...info while charging Off Press 2 seconds Powers on Standby Press and release Wakes device What to Expect When Powering On When you power on your Amigo 1 The Amigo logo displays indicating the device is...

Page 15: ...ext size you want in the menus The number on the screen is the same size as the text that will be displayed 4 Press the Color Mode button to select the text size and move to the next screen Note To di...

Page 16: ...r Mode button If you select 52 for example the time would be set at 10 52 8 In the third column highlight AM or PM and press the Color Mode button If you select AM for example the time would be set at...

Page 17: ...re labels read restaurant menus or magnify anything nearby When you extend the stand you can read material directly beneath Amigo or you can write directly behind it This section provides examples of...

Page 18: ...of the Amigo to reduce the risk of your fingers getting pinched Reading You can either read objects while holding the device or you can extend the stand and place the device on top of the reading mate...

Page 19: ...ced Vision Amigo Advanced Features and Functions 15 Writing To write extend the stand and place the writing paper under the Amigo Position the device so you can view your writing on the screen as you...

Page 20: ...Distance Viewing You can hold the Amigo to view objects a short distance away The distance camera is ideal for spotting labels price tags or receipts while carrying the device Note You must close the...

Page 21: ...Enhanced Vision Amigo Advanced Features and Functions 17 You can also view signs in stores or on the street as you carry Amigo with you...

Page 22: ...ation or the Zoom Out button to decrease To change the color combination used to display the image on the screen press the Color Mode button To freeze the image press the orange Snapshot button You ca...

Page 23: ...Enhanced Vision Amigo Advanced Features and Functions 19 Panning is available in any Live or Snapshot view Press and hold Zoom In Zoom Out for 0 5 seconds to go to Panning mode...

Page 24: ...ou can use Panning mode in either Live view or Snapshot view Live view means the screen shows what the camera is currently viewing Snapshot view is when you capture an image so it is frozen on the scr...

Page 25: ...5 seconds In Live view button presses result in the following actions Image Color Name Action Orange Snapshot Press and release to auto focus the camera Press and hold 1 second to take a snapshot and...

Page 26: ...result in these actions Image Color Name Action Orange Snapshot Press to close the snapshot and return to Live view Blue Color Mode Press to rotate through configured color combinations used to displa...

Page 27: ...e from the Image Gallery In Live view and Snapshot view you can pan to get a better look at the right left top and bottom portions of the image To pan an image simultaneously press the yellow Zoom In...

Page 28: ...ot Press and release to move left a bit at a time Press and hold to move left as far as possible Quickly double click to move nearly a full screen left Blue Color Mode Press and release to move up a b...

Page 29: ...You can dynamically change the size of the words on the menu screens by going to Font mode While in Menu view press and hold Zoom In Zoom Out for 0 5 seconds to go to Font mode Display the Main Menu T...

Page 30: ...Enhanced Vision 26 Amigo Advanced Features and Functions Menu Structure The Main Menu can include the options in the left column while its sub menus are shown in the middle and right columns...

Page 31: ...time Press the Zoom Out button to go down one line at a time The highlighted item is selected 2 To enable a selection and move to the next screen press the Color Mode button 3 To move back to the pre...

Page 32: ...ange Snapshot Press to return to the previous menu or screen Any changed values are automatically saved when you leave the screen Blue Color Mode Press to select an item For example if you select the...

Page 33: ...JPG file in the Image Gallery This option is only available from Snapshot view Appear ance Menu Sets the options that affect the screen display Font size change the size of the text in the menus page...

Page 34: ...these options page 60 Set the time and date page 60 Update the device with new software page 65 Determine available amount of device storage page 57 Reset all settings to the factory defaults page 62...

Page 35: ...ess is called Zoom In Zoom Out throughout this book 3 Press the Zoom In button to increase the font size and the Zoom Out button to decrease it 4 When you are satisfied with the font size press and ho...

Page 36: ...Amigo Advanced Features and Functions Image Color Name Hint Action Orange Snapshot Unavailable Blue Color Mode Unavailable Yellow Zoom In Press to increase the font size Yellow Zoom Out Press to decr...

Page 37: ...tery Status The time is displayed in the upper right corner of the menu while the battery status is displayed in the bottom right The lightning bolt means that the Amigo is currently charging Neither...

Page 38: ...for 0 5 seconds See page 23 for details on panning Note If you run out of space to save more files on the Amigo see Managing Files on page 57 You can delete one file at a time or all files at once Bef...

Page 39: ...er sound keep the camera steady Movement can blur the image Once you take a snapshot you can save it or modify it changing the colors magnification and other features available through the Appearance...

Page 40: ...is displayed and after a brief pause File saved is displayed 3 Press the blue Color Mode button The Main Menu is displayed 4 Press the orange Snapshot button to exit the Main Menu You are now in Snap...

Page 41: ...Enhanced Vision Amigo Advanced Features and Functions 37...

Page 42: ...u 2 Press the yellow Zoom Out button twice to highlight the Image Gallery option The Image Gallery screen is displayed 3 Use the Zoom buttons to highlight the name of the image you want to view A smal...

Page 43: ...wn as the screen title 5 Press the blue Color Mode button to open the file The message Opening document is shown until the file is displayed using the entire screen 6 If desired view more of the image...

Page 44: ...ds you of each button s purpose See Panning on page 23 for details Pan left Pan up Pan right Pan down 7 If desired modify the saved snapshot See the next section 8 Press and hold Zoom In Zoom Out for...

Page 45: ...ge by pressing the yellow Zoom buttons 4 Change any other values that would enhance the quality of the image To add another color combination to the Color Mode rotation see page 50 To adjust for color...

Page 46: ...operties of the image on the screen Font Size Lines and Masks Light Sensitivity Filter Color Blindness Filter Color Combinations Brightness Edge Effects Note See Menu View on page 25 for basic instruc...

Page 47: ...change the font size Detailed steps are provided after the following summary 1 Press and hold Snapshot Color Mode for 0 5 seconds to display the Main Menu 2 From anywhere in the Menu view press and h...

Page 48: ...or the Zoom Out button to decrease it Tip You can press repeatedly on the button or hold it down to quickly increase or decrease the size 4 When you are satisfied with the font size press and hold Zoo...

Page 49: ...Either press the Snapshot button to return to the previous menu or press and hold Snapshot Color Mode for 0 5 seconds to go to Live view Lines and Masks Using lines or masks can help you keep your pl...

Page 50: ...y the option 5 Optionally press the Snapshot button to return to the previous screen See Set Line Position or Set Mask Size on the following pages to change the default line placement middle or defaul...

Page 51: ...ton to return to the previous screen or press and hold Snapshot Color Mode for 0 5 seconds to display Live view Set Mask Size When you use masks Live view displays in the center of the screen and the...

Page 52: ...ay Live view Light Sensitivity Filter Amigo attempts to maximize comfort during long term use by minimizing discomfort from light sensitivity This feature reduces the wavelengths of light associated w...

Page 53: ...ght the Color Blindness Filter option 3 Press the Color Mode button to display the Color Blindness Filter screen This screen gives you a choice of three colored boxes each with gray on the right side...

Page 54: ...screens and separately set the rotation of color combinations available while viewing images The following two color combinations can be used in displaying both menus and images When referenced foreg...

Page 55: ...ately displayed 4 When satisfied with the menu colors press the Snapshot button to return to the previous menu or press and hold Snapshot Color Mode for 0 5 seconds to display the Live view Image Colo...

Page 56: ...want in the rotation 3 Press the Color Mode button to display a checkmark next to the color combination you want in the rotation Note True color is always available in the rotation of colors so it is...

Page 57: ...vious menu or press and hold Snapshot Color Mode for 0 5 seconds to display Live view Edge Effects Amigo helps you recognize objects by removing clutter and enhancing edges Objects stand out against t...

Page 58: ...Enhanced Vision 54 Amigo Advanced Features and Functions Highlight which highlights the edges of objects Smooth which reduces visual noise in high contrast modes...

Page 59: ...d Features and Functions 55 Edge Only which removes colors to display only the lines and edges of objects b If using true color or grayscale use the Zoom buttons to highlight one of the following No E...

Page 60: ...ly applied Note The edge effect is applied until you return to this screen and change the selection Also edge effects are removed if you press and hold the Color Mode button for 4 seconds to display t...

Page 61: ...A power cable to store them on another device such as a computer Checking Available Storage To find out how much room is available on your Amigo go to Main Menu Settings Menu System Settings Device St...

Page 62: ...Yes 6 Press the Color Mode button to confirm deletion of the file The File deleted message displays 7 Press the Color Mode button to return to the Image Gallery screen Delete All Files To delete all f...

Page 63: ...u must have a USB C to USB A cable to copy files from your Amigo onto another device If you attach a USB cable between the Amigo and your laptop for example then you could copy the files using Windows...

Page 64: ...e Zoom Out button to highlight the name of the system language you want to use The screen titles and menus immediately display in the chosen language Warning The menu language changes automatically wh...

Page 65: ...wn the left column of numbers When the correct hour is highlighted press the Color Mode button If you select 10 for example the time is set at 10 o clock 5 In the right column of numbers highlight the...

Page 66: ...efault Settings If you are dissatisfied with the way your Amigo is set up you may wish to restore its default settings However you will have to set the language date and time before using the device a...

Page 67: ...es into standby The minimum is None and the maximum is 30 minutes If you highlight 20 minutes for example the Amigo goes into Standby mode when no buttons are pressed on the device for 20 minutes 3 Pr...

Page 68: ...ettings screen use the Zoom buttons to set the volume The volume level is available in increments of 10 with the minimum 0 no sound and the maximum 100 highest volume Setting the level at 50 for examp...

Page 69: ...on com support software html onto a USB drive that can support both USB C and USB A or can work with a USB A to USB C adapter The release file which has a VHU Vispero Hardware Update extension updates...

Page 70: ...e Try flipping over the USB C drive and reinserting it into the port 6 A message about the update displays Press the Color Mode button to start the update 7 During the update status messages display U...

Page 71: ...irmware 2 Insert the USB A side of the cable into the computer where you downloaded the VHU file 3 Insert the USB C side of the cable into Amigo 4 In Windows File Explorer copy the VHU file from the c...

Page 72: ...ed Expect the system to restart during the update process 8 After a successful update a confirmation message displays Press the Color Mode button to clear the message Note The VHU file used to update...

Page 73: ...expedited assistance Technical Support Instructions Before calling or emailing Technical Support collect the following information A short description of the problem with an example such as the serie...

Page 74: ...o Main Menu Information Menu Technical Support The Export Support File option is highlighted 3 Press the Color Mode button to display the Export To screen A highlighted line under the screen title dis...

Page 75: ...you should delete the exported support file after emailing it to Technical Support 1 Go to Main Menu Information Menu Technical Support 2 Press the Zoom Out button to highlight the Delete Support Fil...

Page 76: ...it Panning mode to continue using your Amigo for any other function The same is true for Font mode You must exit it to continue using the device How can I quickly change the magnification You can repe...

Page 77: ...he directions found with the update on the website for further information I pressed several buttons in a row but the device never caught up with my requests Button presses are not queued so wait unti...

Page 78: ...Enhanced Vision 74 Amigo Advanced Features and Functions DOC 000837 Rev A AMHD8 June 2022...

Reviews: