background image

15

Settings


[Settings] icon

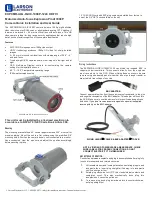
This option allows you to adjust the settings on the recorder. Click the above 

icon to bring up the screen below. 

Record


Mode

Event (Automatically starts recording by G‐sensor or Panic button.) 

Continuous (Always recording when powered by DC 12/24V.)

Resolution


VGA (640x480), 720P (1280x720), 1080p HD (1920x1080). 

Frame


Rate


Adjust the frame rate from 30fps, 15fps, 10fps, 1fps 

Password

Enter 4 numbers from 1000 to 9999 as a password

Overwrite


Recordings

This function allows the unit to overwrite old files on the SD Card 

automatically. You can overwrite the continuous, panic or G‐Sensor 

recorded files. 

Record


Audio


Turn the audio recording on or off.
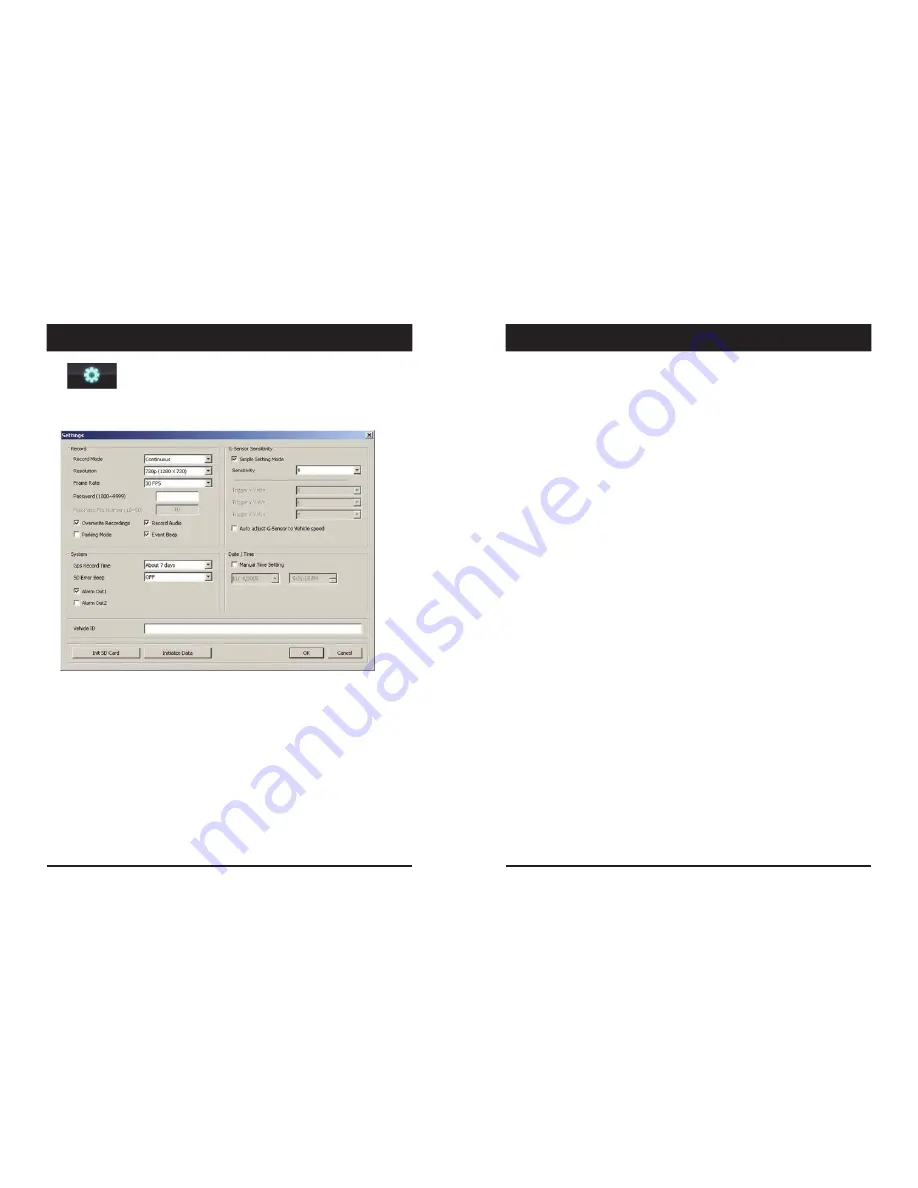
16

Settings

Parking


Mode


Set Record Mode as Continuous and then you can check the Parking Mode box. 

If G‐Sensor value does not change for 5 minutes, the record frame rate will be 

automatically change to 1FPS. When a vehicle starts to move then the parking 

mode will switch off automatically and start the continuous recording 

immediately

Event


Beep


Turn on the event beep to make the unit ‘beep’ when the G‐sensor has been 

triggered or the Panic button has been pressed.

G

Sensor


Sensitivity


The shock sensor sensitivity can be set to ‘Simple setting Mode’ or ‘Custom’. Set 

to easy allows you to set the sensitivity to 9 (High), 5 (Medium) or 1 (Low). 

In custom set, you can set 3 different shock sensor values individually. 

Auto


adjust


G

Sensor


to


Vehicle


speed

Once it checked, VT1000 will automatically decrease the G‐Sensor sensitivity at 

higher vehicle speeds to compensate for the naturally added G‐forces that are 

experienced due to velocity.

GPS


Record


Time

Select the total log file size.

About 2days (80MB)

About 7days (280MB)

SD


Error


Beep

Turn on the SD Error beep to make the unit ‘beep’ when the SD Error occurred. 

Alarm


Out1

High voltage 5V out when G‐sensor or Panic triggered. (Low to High 2 seconds)

Alarm


Out2

High voltage 5V out when SD error occurred. (Low to High 2 seconds)

Date/Time

Automatically synchronize with GPS time. However this manual time setting is 

also available to use the unit at the inside of building. 

Vehicle


ID


Set a vehicle ID for the unit. 

Init SD


Card


(Initialize


SD


Card)

All video and GPS data will be deleted and create necessary folders and copy 

necessary files into the SD card. 

Initialize


Data


Click this option to delete all recorded files on the SD card. Please backup all data 

files you wish to keep before doing this. 

15

16

SETTINGS

SETTINGS

Summary of Contents for VT1000

Page 1: ...ou for purchasing the VT1000 Vehicle Recorder Please ensure that you read and understand this USER GUIDE and use it before connecting and installing this Recorder Please store the USER GUIDE in an easily accessible location VER 1 0 0 1st Edition ...

Page 2: ...wer Software Viewing Settings 17 Open the SD card 18 Playback 19 Log File Playback 20 Save JPEG and AVI File 21 Print Image 22 Backing up Files 23 GPS Log to KML Converter 24 Driver Report 25 Analysis Criteria settings 26 Grading Criteria settings 28 Grading method 31 Graph display settings 32 SPECIFICATION 33 Appendix Recording time table 34 Appendix Upgrade 35 Technical support and Warranty 36 2...

Page 3: ... GPS reception 2 The temperature range for optimum operation of the GPS receiver in your car is 10 50 C 3 When using the product for the first time or after a long period more than three days it may take a little longer to recognize your current location It may take between five and thirty minutes to get GPS reception GPS reception may be impaired under the following circumstances 1 If there is an...

Page 4: ...0 Vehicle Recorder Wire Splice clips x5 Sticker for Windscreen mounting double sided tape x1 Power Cable 6 INTRODUCTION Camera Lens Bracket FRONT Left side Right Side SD Memory Card Slot Lock 5 6 INTRODUCTION CONTENTS ...

Page 5: ...after boot up and record the entire time the unit is powered The resolution and frame rates can be set as per your requirements You can change the configuration of the recording using the VT1000 Software To do this please see the Settings section on page 15 NOTE The unit will not start recording immediately after power on It takes around 1 minute for the built in power backup system to charge Ther...

Page 6: ... during power on There are 2 ways to remove the SD card the first requires the vehicle to be powered down and the second you can safely remove the SD with the vehicle is powered on Please see below details for both methods Safely Removal SD Card 10 Status BLUE LED RED LED BUZZER Booting on on off Upgrade heartbeat heartbeat off Continuous recording 4sec 1sec off off Triggered Event recording 0 5se...

Page 7: ...rim The VT1000 requires a continuous 12 24volt power source from the vehicle The cable supplied will allow you to hard wire the VT1000 unit to the fuse box of your vehicle Connect the red cable to a fuse It should be connected to a fuse that have power when you start the engine The ground cable should be connected to the car body or battery negative Start the car after installation 12 SOFTWARE USE...

Page 8: ... running and open the Control Panel Select Remove Program and remove the PC Viewer Software The PC Viewer Software is on the provided SD card Also available on our website 14 Initialize SD Card To initialize the SD card click on the above icon and you will be presented with the following screen to choose the card to initialize Click Ok when selected On the following screen check the Quick Format b...

Page 9: ...on has been pressed G Sensor Sensitivity The shock sensor sensitivity can be set to Simple setting Mode or Custom Set to easy allows you to set the sensitivity to 9 High 5 Medium or 1 Low In custom set you can set 3 different shock sensor values individually Auto adjust G Sensor to Vehicle speed Once it checked VT1000 will automatically decrease the G Sensor sensitivity at higher vehicle speeds to...

Page 10: ...tings This setting is for the PC Viewer Software itself To set the Recorder refer to page 15 Viewing settings 18 Open the SD card Click Select SD Card icon Select the SD card drive and click OK Click Check All and then click Load Insert the SD card into your PC Change tap to load the Panic Events or G sensor Events or Log files 17 18 Open the SD card PC VIEWER SOFTWARE VIEWING SETTINGS ...

Page 11: ...n the small check box at right side of each value Then input data for data sorting If there is recorded video data Switch or G Sensor mark will be displayed on list Log data Log data will be recorded during driving even if there are no events The total log data size can be set from 2 days to 31days The log data overwrites the oldest data Using this log data you can use the data sorting function wh...

Page 12: ... icon Save AVI icon 22 Print Image Pause the playback and click Print Image icon Print Image icon Choose to print the current image or select another image from the same file you are in by searching the time and date See a preview of the printed image and alter the printer settings to change paper size orientation etc 21 22 Print Image Save JPEG and AVI File ...

Page 13: ...ML Converter To see the whole route on Google Earth select the log file and click the Google Earth icon as shown below STEP 1 Install Google Earth on your PC http www google com earth STEP 2 Check the log file STEP 3 Click the Google Earth Icon Select the folder location of the KML file Click OK and the route will then be shown on Google Earth We recommend you use Google Earth Version 5 0 or above...

Page 14: ...ar shows the speed White means that the vehicle was within both the permitted speed and eco speed limit green means above eco speed but within permitted speed limit and red means above the legal speed limit The last bar shows the state of the engine where white means the engine is off blue means it is running properly within the pre set RPM limit and red means over acceleration i e exceeding the p...

Page 15: ...this menu go to settings click analysis criteria settings and you will be presented with the following screen 28 Grading Criteria Settings The criteria for grading driver s safety and eco score can be set in these settings The safety and eco grading criteria have 7 and 8 separate components respectively A weighted average of these component scored are used to determine an overall score Grading for...

Page 16: ...as A The assessment of this criteria is based on the eco speed limit option in the Analysis Criteria Setting This criteria is used for eco grading only 30 Grading Criteria Settings Peak Speed Relative to Speed Limit kmh mph This option sets the grading criteria for speeding and calculates the peak speed the driver drove relative to the speed limit The value can be set from 0 999km h The assessment...

Page 17: ...0 A 100 C 70 Speeding Duration Ratio 10 C 70 A 100 Peak Speed Relative to Speed Limit 10 A 100 A 100 Average Speed Relative to Speed Limit 10 A 100 A 100 Excess Eco speed Count 91 88 Excess Eco speed Duration Ratio A B Driver 1 Eco score 20 100 100 10 100 100 20 70 100 20 100 100 10 70 100 10 100 100 10 100 100 91 Eco grade A Driver 2 Eco score 20 70 100 10 100 100 20 100 100 20 70 100 10 100 100 ...

Page 18: ...Sensor Internal 3 axis G sensor RTC Internal battery Buzzer Recording start error Audio Internal Microphone LED Record Blue LED Warning Red LED Supper Capacitor Enable recording of last file and shut down PC software Supplied Power input 12V to 24V permeant wiring kit Power consumption 3 6W Size LxØ 100mm X 50mm Weight 175g include 1m cable Operation Temp 10 60 34 APPENDIX Recording time table Thi...

Page 19: ...000 unit should be returned to your local distributor Once the upgrading is finished the unit will automatically turn off and on the power NOTE To get the upgrade firmware please contact your local distributor 36 Technical Support Warranty TECHNICAL SUPPORT For Technical Support please contact your local distributor LIMITED WARRANTY This product is supplied with 1 year warranty The Warranty exclud...

Page 20: ......

Page 21: ...http www visiontrack com ...

Reviews: