


3: Configuring the ADSL gateway
Installing and Configuring the GW8600 SMG
© Virtual Access Ltd.
Issue 1.1
Page 8 of 12
3
Configuring the ADSL gateway
1.
Turn off the mains power to the SMG.
2.
On the board of the GW8000 Series SMG, connect one end of a grey Ethernet
cable to the Ethernet port marked
J6
on the board. Connect the other end
into the LAN port of your PC or to a LAN hub.
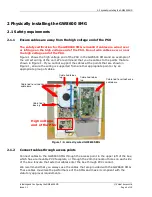
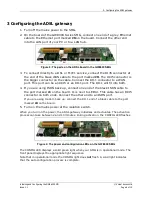
Figure 3: The ports on the ADSL board in the GW8600 SMG
3.
To connect directly to a DSL or T1/E1 service, connect the RJ45 connector at
the end of the black WAN cable to the port marked
J9
. The RJ45 connector is
the bigger connector on the cable. Connect the RJ11 connector to a WAN
port. This port can be an RJ45 or an RJ11 port. The RJ11 will fit into both.
4.
If you are using ISDN back up, connect one end of the black ISDN cable to
the port marked
J1
on the board. J1 is next to LED14. This cable has an RJ45
connector on both ends. Connect the other end to an ISDN port.
If you are using modem back up, connect the RJ11 end of a black cable to the port
marked
J8
on the board.
5.
Turn on the mains power at the isolation switch.
When you turn on the power, the ADSL gateway initialises and activates. The activation
process can take between 2 and 10 minutes. During activation, the CONFIG LED flashes.
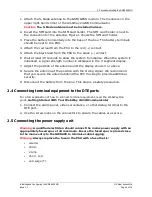
Figure 4: The power and configuration LEDs on the GW8600 SMG
The CONFIG LED displays a solid green light when your SMG is in operational mode. The
front panel displays the appropriate light sequence.
Note that in operational mode the CONFIG light does
not
flash. A solid light indicates
that the auto configuration process is complete.


