background image

Viomi V3 Max User Manual
Viomi V3 Max Benutzerhandbuch
Manuel d'utilisateur Viomi V3 Max

Руководство


Пользователя

 Viomi V3 Max 

Instrukcja Użytkownika Viomi  V3 Max
Manual de Usuario de Viomi V3 Max
Manual do Usuário de Viomi V3 Max
Manuale d'Uso di Viomi V3 Max 
Viomi V3 Max Kullanım Kılavuzu

01
22
43
64
85
106
127
149
170

Summary of Contents for V3 Max

Page 1: ...Viomi V3 Max...

Page 2: ...dbuch Manuel d utilisateur Viomi V3 Max Viomi V3 Max Instrukcja U ytkownika Viomi V3 Max Manual de Usuario de Viomi V3 Max Manual do Usu rio de Viomi V3 Max Manuale d Uso di Viomi V3 Max Viomi V3 Max...

Page 3: ...ofessional to avoid danger To prevent the product from falling accidentally do not use this product in a suspended place without a protective fence which may result in personal injury The user shall n...

Page 4: ...afety This appliance can be used by children aged from 8 years and above and persons with reduced physical sensory or mental capabilities or lack of experience and knowledge if they have been given su...

Page 5: ...the instructions may cause harmful interference to radio communications However there is no guarantee that interference will not occur in a particular installation If this equipment does cause harmfu...

Page 6: ...Holder Side Brush 2 Wet Mop 2 Disposable Mop 10 Product Overview 1 Product Accessories List Vacuum Mop Accessories Accessory Box Contents Note Illustrations of product accessories and user interface i...

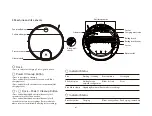
Page 7: ...ly for 3 seconds to reset Wi Fi connection Press and hold both buttons simultaneously for 10 seconds to restore factory settings For more details please refer to Installation Restoring factory setting...

Page 8: ...ait for connection Blinking fast white Being connected to Wi Fi White Wi Fi connected Reset button Water inlet Air outlet Water inlet cap 2 in 1Dust Compartment with Water Tank Button for taking out 2...

Page 9: ...y when the machine is not connected to the charging dock White light off The machine is correctly connected with the charging dock Mop Power cord take up bin Power cord Wiring terminal Power socket Wi...

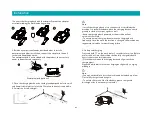
Page 10: ...k goes off charging will begin 3 Place the charging dock on a flat hard ground perpendicular to a wall and keep it clear of obstacles within 1 5 meters in front of it and within 0 5 meters on its left...

Page 11: ...o the charging dock or press and hold the key for 3 seconds to turn it ON and system reset will be complet ed Note Do not move the charging dock during sweep and make sure the charging dock is powered...

Page 12: ...the tank Do not fill the tank with hot water which may cause it to deform When filling up with water be sure to remove the tank separately and fill it only with clean water at small flow rate through...

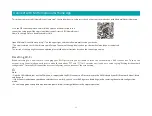
Page 13: ...ated please follow the instructions based on the current app version Resetting Wi Fi When switching to a new router or changing your Wi Fi password you will need to reset the vacuum mop s Wi Fi connec...

Page 14: ...cleaning task it will automatically return to the charging dock to recharge Once the vacuum mop is fully charged it will resume cleanup where it left off If the vacuum mop automatically shuts down du...

Page 15: ...ean a square shaped area of 2 2 meters Clean There You can schedule cleaning times in the app The vacuum mop will automatically start cleaning at the scheduled times then return to the charging dock a...

Page 16: ...with hot water or detergent E After cleaning the 2 in 1Dust Compartment with Water Tank and the filter module shall be thoroughly air dried F Reassemble the air dried 2 in 1Dust Compartment with Wate...

Page 17: ...and fix it with the buckle 3 Clean its side brush Foreign matter such as hair is easily tangled in a side brush and dirt may attach to it Please be sure to clean it regularly A Turn over the machine a...

Page 18: ...ng the mop module every time to avoid mildew or peculiar smell 5 Clean sensors and charging electrodes In order to ensure optimum operating conditions please clean sensors and charging electrode regul...

Page 19: ...lution The side brush may be entangled with foreign matters Please clean and restart it The collision sensor is stuck Please tap repeatedly to remove foreign matters If there is no foreign matter plea...

Page 20: ...nt such as metal mirrors also affect the normal operation of a laser distance sensor Please relocate it to start Please make sure the laser distance sensor is not blocked 1 Please open the battery com...

Page 21: ...rt the machine Abnormal action or sweep route of the machine Troubleshooting Fault Solution 1 Make sure the machine has been powered on 2 Set the time and schedule the time for automatic sweep with th...

Page 22: ...1 5 A Rated Output Current Rated Input Voltage 24 V 1 5 A Rated Input Current Rated Output Voltage Model V RVCLM27A V RVCLM27B 24 V Model BLJ38W240150P U 100 240 V 50 60 Hz 1 0 A Power Adapter 1 5 A O...

Reviews: