3
Installation must be done by a qualified licensed plumber.
Prior to installation please read the instructions thoroughly, confirm that all
parts are included and visually inspect the unit for any defects.
If you have any questions please contact the Vigo Technical Support
Department before proceeding with installation.
Adjustable wrench
Groove joint pliers
Plumber's putty
Pipe tape
Flat screwdriver
Your new faucet is designed for years of trouble-free performance.
Keep it looking new by cleaning it periodically with a soft cloth. Avoid abrasive
cleaners, steel wool and harsh chemicals as these will scratch, dull, and/or damage
the finish and/or product void your warranty.
Be sure to shut off water supply prior to installation.
Protect your eyes with safety glasses when cutting or soldering water
supply lines
Cover your drain to avoid losing parts.
Prior to beginning installation, turn off the cold and hot water lines and open the hot
and cold knobs on the old faucet to release build-up pressure.
When installing your new faucet, turn the connector nuts finger-tight, then use one
wrench to anchor the fitting and a second wrench to tighten the nut one additional
turn. Connections that are too tight will reduce the integrity of the system.
Wrap all threaded connections with Teflon tape available at your local hardware or
plumbing supply store. Always wrap in a clockwise direction.
All installations can vary depending on how your previous faucet was installed. Not
all necessary supplies to install your faucet are included, however, they are
available wherever plumbing supplies are sold.
2. CONNECT FLEXIBLE
HOSES TO THE BRASS PIPES.
1. SHUT OFF WATER SUPPLY.
REMOVE OLD FAUCET AND
FLEXIBLE HOSES. CLEAN
SINK SURFACE IN
PREPARATION FOR THE NEW
FAUCET. FLUSH WATER
CONNECTION AT HOME TO
MAKE SURE NO DEBRIS IS
STUCK IN THE LINE.
4. CONNECT FLEXIBLE
HOSES TO THE COLD AND
HOT WATER SUPPLY.
5. AFTER INSTALLATION IS COMPLETE TURN ON
THE WATER SUPPLY VALVES AND ALLOW BOTH
HOT AND COLD WATER TO RUN AT LEAST ONE
MINUTE EACH. WHILE WATER IS RUNNING,
CHECK FOR LEAKS, ESPECIALLY AT HOOK-UPS
TO SUPPLY LINES. TIGHTENING NUTS SLIGHTLY
WILL STOP ANY MINOR LEAKS.
3. PLACE NEW FAUCET IN
THE POSITION ON THE SINK.
FROM UNDER THE SINK, PUT
RUBBER WASHER AND
THREAD NUT ONTO THE PIN.
TIGHTEN NUT.
MAINTENANCE
REQUIRED TOOLS
IMPORTANT POINTS
SAFETY TIPS
INSTALLATION
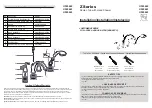
ASSEMBLY
PACKAGE CONTENTS
2
FAUCET
TWO
FLEXIBLE
HOSE
1
4
BRASS RING
RUBBER WASHER
NUT
3