background image

v

ViewSonic

                                                                                                               VT1901LED

ENGLISH

If there are too many appliances connected to the 
same AC power outlet, it could result in a fire or 
an electric shock.

Optional equipment

If optional equipment is to be installed, leave 
some space between optional equipment and 
the TV set. Picture distortion and/or noisy sound may occur if 
the TV set is positioned in close proximity to any equipment 
emitting electromagnetic radiation.

Small accessories

Keep small accessories in a safe place where children are unable 
to reach.

Magnetic influence

This TV contains a strong magnet in the speaker unit that 
generates a magnetic field. Keep any items susceptible to 
magnetic fields away from the speaker.

Sound

If you hear snapping or popping sound comes 
from the TV continuously or frequently while the 
TV is operating,  
unplug the TV and consult your dealer or service 
technician. It is normal for some TVs to make occasional 
snapping or popping sounds, particularly when being turned on 
or off.

Use in outdoor

This TV is not designed for outdoors 
installation. Do not expose the TV to rain, 
as it may result in a fire or an electric shock. 
Also, do not expose the TV to direct sunlight, 
as it may heat up and become damaged.

Vehicle, ships and other vessels

Do not install this TV in a vehicle.  
Car accidents may cause the TV to fall down and 
cause injury.
Do not install this TV in a ship or vessel.
If the TV is exposed to seawater, it may cause a 
fire or damage the TV.

Medical institutions

Do not place this TV in a place where medical equipment is in 
use. It may cause the medical equipment to malfunction.

Volume adjustment

• 

Adjust the volume to avoid disturbing your neighbors.  
Sound carries easily at night. Therefore, we suggest you close 
the windows or use headphones.

• 

When using headphones, adjust the volume to appropriate 
levels, or hearing damage may result.

ANTENNAS

Outdoor antenna grounding

If an outdoor antenna is installed, follow the precautions below.
Do not install the outdoor antenna system near of overhead 
power lines or other electric light or power circuits, or where it 
can come in contact with such power lines or circuits.
WHEN INSTALLING AN OUTDOOR ANTENNA SYSTEM, 
EXTREME CARE SHOULD BE TAKEN TO KEEP FROM 
CONTACTING SUCH POWER LINES OR CIRCUITS AS 
CONTACT WITH THEM IS ALMOST INVARIABLY FATAL.
Be sure the antenna system is grounded so that it can provide 

some protection against voltage surges and built-up static 
charges.
Section 810 of the National Electrical Code (NEC) in the U.S.A. 
and Section 54 of the Canadian Electrical Code in Canada 
provides information with in regard to proper grounding of the 
mast and supporting structure, grounding of the lead-in wire to 
an antenna discharge unit, size of grounding conductors, location 
of antenna discharge unit, connection to grounding electrodes, 
and requirements for the grounding electrode.

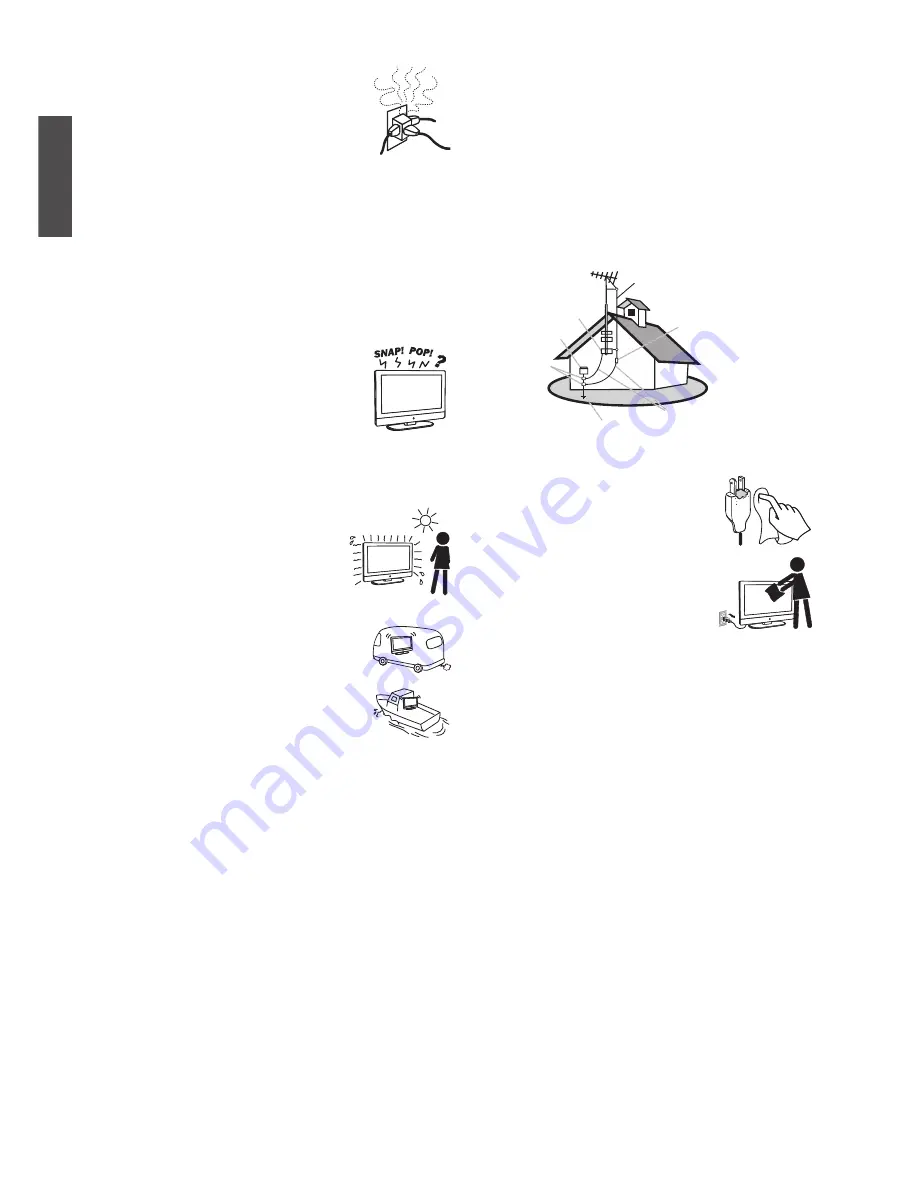
Antenna grounding according to the National 
Electrical Code, ANS/NFPA 70

Antenna

Antenna discharge

unit

Grounding conductors

Power service grounding 

electrode system 

Ground clamps

Electric service 

equipment

Ground clamp

CLEANING

Cleaning the AC power plug

Unplug the AC power plug and clean it 
regularly. If the plug is covered with dust and 
gathers moisture, its insulation may deteriorate 
and result in a fire.

Cleaning the screen surface/ cabinet of 

the TV set

When cleaning this TV, unplug the AC power 
cord. If not, it may result in electric shock. Use 
a dry soft cloth to clean the cabinet of the TV. To remove dust 
near the screen, wipe it gently with a soft cloth. Stubborn stains 
may be removed with a cloth slightly dampened with a solution 
of mild soap and warm water. Never use strong solvents such as 
thinner or benzine for cleaning. If using a chemically pretreated 
cloth, please follow the instruction provided on the package. The 
ventilation holes can accumulate dust over time.
To ensure proper ventilation, we recommend you to remove the 
dust periodically (once a month) using a vacuum cleaner, while 
the LED TV is powered off. 

Disclaimer

Some chemical cleaners have been reported to damage the 
screen and/or case of the LCD TV. ViewSonic will not be liable 
for damage resulting from use of these cleaners. 

CARRYING THE TV


Carry the TV as instructed

To prevent dropping the TV and causing serious injury, you must 
follow these guidelines:

• 

Disconnect all cables before carrying the TV.

• 

Carrying the large size TV requires at least two or three 
people.

• 

When you carry the TV, place your hands as illustrated and 
hold it securely. Do not put stress on the LCD panel and the 
frame around the screen.

• 

When carrying the TV, do not subject it to shocks, vibration, 

Summary of Contents for VS14565-1M

Page 1: ...well as registering your product for future service Warranty information contained in this User Guide will describe your limited coverage from ViewSonic Corporation which is also found on our web sit...

Page 2: ...wall 3 Wall Mount Kit Specifications VESA 4 Front View of the Product 5 Rear View of the Product 6 Connecting the LCD TV 7 Cable System or VHF UHF Antenna System 7 Cable System and VHF UHF Antenna Sys...

Page 3: ...adio TV technician for help Warning You are cautioned that changes or modifications not expressly approved by the party responsible for compliance could void your authority to operate the equipment Fo...

Page 4: ...1 Polybrominated biphenyls PBB 0 1 0 1 Polybrominated diphenyl ethers PBDE 0 1 0 1 Certain components of products as stated above are exempted under the Annex of the RoHS Directives as noted below Exa...

Page 5: ...Information in this document may change without notice No part of this document may be copied reproduced or transmitted by any means for any purpose without prior written permission from ViewSonic Cor...

Page 6: ...el Servicing is required when the apparatus has been damaged in any way such as power supply cord or plug is damaged liquid has been spilled or objects have fallen into the apparatus the apparatus has...

Page 7: ...FROM CONTACTING SUCH POWER LINES OR CIRCUITS AS CONTACT WITH THEM IS ALMOST INVARIABLY FATAL Be sure the antenna system is grounded so that it can provide some protection against voltage surges and b...

Page 8: ...points or short out parts that could result in a fire or an electric shock Do not place any objects on the TV MOISTURE Moisture and flammable objects Keep the product away from moisture Do not expose...

Page 9: ...Power management Avoid exposing the LCD screen surface to direct sunlight It is likely to damage the LCD panel Do not push or scratch the LCD screen or place objects on top of the TV The image may be...

Page 10: ...ng to display on TV For detailed information please refer to your User Manual Please contact ViewSonic Service Team if you had any problem on connection Quick Start Guide Welcome to high definition en...

Page 11: ...old the TV and one hand pull stand with arm together see Figure 2 3 Stand the TV up see Figure 3 Disconnecting the Stand 1 Lay the TV flat on a table with the LCD screen face down To prevent the TV fr...

Page 12: ...uidelines Disconnect the power and any other cables that might hinder moving the LCD TV Set the LCD TV on a table or work surface placing the screen face down on a towel or woolen blanket to protect t...

Page 13: ...imensions for wall mount kits as shown in the table above C D A B Please use the following ViewSonic TVs only with the following wall mount kit Use with other Wall Mount kit may cause instability and...

Page 14: ...TV is in standby mode 2 CH Up Down Channel up down when source is TV or select a control while in OSD menu 3 MENU Turn OSD menu ON OFF 4 Power ON OFF button Turn the power on from standby mode or turn...

Page 15: ...of your computer and the other end to the RGB input on the rear of the LCD TV 5 Composite Video input Connect this jack to the composite video output connectors on your A V equip ment 6 AV Audio input...

Page 16: ...n the cable and antenna programming as shown below Remember to set the TV CATV setting in the TV menu to Air or Cable for the type you choose HD Cable Box HD Satellite Box You can also enjoy high defi...

Page 17: ...454 11054 or 10690 It usually works with DIRECTV SD DVD Player AV or S Video Connection COMPONENT VIDEO OUT LINE OUT HDMI OUT DVI HDTV OUT AUDIO VIDEO IN OUT HD cable box HD satellite box Rear of TV A...

Page 18: ...M 720 x 400 70Hz 1366x768 Yes VESA 640 x 480 60Hz 1366x768 Yes VESA 640 x 400 70Hz 1366x768 Yes VESA 800 x 600 56Hz 1366x768 Yes VESA 800 x 600 60Hz 1366x768 Yes VESA 1024 x 768 60Hz 1366x768 Yes VESA...

Page 19: ...e a risk of fire or lead to personal injury Dispose of the battery in accordance with local laws and regulations Keep the batteries away from children or pets When the remote control will not to be us...

Page 20: ...adjust the volume 12 GUIDE Press to display the Electronic Program Guide EPG It contains the program information for the channel you re watching The picture here shows an example of the GUIDE screen i...

Page 21: ...iming 20 FAV Press this button to show Favorite List and select your favorite channels that have already been stored To preset favorite channels use the Favorite item in the Channel menu 21 SOUND Pres...

Page 22: ...lect Home or Retail See Figure1 3 Press or to select OSD language then press ENTER to confirm the selection and press to go to next step To return to the previous page press MENU See Figure2 4 Select...

Page 23: ...t the sub channel in DTV Ex Your desired number is 80 3 Press 8 press 0 press press 3 Return to the previous channel press RETURN button Adjusting the Volume Press VOL to adjust volume To turn off the...

Page 24: ...ms by Cable 3 Press or to select Auto Scan then press to enter 4 The Auto Scan screen will be shown and after it is done the screen will return to the first found channel Selecting the Input Source To...

Page 25: ...channel 5 Press MENU to exit To view your favorite channels press FAV button to show Favorite List and select your favorite channels that have already been stored Adding Erasing Channel When the chan...

Page 26: ...en press button to enter Channel Label setting 5 Use or to choose letters or signs or to move forward or backward 6 After you input the channel name press MENU or ENTER to complete the setting 7 Press...

Page 27: ...ure audience NC 17 no one under 17 years of age X adult audience only N A not applicable 3 Press to set or reset each area 4 Press MENU to exit 2 TV 1 Press or to select TV then press to enter TV rati...

Page 28: ...et each area 5 Press MENU to exit 2 Canadian French 1 Press or to select French rating 2 Press to enter 3 Press or to select your desired Canadian French rating level The Canadian French rating levels...

Page 29: ...ct Restore Default then press to restore the factory default setting 5 Select Yes and press ENTER to confirm the setting Blue Background No Signal Power Off Using PC Function 1 When in PC source press...

Page 30: ...ss ENTER to auto play or stop the pictures In Option menu can setup following functions 1 Press the MENU button to display the OSD main menu 2 Press or to select Option menu then press ENTER or to ent...

Page 31: ...rmal Wide Cinema Zoom PC Settings To fine tune the image Only enabled in PC source Auto Adjust To auto adjust picture s horizontal position vertical position clock phase fine tune and H Size Horizonta...

Page 32: ...x or optical terminal PCM Raw Off Equalizer Settings Adjust the curve of 7 bands equalizer Channel menu Only available in TV source Function Description Channel List You can view all the channels and...

Page 33: ...ay of week Daylight Saving Time Setup menu Lock menu Function Description Lock Parental Control The following items are only available if the password input is correct Note The default user password i...

Page 34: ...lculate current day of week according to the time Daylight Saving Time Set summer time yes or not Time menu Except USB source Pacific Setup Time 2009 10 21 20 00 00 Sat Daylight Saving Time Others Fun...

Page 35: ...e The TV station may be experiencing problems Try another channel The Cable TV signal may be scrambled or encoded Please contact your local cable operator Make sure that connection to other components...

Page 36: ...nces such as lightning or static electricity may cause improper operation In this case operate the unit after first turning on the power of the LCD TV and the AVC System or unplug the AC cord for 1 to...

Page 37: ...ESA 1280 720 60Hz VESA 1280 960 60Hz VESA 1280 768 60Hz VESA Speaker Output 2 5W x 2 THD 10 Audio Output 1 Headphone jack 1 SPDIF optical Power Voltage 100V 60Hz 264V 50Hz auto switch Display area Ful...

Page 38: ...us viewsonic com Canada www viewsonic com T Toll Free 1 866 463 4775 T Toll 1 424 233 2533 F 1 909 468 3757 service ca viewsonic com Latin America Argentina www viewsonic com la T 0800 4441185 soporte...

Page 39: ...r information about receiving service under warranty contact ViewSonic Customer Support please refer to Customer Support page You will need to provide your product s serial number 2 To obtain warrante...

Page 40: ...nder warranty contact ViewSonic Customer Support Please refer to the attached Customer Support page You will need to provide your product s serial number so please record the product information in th...

Page 41: ...54 E Mail Cefeo soluglobales com Cuernavaca Compusupport de Cuernavaca SA de CV Francisco Leyva 178 Col Miguel Hidalgo C P 62040 Cuernavaca Morelos Tel 01 777 3180579 01 777 3124014 E Mail aquevedo co...

Page 42: ...ViewSonicTM...

Reviews: