background image

ViewSonic

VA702mb

9

Main Menu Controls

The descriptions for function control LEDS.
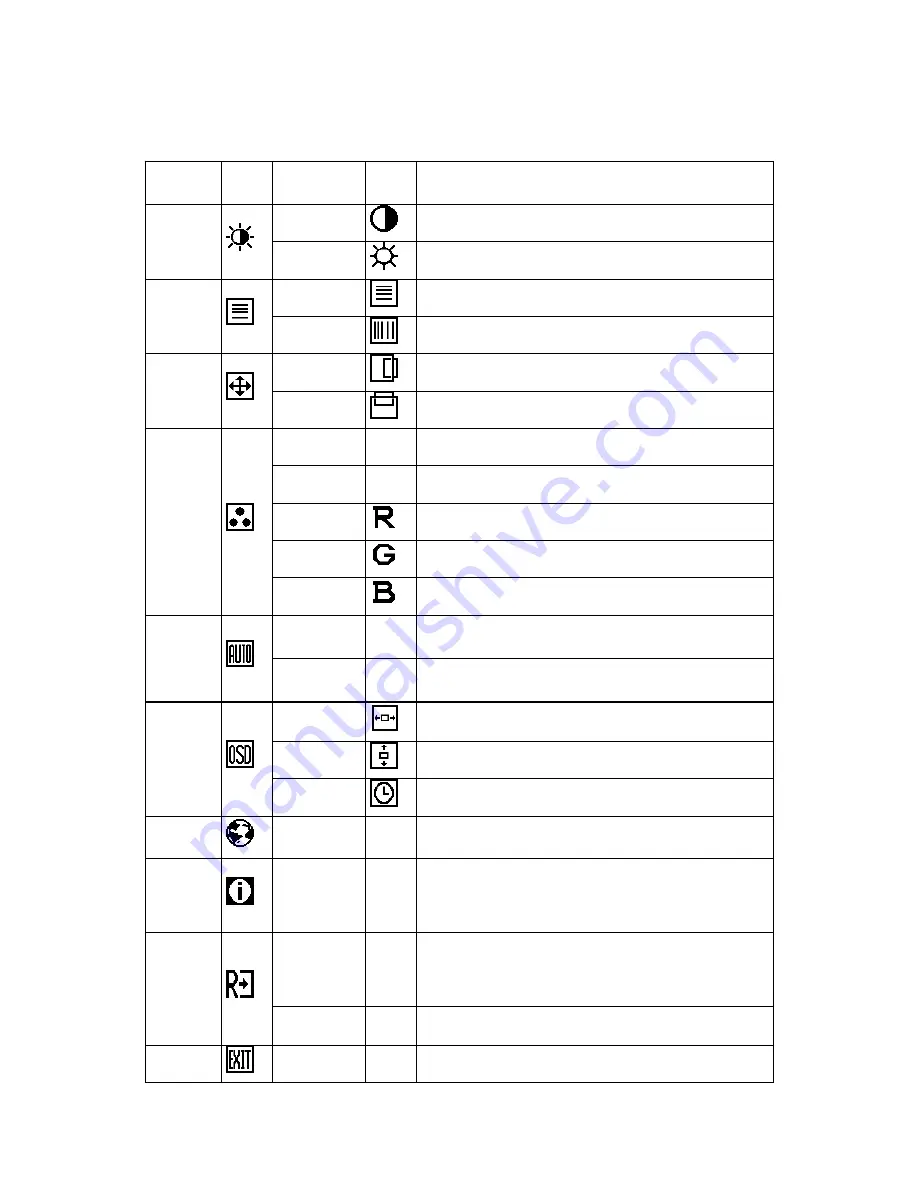
Main Menu 

Item 

Main 

Menu 

Icon 

Sub Menu 

Item 

Sub 

Menu 

Icon

Description 

Contrast 


Contrast from Digital-register. 

Luminance 


Brightness 

 Backlight 

Adjustment 

Focus 


Adjust Picture Phase to reduce Horizontal-Line noise 

Image Setup 


Clock 


Adjust picture Clock to reduce Vertical-Line noise. 

H. Position 


Adjust the horizontal position of the picture. 

Image 

Position 


V. Position 


Adjust the verticalposition of the picture. 

Warm 

N/A 

Recall Warm Color Temperature from EEPROM. 

Cool 

N/A 

Recall Cool Color Temperature from EEPROM. 

User / Red 


Red Gain from Digital-register. 

User / Green 


Green Gain Digital-register. 

Color Temp. 


User / Blue 


Blue Gain from Digital-register. 

Yes 

N/A 

Auto Adjust the H/V Position, Focus and Clock of picture. 

Auto Config 


No 

N/A 

Do not execute Auto Config, return to main menu. 

H. Position 


Adjust the horizontal position of the OSD. 

V. Position 


Adjust the verticalposition of the OSD. 

OSD Setup 


OSD Timeout 


Adjust the OSD timeout. 

Language 


Language 

N/A 

Set OSD language   

Information 

 Information  N/A 

Show the resolution, H/V frequency and input port of current 

iput timing. 

Reset Yes 

N/A 

Clear each old status of Auto-configuration and set the color 

temperature to Warm. 


No 

N/A 

Do not execute reset, return to main menu. 

Exit 

 N/A 

N/A  Exit 

OSD 

Summary of Contents for VA702mb

Page 1: ...ViewSonic VA702mb LCD Display Model No VS11478...

Page 2: ...ing Started Package Contents 4 Precautions 4 Quick Installation 5 Using the LCD Display Setting the Timing Mode 6 Adjusting the Screen Image 6 Front Panel Control 7 How To Adjust a Setting 8 Main Menu...

Page 3: ...ined by turning the equipment off and on the user is encouraged to try to correct the interference by one or more of the following measures Reorient or relocate the receiving antenna Increase the sepa...

Page 4: ...des and a third grounding prong The wide blade and the third prong are provided for your safety If the plug does not fit into your outlet consult an electrician for replacement of the outlet 10 Protec...

Page 5: ...ation reserves the right to change product specifications without notice Information in this document may change without notice No part of this document may be copied reproduced or transmitted by any...

Page 6: ...h the INF and ICM files Precautions Sit at least 18 from the LCD display Avoid touching the screen Skin oils are difficult to remove Never remove the rear cover This LCD display contains high voltage...

Page 7: ...omputer does not have a CD ROM drive see Customer Support on page 13 Wait for the CD ROM to auto start NOTE If the CD ROM does not auto start double click on the CD ROM icon in the Windows Explorer th...

Page 8: ...1 Set the resolution Right click on the Windows desktop Properties Settings set the resolution 2 Set the refresh rate See your graphic card s user guide for instructions WARNING Do not set the graphi...

Page 9: ...OSD press and hold the MENU button while the monitor is off and then press power button to turn the monitor on NOTES Do not install the monitor in a location near heat sources such as radiators or ai...

Page 10: ...ess the MENU button to activate it If the function selected has a sub menu press or again to navigate through the sub menu functions Once the desired function is highlighted press MENU button to activ...

Page 11: ...ll Cool Color Temperature from EEPROM User Red Red Gain from Digital register User Green Green Gain Digital register Color Temp User Blue Blue Gain from Digital register Yes N A Auto Adjust the H V Po...

Page 12: ...35MHz Max Resolution 1280 x 1024 Plug Play VESA DDC2BTM ON Mode 37W EPA ENERGY STAR OFF Mode 1W Audio output Rated Power 1 0W rms Per channel Input Connector D Sub 15pin Input Video Signal Analog 0 7V...

Page 13: ...computer If the other end of the video cable is not attached permanently to the LCD display tightly secure it to the LCD display Adjust brightness and contrast If you are using an Macintosh older tha...

Page 14: ...North Africa www viewsoniceurope com Contact your reseller Australia and New Zealand www viewsonic com au support AUS 1800 880 818 NZ 0800 008 822 service au viewsonic com Singapore Malaysia Thailand...

Page 15: ...n soft lint free cloth and wipe the screen To clean the case 1 Use a soft dry cloth 2 If the case still not clean apply a small amount of a non ammonia non alcohol based mild non abrasive detergent on...

Page 16: ...ut receiving service under warranty contact ViewSonic Customer Support You will need to provide your product s serial number 2 To obtain service under warranty you will be required to provide a the or...

Page 17: ......

Reviews: