HMXCC1-G2 User’s Manual
Chapter 7 Failover for Database Replication
105
Check the <
Failover Enabled
> box and click the <
Submit
> button to reboot the HMXCC1 slave unit.
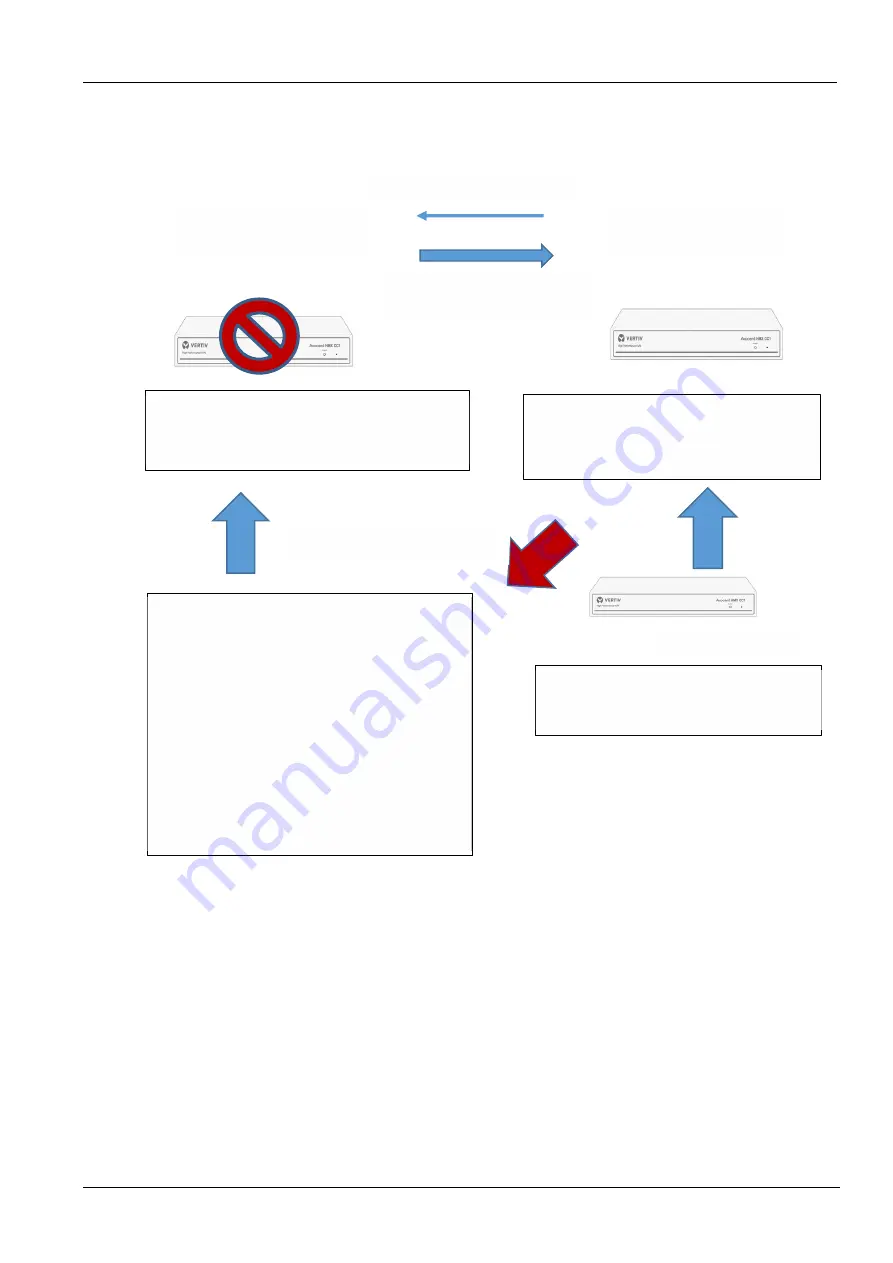
a. The master unit and slave unit operate in parallel, and the master unit fails
Figure 7-22
Add a new Slave unit
Slave retrieves the latest setting
data and log.
HMXCC1 Master Unit
User IP: 192.168.1.
201
Device IP: 169.254.3.
2
HMXCC1 Slave Unit
User IP: 192.168.1.
202
Device IP: 169.254.3.
3
1. Slave unit regularly polls and monitors the master
unit. As the master unit fails, the slave unit sends
out an email to notify the administrator.
2. Slave unit retrieves the setting data and log from
the master unit per every minute.
1.The slave unit will test to confirm the master unit failure
is not resulted from its misjudgment.
2.As the slave unit confirms the master unit failure, it will
replace the master unit and force the failed master unit
to shut down the power.Once the power shutdown is
unsuccessful, the slave unit will send out an email to
notify the administrator to manually shut down the failed
master unit.
3. After the old slave unit became the new master unit,
the system became a single controller system. This
operating new master unit will apply its latest successful
database backup from the failed master unit at the same
IP address (192.168.1.
201
), operating the system.
4.The auto failover procedure won’t interrupt the system
operation.
5.As the new slave unit is added by the administrator to
operate with the master unit, the system will resume as a
fault-tolerant redundant system again.
Slave polls the master regularly.
1. User Registration, authority, and network security
management.
2. Monitor if the slave unit polls regularly. As the slave
no longer polls the master unit, the master sends out an
email to notify the administrator.
Master Failure Confirmed
After the old slave unit replaced the failed master
unit and became the new master unit, add a new
HMXCC1 controller and set up it as the new slave
unit.
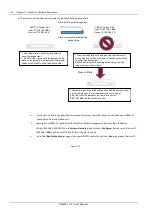
As the master unit fails, the old slave unit replaced the failed master unit. The administrator manually removes
the failed master unit and add a new HMXCC1 controller to be a new slave unit.
Login the new HMXCC1 controller with the factory default management interface login IP address
(https://192.168.1.200:5008). Go to
System
>
Networks
, and click the <
Configure
> button to set the User
IP(192.168.1.
202
) and Device IP(169.254.3.
3
) as the old slave unit.
Go to the <
Replication Mode>
page of the new HMXCC1 controller.Set it as <
Slave
> and input the User IP
address of the master unit (192.168.1.201). At last, click the <
Submit
> button to reboot the new HMXCC1
Summary of Contents for Avocent HMXCC1-G2
Page 1: ...Avocent HMXCC1 G2 User s Manual EN V2 0 April 2022...
Page 2: ......
Page 6: ...8 5 120 8 6 121...
Page 11: ...HMXCC1 G2 5 4 1 4 1 1 4 1 4 1 2 4 2 4 2 4 2 1 4 3...
Page 28: ...HMXCC1 G2 22 HMXCC1 IP KVM 5 3 5 4 5 5...
Page 30: ...HMXCC1 G2 24 HMXCC1 IP KVM 5 6 5 2 1 Detected Devices 5 7 HMXCC1 Device Network HMXCC1...
Page 31: ...HMXCC1 G2 HMXCC1 IP KVM 25 5 8 5 9...
Page 32: ...HMXCC1 G2 26 HMXCC1 IP KVM 5 10 5 2 2 User Connections 5 11 5 5 I O V A U R I...
Page 33: ...HMXCC1 G2 HMXCC1 IP KVM 27 5 12 5 13 5 2 3 Group Connections 5 14...
Page 34: ...HMXCC1 G2 28 HMXCC1 IP KVM 5 15 5 2 4 TX Preview...
Page 35: ...HMXCC1 G2 HMXCC1 IP KVM 29 5 16 IP KVM 5 17 5 3 Devices...
Page 36: ...HMXCC1 G2 30 HMXCC1 IP KVM 5 18 5 3 1 Receivers 5 19 HMXCC1 MAC 5 20...
Page 37: ...HMXCC1 G2 HMXCC1 IP KVM 31 5 21 5 22...
Page 38: ...HMXCC1 G2 32 HMXCC1 IP KVM 5 3 2 Transmitters 5 23 HMXCC1 MAC 5 24...
Page 39: ...HMXCC1 G2 HMXCC1 IP KVM 33 5 25 1 1 2 2 TX 1 1 2...
Page 40: ...HMXCC1 G2 34 HMXCC1 IP KVM 5 26 3 TX 1 5 27...
Page 43: ...HMXCC1 G2 HMXCC1 IP KVM 37 e SG TX1 5 32 f SG TX1 TX 1 TX 2 TX 3 TX 1 TX 2 TX 3 SG TX1 5 33...
Page 45: ...HMXCC1 G2 HMXCC1 IP KVM 39 5 35 c HG RX1 RX A RX B RX C RX A RX B RX C RX A...
Page 46: ...HMXCC1 G2 40 HMXCC1 IP KVM 5 36 d HG RX2 RX D RX E RX RX RX e HG TX1...
Page 47: ...HMXCC1 G2 HMXCC1 IP KVM 41 5 37 f HG TX1 TX 1 TX 2 TX 3 TX 1 TX 2 TX 3 TX 1...
Page 53: ...HMXCC1 G2 HMXCC1 IP KVM 47 5 46 c MR DEMO RX A RX 0 0 RX B 1 0 RX C 2 0 RX D 0 1 RX E 1 1 5 47...
Page 54: ...HMXCC1 G2 48 HMXCC1 IP KVM 5 48 d RX A 5 49...
Page 58: ...HMXCC1 G2 52 HMXCC1 IP KVM 5 55 c VW DEMO 2 2 5 56...
Page 61: ...HMXCC1 G2 HMXCC1 IP KVM 55 5 61 5 62 5 63 5 3 5 Monitors 5 64...
Page 62: ...HMXCC1 G2 56 HMXCC1 IP KVM HMXCC1 EDID HMXCC1 EDID ID HMXCC1 EDID EDID EDID 5 65 5 66...
Page 63: ...HMXCC1 G2 HMXCC1 IP KVM 57 5 67 EDID Scroll Lock Scroll Lock M EDID 5 68...
Page 64: ...HMXCC1 G2 58 HMXCC1 IP KVM 5 3 6 Firmware 5 69 HMXCC1 TX RX bin HMXCC1 5 3 7 Upgrade 5 70...
Page 65: ...HMXCC1 G2 HMXCC1 IP KVM 59 5 71 TX RX TX RX 15 Flash 5 72 5 73...
Page 66: ...HMXCC1 G2 60 HMXCC1 IP KVM 5 74 5 75 5 76...
Page 67: ...HMXCC1 G2 HMXCC1 IP KVM 61 5 77 5 78 IP KVM 5 79...
Page 68: ...HMXCC1 G2 62 HMXCC1 IP KVM 5 80 5 4 Users 5 81 5 4 1 List 5 82...
Page 69: ...HMXCC1 G2 HMXCC1 IP KVM 63 5 83 5 84 OSD 5 85...
Page 70: ...HMXCC1 G2 64 HMXCC1 IP KVM 5 86 5 87 5 88...
Page 71: ...HMXCC1 G2 HMXCC1 IP KVM 65 5 4 2 Groups 5 89 TX RX TX RX 5 90 5 91...
Page 72: ...HMXCC1 G2 66 HMXCC1 IP KVM 5 92 5 93 5 94 TX RX...
Page 74: ...HMXCC1 G2 68 HMXCC1 IP KVM 5 98 LDAP 5 99 LDAP IP KVM 5 100...
Page 75: ...HMXCC1 G2 HMXCC1 IP KVM 69 5 5 System 5 101 5 5 1 Miscellaneous 5 102 HMXCC1 HMXCC1 HMXCC1...
Page 76: ...HMXCC1 G2 70 HMXCC1 IP KVM 5 5 2 Log 5 103 5 104 5 105...
Page 77: ...HMXCC1 G2 HMXCC1 IP KVM 71 5 106 5 5 3 Date Time 5 107 HMXCC1 NTP 5 108...
Page 79: ...HMXCC1 G2 HMXCC1 IP KVM 73 5 111 IP IP 5 112...
Page 81: ...HMXCC1 G2 HMXCC1 IP KVM 75 5 115 HMXCC1 HMXCC1 HMXCC1 IP 5 116 IP IP...
Page 82: ...HMXCC1 G2 76 HMXCC1 IP KVM 5 117 IP hmxcc log txt gz 5 118 HMXCC1...
Page 83: ...HMXCC1 G2 HMXCC1 IP KVM 77 5 119 5 120...
Page 86: ...HMXCC1 G2 80 HMXCC1 IP KVM 5 125 5 126 IP IP 192 168 1 201 IP 169 254 3 2...
Page 88: ...HMXCC1 G2 82 HMXCC1 IP KVM IP 5 129 IP https 192 168 1 202 5008 HMXCC1...
Page 90: ...HMXCC1 G2 84 HMXCC1 IP KVM 5 131...
Page 91: ...HMXCC1 G2 85 6 1 1 6 1 6 2 2...
Page 92: ...HMXCC1 G2 86 6 3 hmxcc backup master xxxxxx sql gz hmxcc log master xxxxxx txt gz 3 6 4...
Page 93: ...HMXCC1 G2 87 a hmxcc backup xxxxxx sql gz b c 4 a hmxcc log xxxxxx txt gz 6 5 b...
Page 94: ...HMXCC1 G2 88 6 6 5 a 6 7 b...
Page 97: ...HMXCC1 G2 91 6 12 TX1 TX2 TX3 TX4 6 13 RX1 RX2 RX3 RX4 6 14...
Page 100: ...HMXCC1 G2 94 6 20 TxGroupA TxGroupB User1 User2 User3 User4 4 User1 User2 User3 User4 6 21...
Page 102: ...HMXCC1 G2 96 6 24 GroupA User1 User2 6 25 GroupA RxGroupA 6 26 GroupA TxGroupA...
Page 111: ...HMXCC1 G2 105 7 3 c 7 4 d IP 192 168 1 201 IP 169 254 3 2...
Page 112: ...HMXCC1 G2 106 7 5 e...
Page 113: ...HMXCC1 G2 107 7 6 f IP https 192 168 1 201 5008 7 7 IP a IP https 192 168 1 200 5008...
Page 114: ...HMXCC1 G2 108 7 8 b 7 9 c IP 192 168 1 202 IP 169 254 3 3...
Page 115: ...HMXCC1 G2 109 7 10 d IP 192 168 1 201...
Page 116: ...HMXCC1 G2 110 7 11 e IP https 192 168 1 202 5008 7 12...
Page 117: ...HMXCC1 G2 111 7 1 2 1 HMXCC1 8 LED LED 7 13 LED 7 1 LED 2 LED LED...
Page 118: ...HMXCC1 G2 112 7 14 7 2 HMXCC1 HMXCC1 HMXCC1 HMXCC1 HMXCC1 HMXCC1 HMXCC1...
Page 119: ...HMXCC1 G2 113 7 15 7 2 1 HMXCC1 1 7 16 2 IP...
Page 120: ...HMXCC1 G2 114 7 17 7 18 1 HMXCC1 PC 2 3 PC hmxcc backup xxxxxx sql gz a...
Page 122: ...HMXCC1 G2 116 7 2 2 HMXCC1 7 21...
Page 123: ...HMXCC1 G2 117 7 22 1 2 IP 192 168 1 202 IP 169 254 3 3 3 IP 192 168 1 201 4 HMXCC1...
Page 128: ...HMXCC1 G2 User s Manual...
Page 238: ...HMXCC1 G2 User s Manual This page is intentionally left blank...
Page 240: ...HMXCC1 G2 User s Manual...


